¶ Loquace Web App
Loquace Web App is the Loquace User dashboard
The main features are:
- Contacts management
- Devices management
- WebRTC Sip Voip audio/video softphone
- Click to call
- Call flow management
- Call history
- Voice mail management
- Fax server management
- Presence management
- Xmpp Chat and Group Chat features
- Videoconference management
Loquace Web App is fully compliant with Explorer, Firefox and Microsoft Edge browser
¶ User login
Open the web browser
Type into the URL bar the PBX name or IP address (example: https://mycompany.loquacecloud.net)
Enter your credentials:
- username
- password
Click the Login button to log in
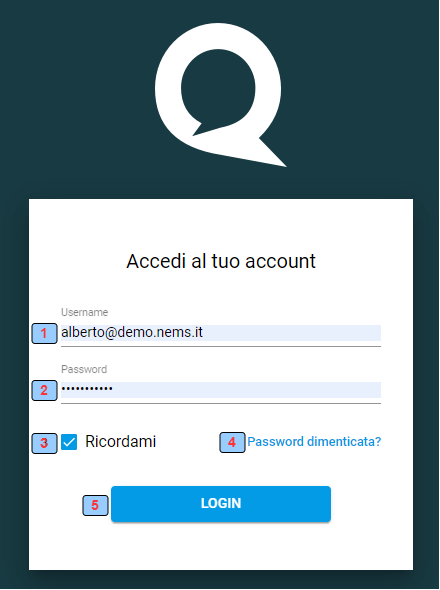
1 - Login username
2 - Password Username
3 - Remember login credential
4 - Recovery password procedure
5 - Login button
¶ Main window
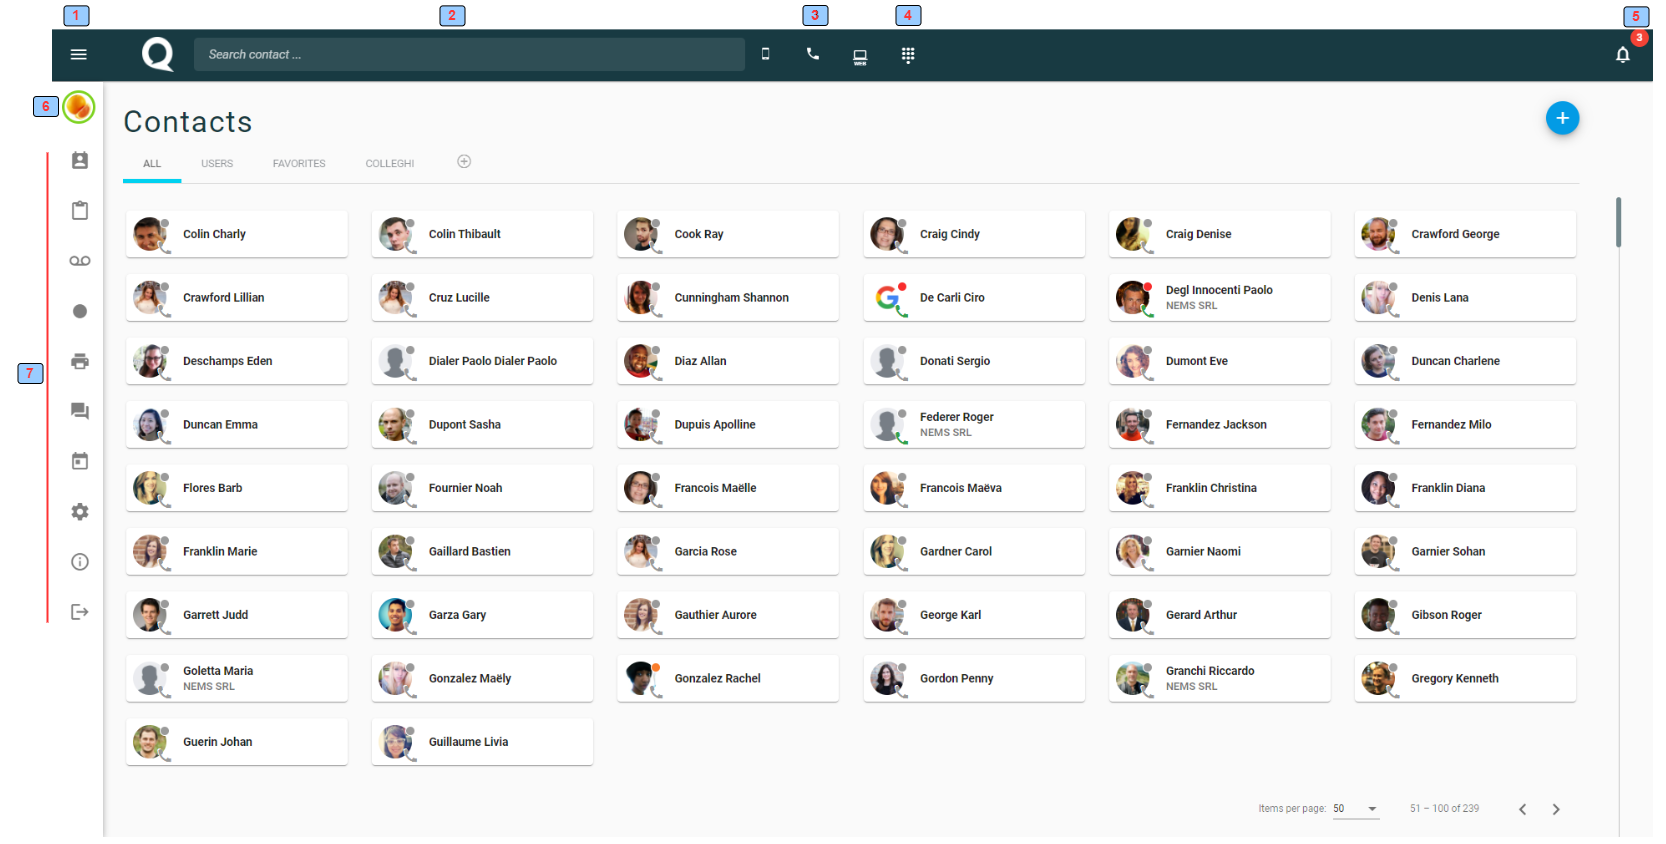
1 - Menu bar resize
2 - Search contact
3 - Incoming and Web call multi-device management
4 - Dial pad
5 - Notification
6 - User avatar and presence state
7 - Menu bar
¶ Incoming and Web Call Multi-Device Management
Loquace implements multi-device features.
Each extension (internal number) can be associated with more than one device.
In particular, an extension can be associated to:
- Mobile device, i.e. Android or IOS Loquace mobile app
- Browser device, i.e. WebRTC video/audio phone embedded into Loquace Web app
- Phone device, i.e. IP phone or a standard softphone
Loquace users can select which device or devices are enabled to receive calls or to manage “click and dial” Web calls
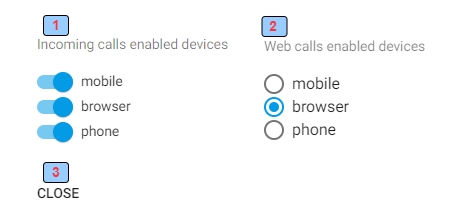
1 - Select which device or devices are enabled to receive calls
2 - Select which device is enabled to manage the “click and dial” Web call
3 - Store the information and close the window

1 -2-3 - Display the Loquace mobile status: HIGHLIGHTED (the app or apps are enabled to receive incoming calls) WEB (the app is enabled for “click and dial” Web calls)
¶ Menu bar
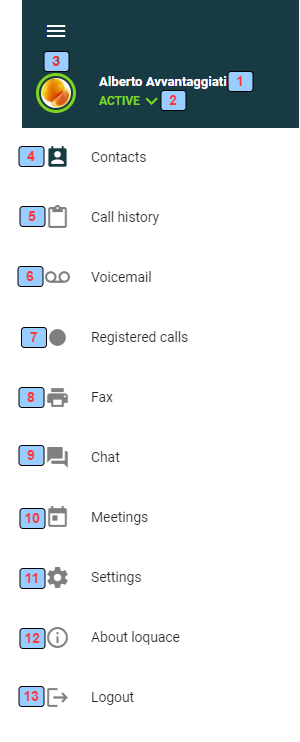
1 - User first name and last name
2 - Presence state
3 - Avatar and presence state
4 - Contacts
5 - Call history
6 - Voicemail
7 - Registered calls
8 - Faxserver
9 - Chat
10 - Meeting
11 - Settings bar
12 - About loquace
13 - Logout button
¶ User presence setting
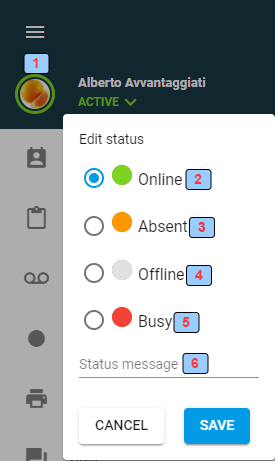
1 - User avatar and user presence status(coloured circle)
2 - Online (Active) status toggle setting - Green. Other users can see if the user is connected by the Web (green colour, or is not connected (grey colour)
3 - Absent status toggle setting - Orange. Permanent status, other users see this status whether the user is connected by Web App or not
4 - Offline (Hidden) status toggle setting - Grey. Permanent status, other users see this status whether the user is connected by Web App or not
5 - Busy status toggle setting - Red. Permanent status, other users see this status whether the user is connected by Web App or not
6 - Staus message to dispaly
¶ Click to Call
Users can start a call at every moment by the Contact Card sections or by utilising the Dial pad
1 - Click to call the user extension
2 - Click to open a chat session with this user
3 - Click to call the user's mobile phone number
4 - Click to call the user's home phone number
¶ Call Flow Management
Regardless calls are made by Mobile, Browser or Phone device, the user can utilize the Call Flow management panel to manage current and queued calls.
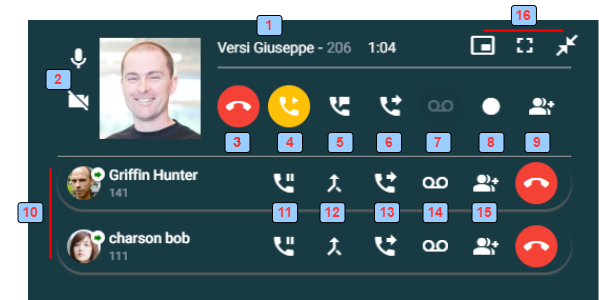
1 - Caller/Called Photo, Name, Number and call duration
2 - Mute/Unmute and Start/Stop video (to be used if the call is performed by WebRTC device)
3 - Hungup
4 - Hold/Unhold
5 - Attendant Transfer
6 -Blind transfer
7 - Divert to voicemail
8 - Start/Stop call record
9 - Conference Call
10 - Calls in the queue
11 - Swap command: the queued call and the current call are swapped
12 - Attendant Transfer command (applied to the queued call)
13 - Blind transfer command (applied to the queued call)
14 - Divert to voicemail command (applied to the queued call)
15 - Hungup
16 - Windows Magamemet command
¶ Dial pad
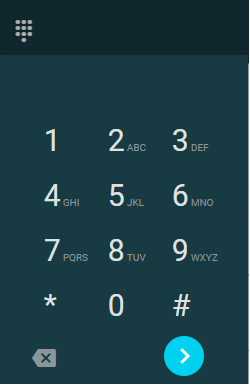
Use Dial Pad to compose a phone number to start a web call or to send DTMF during a Wetbrtc call
¶ Notification
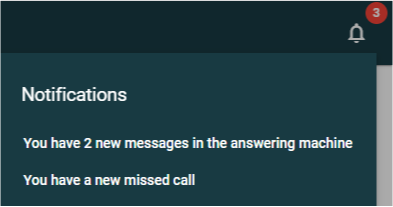
Notification alerts users about new voicemail messages and missed calls
¶ User Presence and Phone Presence

1 - User presence
2 - Phone presence
¶ User Presence
Display user contact presence:
- Green. That user set his user presence as “Online” and he is connected by the Web App
- Grey. That user set his user presence as “Online” and he is not connected by the Web App or set his presence as “Offline”
- Orange. That user set his user presence as “Absent”
- Red. That user set his user presence as “Busy”
¶ Phone Presence
Display phone contact status:
- Green. That user has at least one phone terminal enabled to receive calls and if the terminal enabled is IpPhone and/or WebRTC these have Sip active registration
- Grey. That user has no phone terminal enabled to receive calls or the terminal enabled to receive calls is IpPhone and/or WebRTC and these have no Sip active registration
- Orange. The phone terminal of that user is “ringing”
- Red. The phone terminal of that user is “in calling”
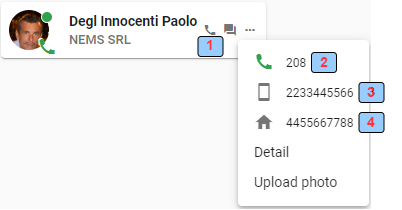
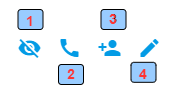
¶ Contact Card
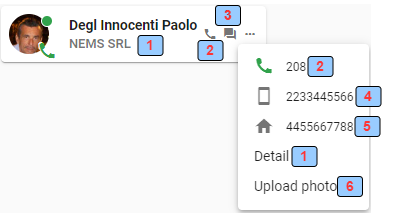
1 - Click to open user contact details
2 - Click and dial the user extension
3- Click to open a chat session with this user
4 - Click and dial the user's mobile phone number
5 - Click and dial the user's home phone number
6 - Click to upload a user avatar image
¶ Contacts
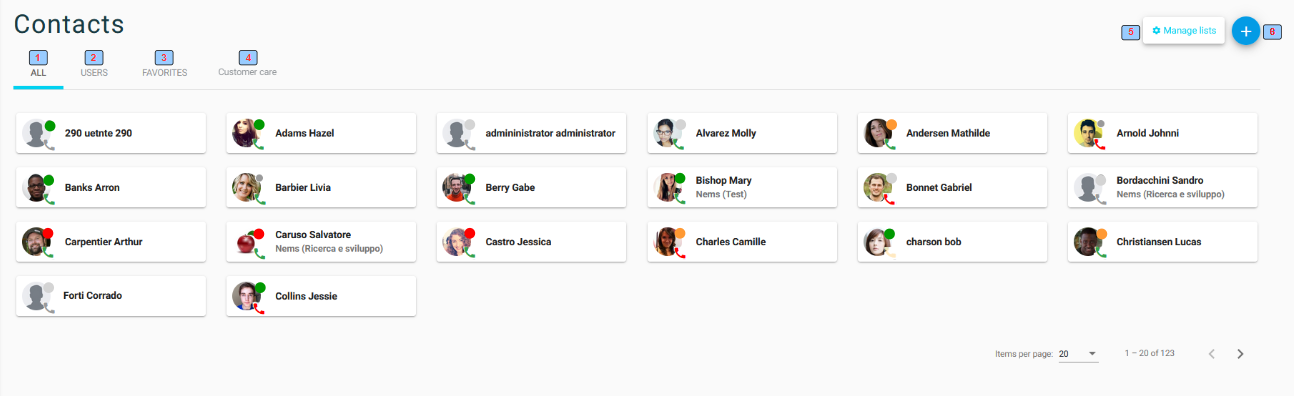
1 - “ALL” tab: it displays all contacts (public address book, private address block and Loquace user address book)
2 -“USER” tab: it displays only the Loquace user address book
3 - “FAVORITES” tab: put into this contacts list favourite contacts
4 - Custom contacts list created by the user
5 - Manage contact list
6 - Add a new contact
¶ Add a new Contact
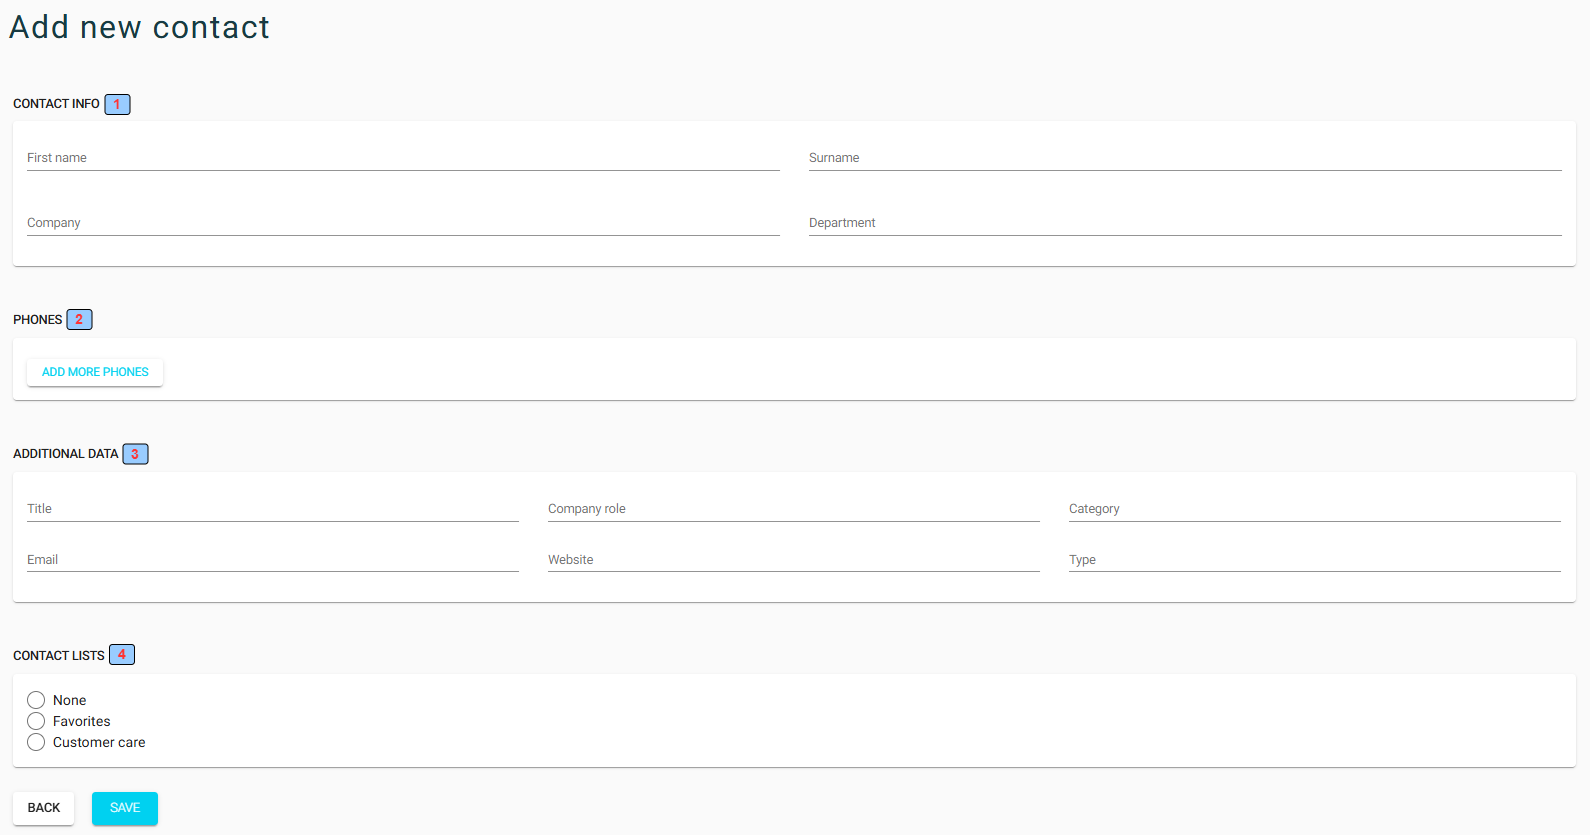
1 - Open the window to add a new contact
2 - Insert contact main information
3 - Insert contact phone number
4 - Insert additional data
¶ Contact List
Contacts can be grouped into lists for easier searches.

¶ Manage list
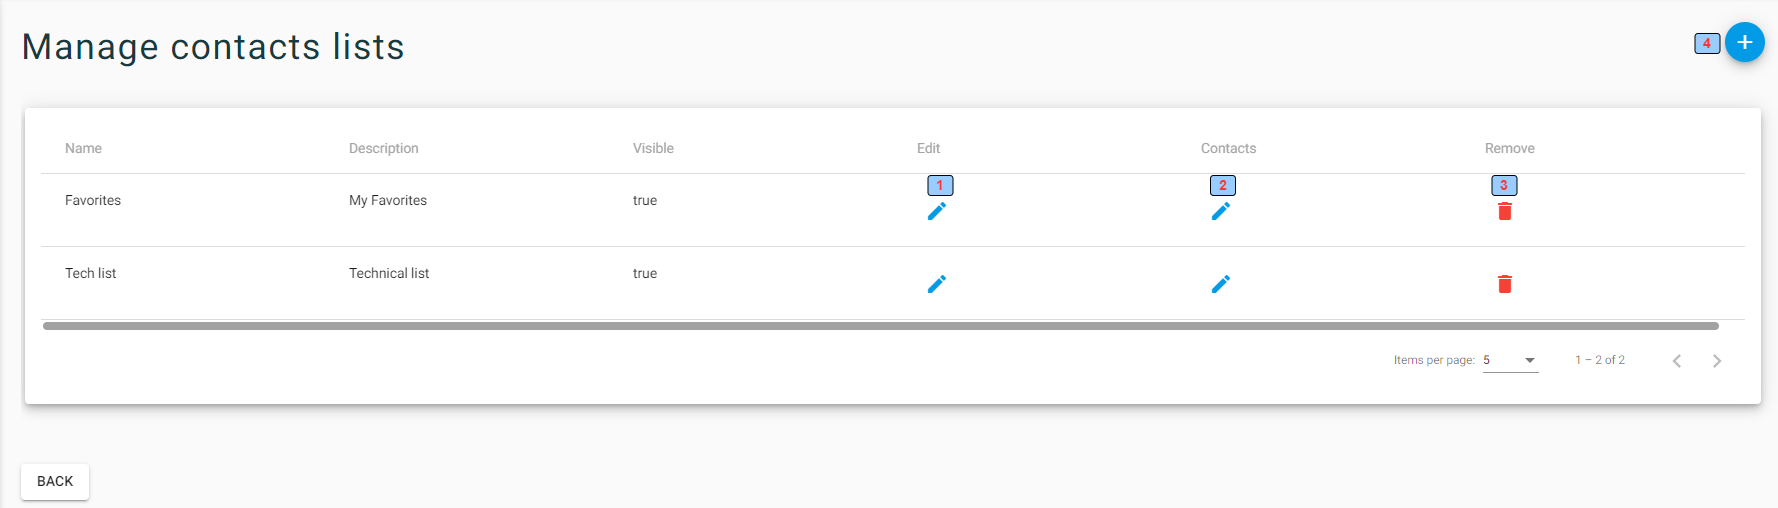
1 - Edit the contact list
2 - Manage contact
3 - Delete the contact list
4 - Insert additional data
¶ Edit list
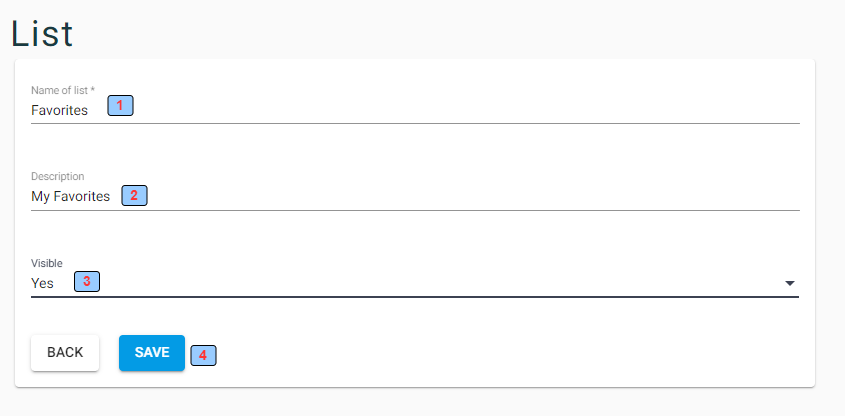
1 - List name
2 - List description
3 - Visible yes/no
4 - Save the list
¶ Contacts list
Contacts can be added to a list manually, inherited from a linked list, or automatically using selection criteria.
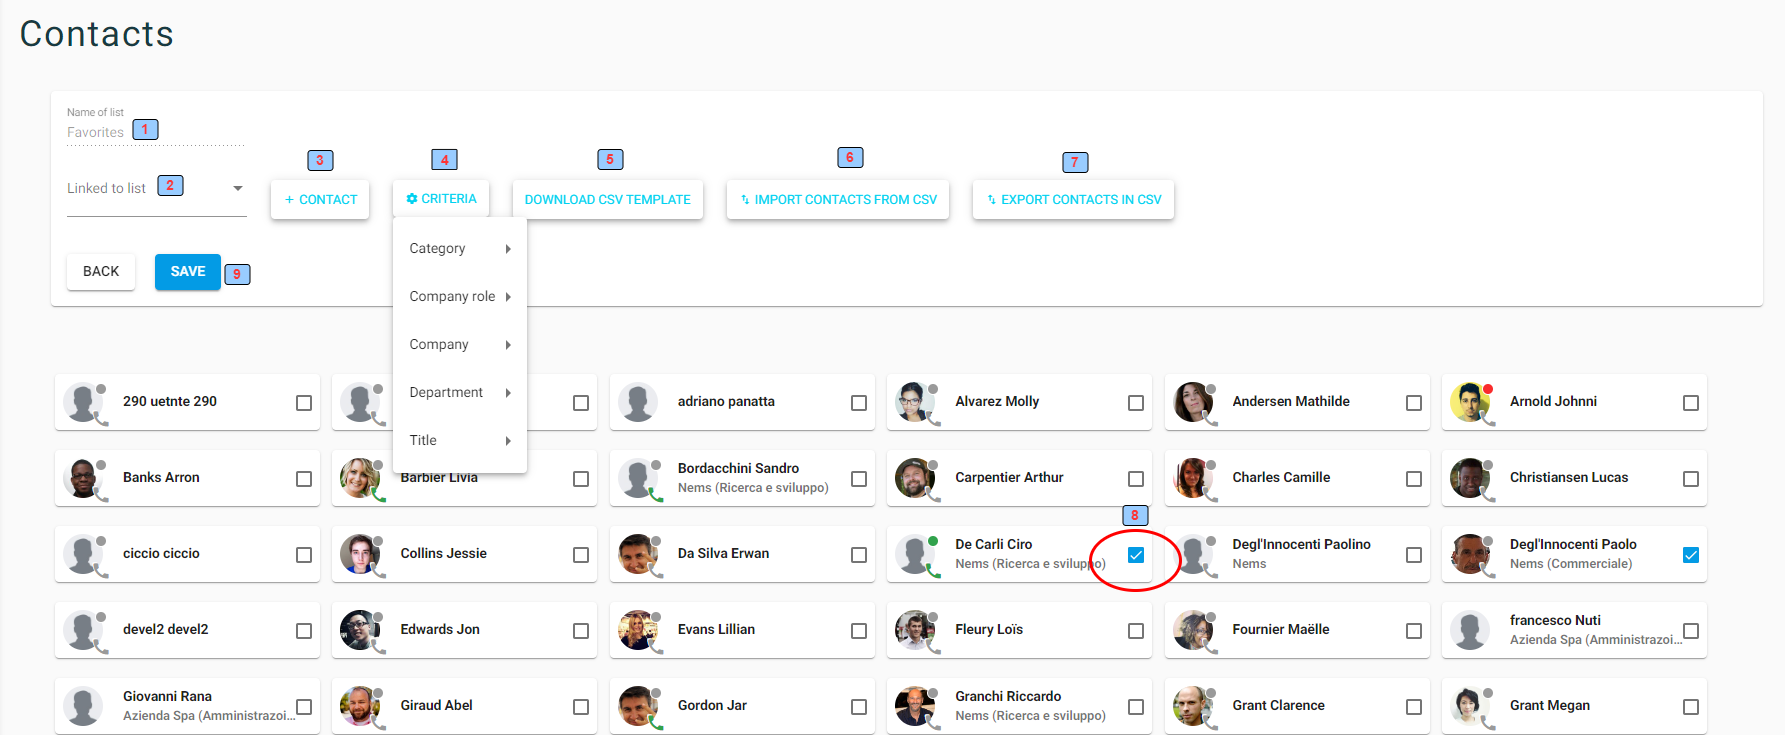
1 - List name
2 - Linked to List. If linked to a list, this contact list will inherit those contacts.
3 - Add new contact. The contact will added to this list
4 - Criteria. Selecting the criteria will allow you to add all those contacts that meet them dynamically
5 - Download the template to complete a file to be uploaded
6 - Import contacts from a file
7 - Export contacts
8 - The contacts are added manually
9 - Save the list
¶ Call History
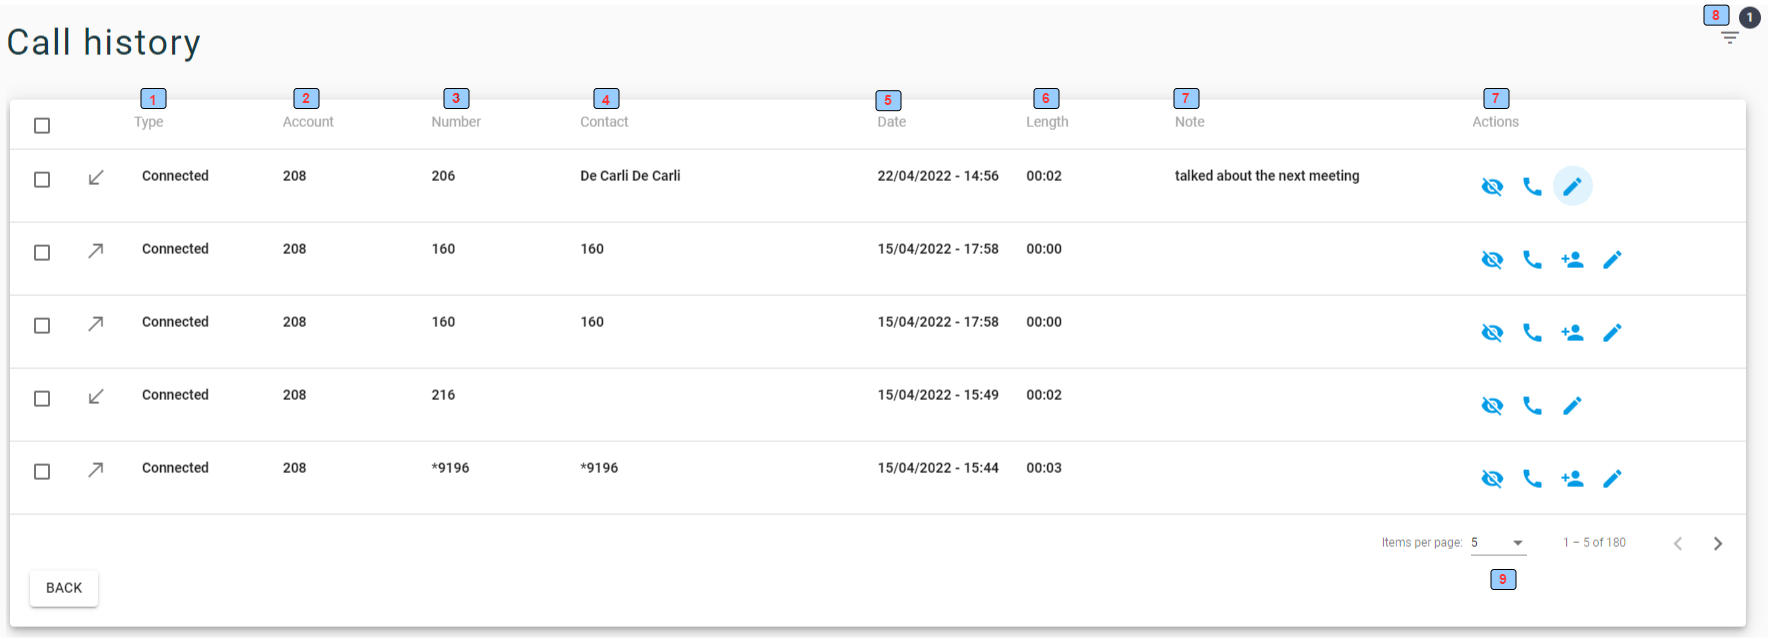
1 - Call type and call status
2 - Account: user extension number
3 - Number: called or calling number
4 - Contact: called or calling contact
5 - Date: call date
6 - Length: call length
7 - Actions: see later
8 - Filter: see later
9 - Items per page
1 - Mark items as seen
2 - Clik and dial
3 - Add contact
4 - Note edit
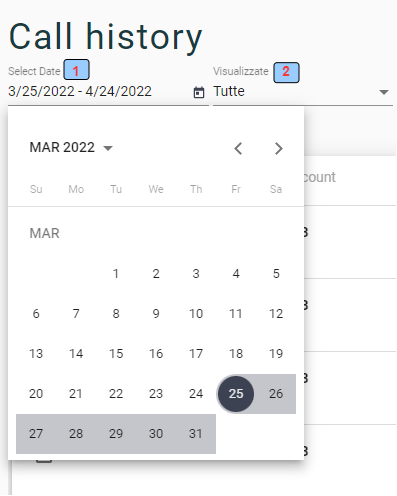
1 - Selet date interval
2 - Call type
¶ Voice Mail (answer machine)
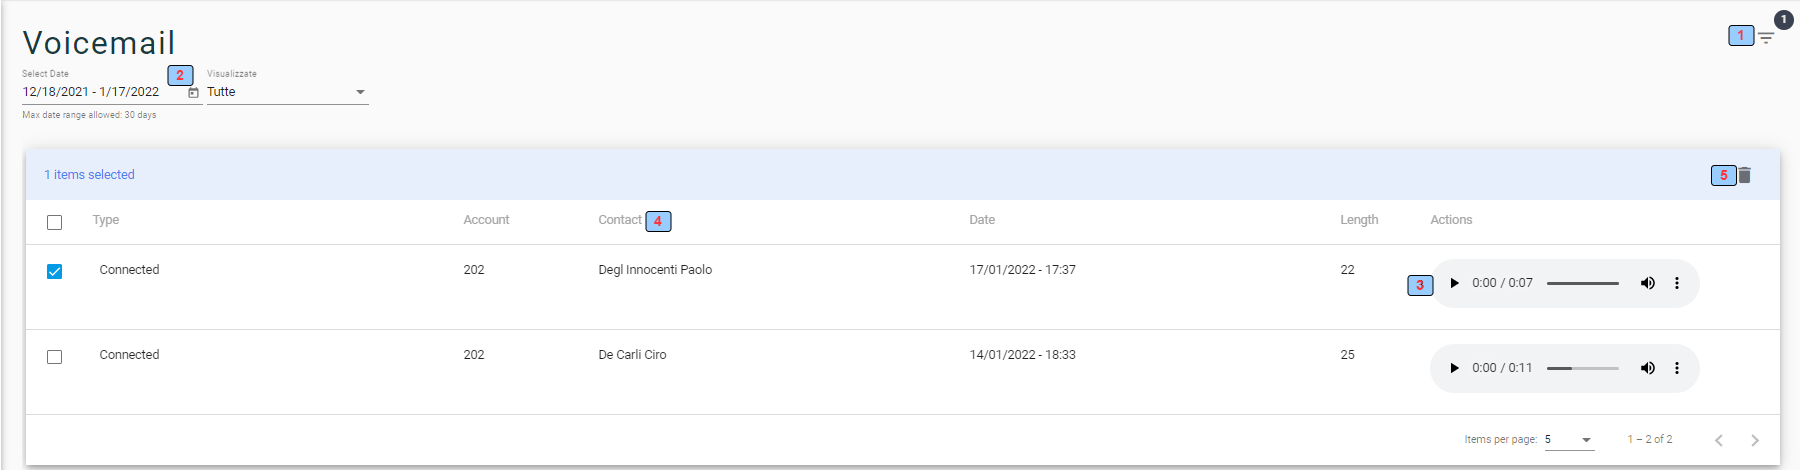
1 - Open the filter menu
2 - Filter menu
3 - Listen to the message
4 - Who left the message
5 - Delete selected messages
¶ Registered Calls
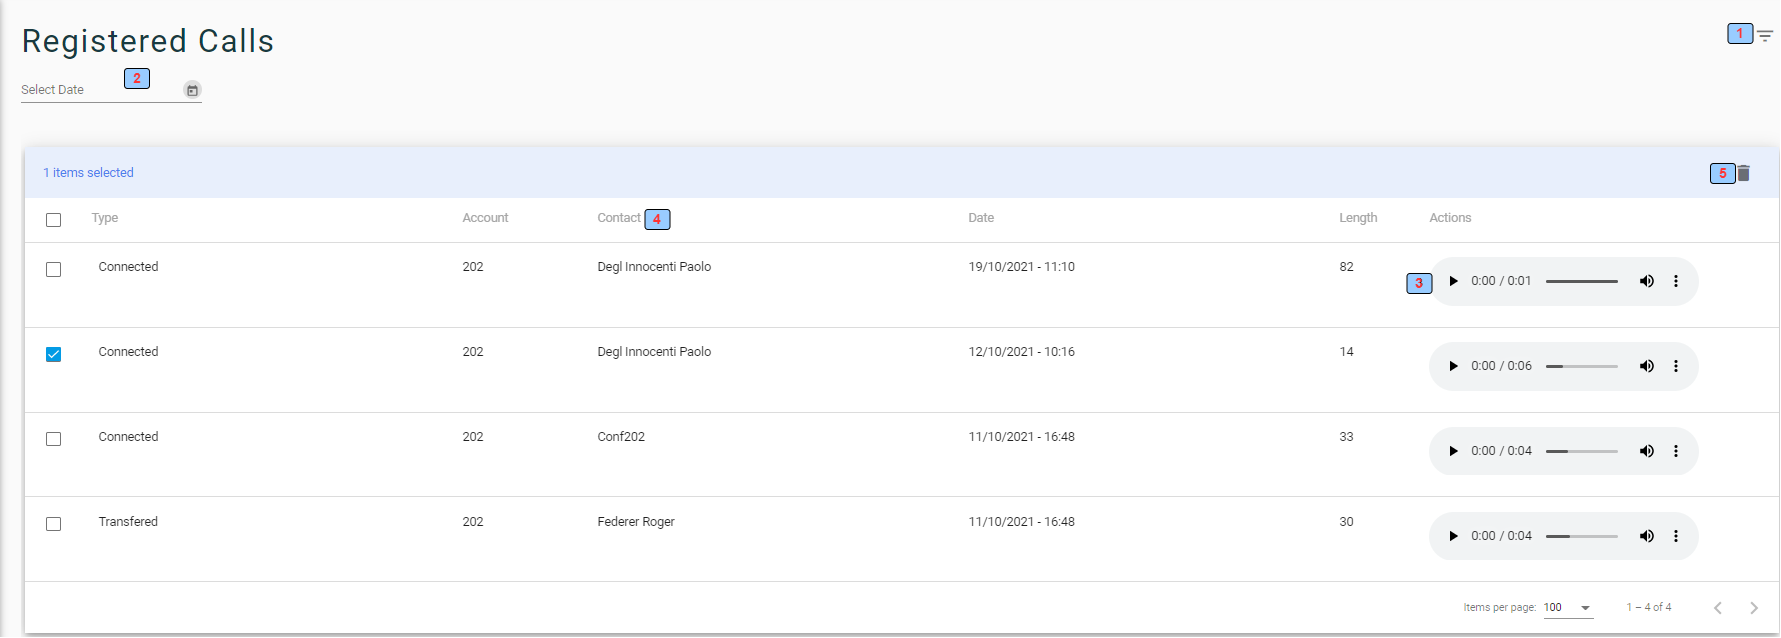
1 - Open the filter menu
2 - Filter menu
3 - Listen to the message
4 - Who left the message
5 - Delete selected messages
¶ Fax server
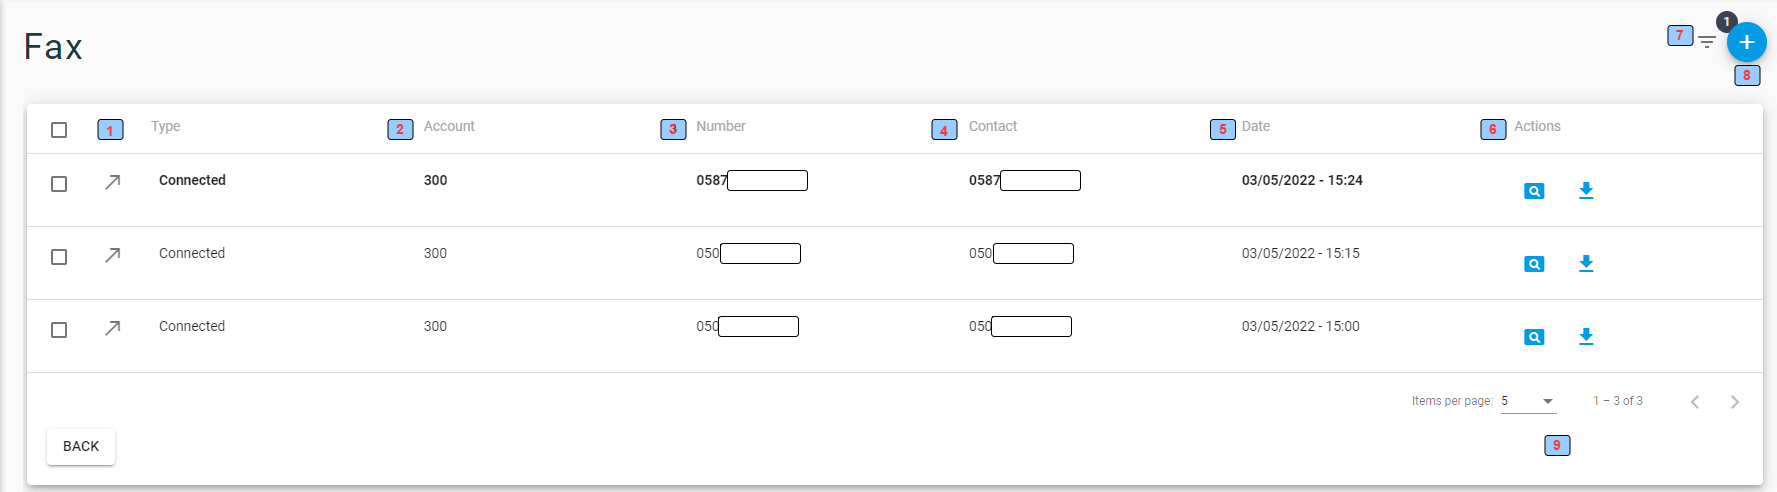
1 - Type: sent/received and connected or error
2 - Fax server extension
3 - Sent to or received from a number
4 - Sent to or received from contact
5 - Sent/received date
6 - Open/download sent/received fax (pdf format)
7 - Open the filter menu
8 - Open the send fax page
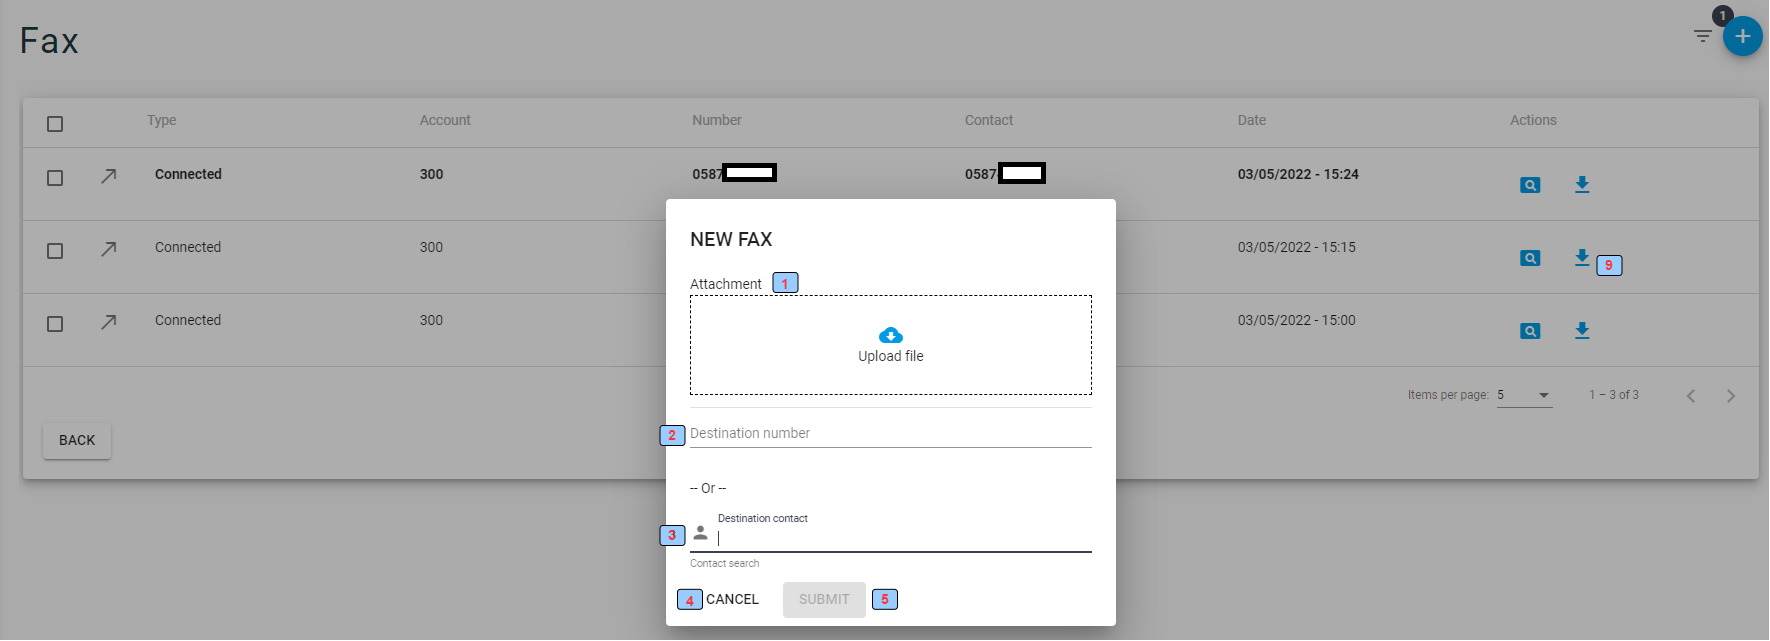
1 - Upload fax file (pdf format)
2 - Destination Number
3 - Destination contact (search contact)
4 - Cancel
5 - Send fax
¶ Chat
¶ User-to-user chat
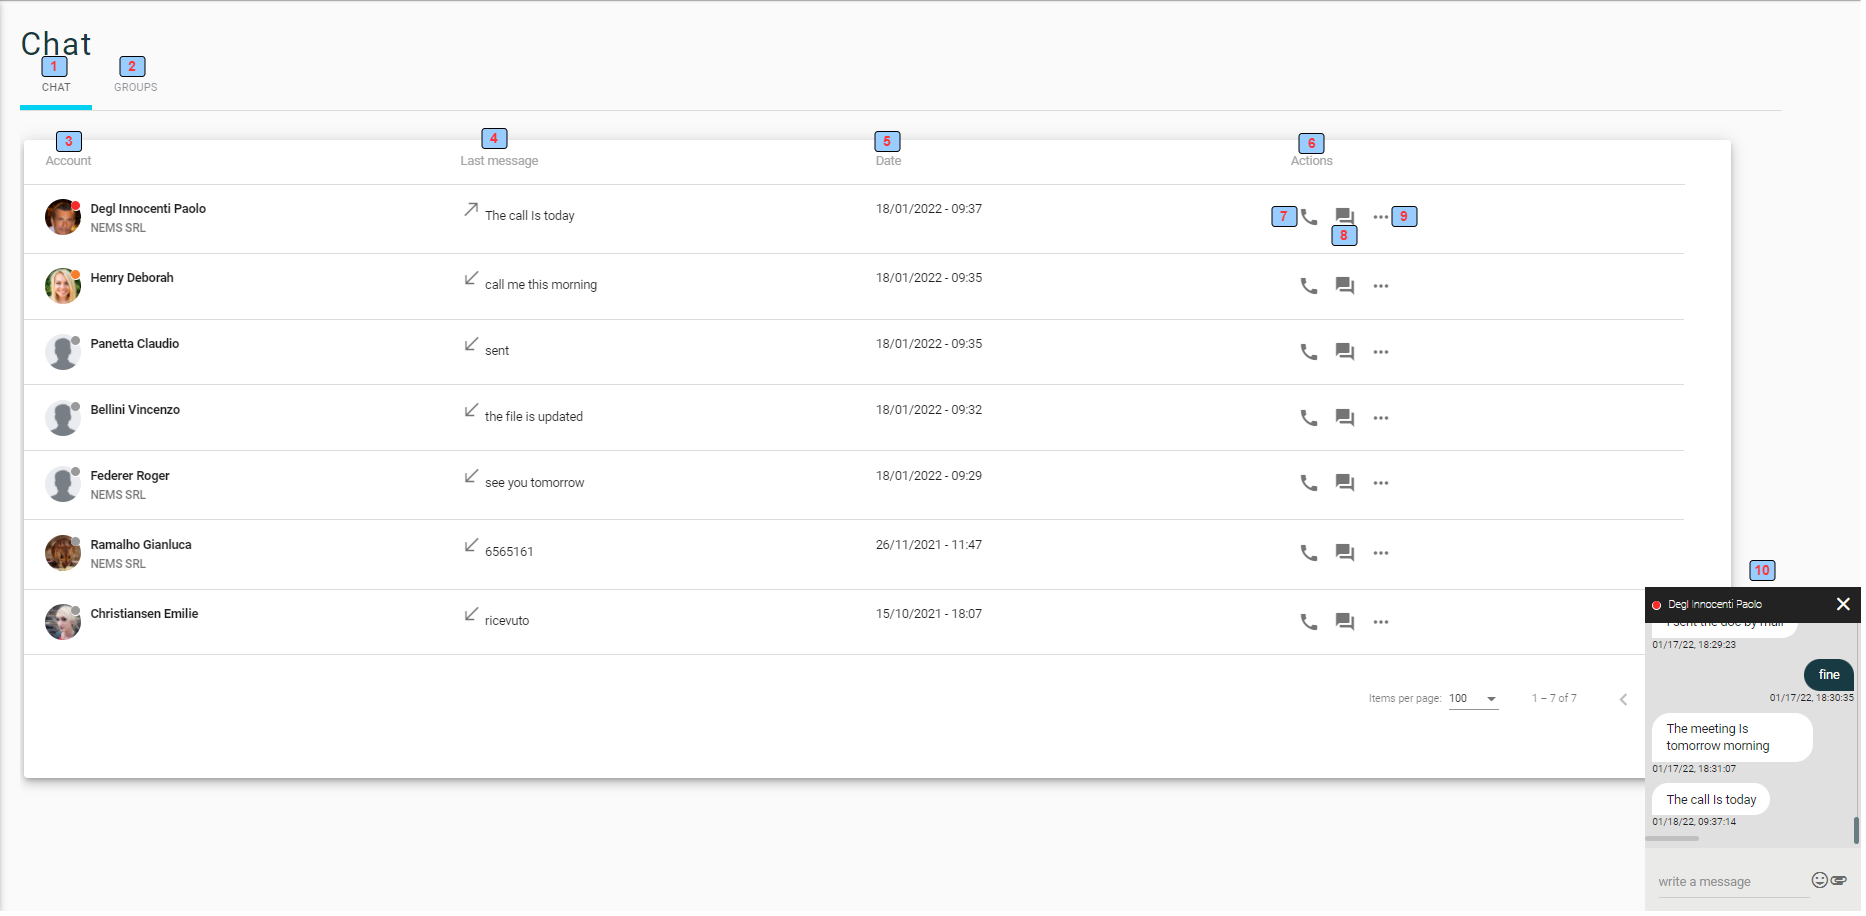
1 - User-to-user chat tab
2 - Group chat tab
3 - User contact chat session
4 - Last sent/received message
5 - Date of last sent/received message
6 - Action:
- 7 - Click and dial
- 8 - Open the chat message window to send/receive text messages, emoji and file
- 9 - Other actions
10 - Message window
¶ Group Chat
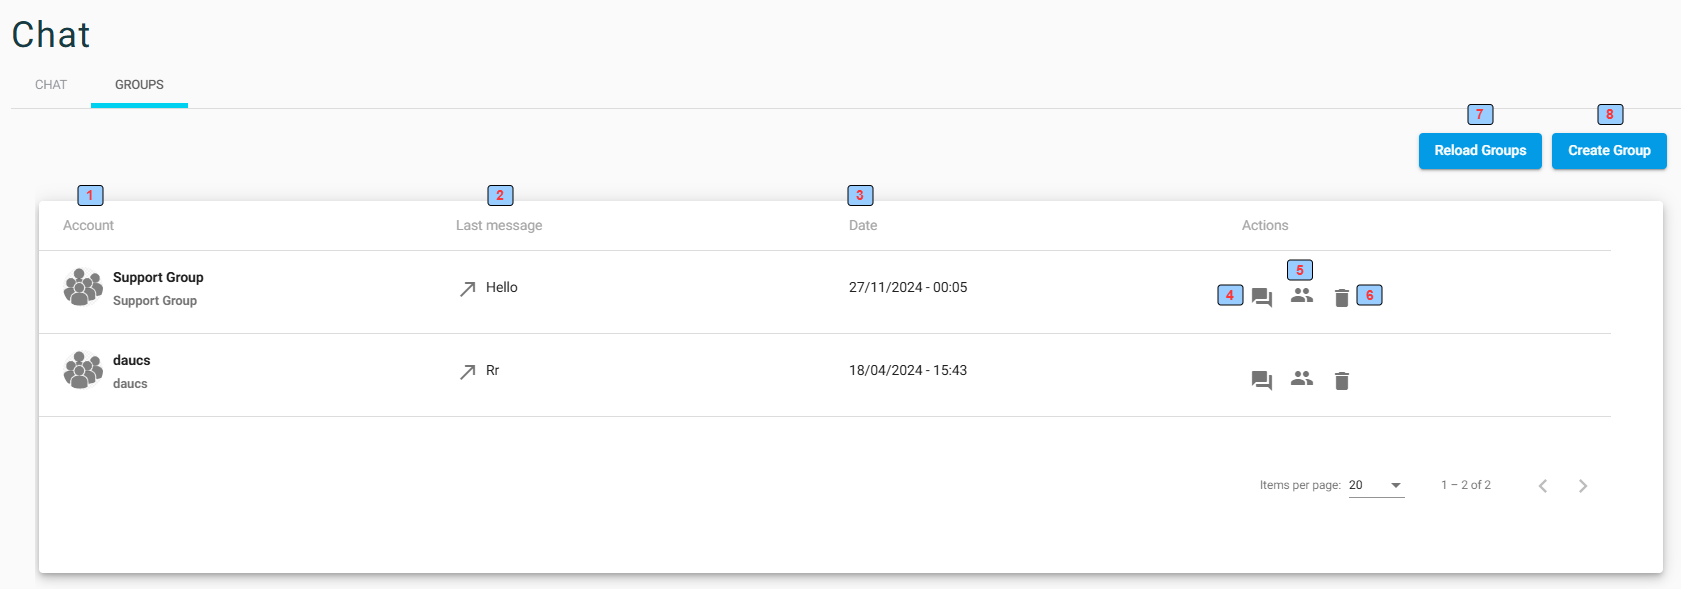
1 - Group name
2 - Last sent/received message
3 - Date of last sent/received message
4- Open message window
5 - Edit the group
6 - Delete the group
7 - Reload groups
8 - Create a new group
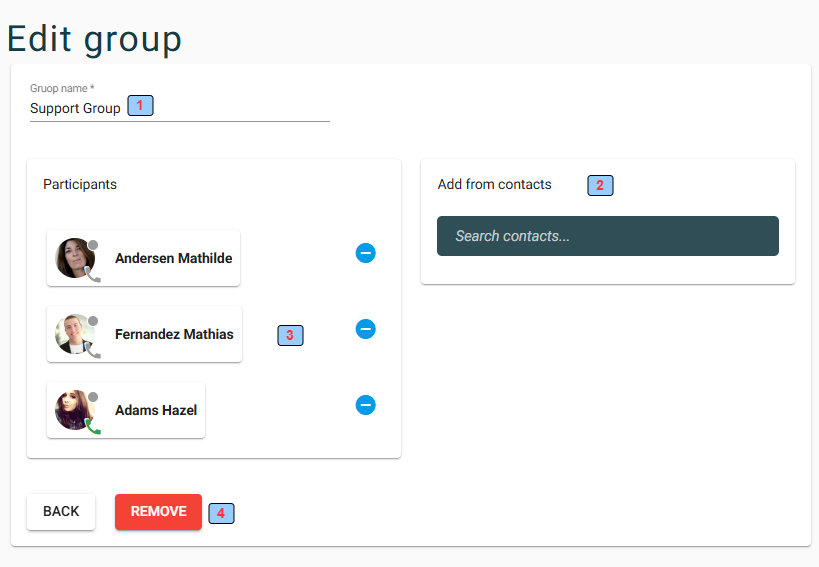
1 - Group name
2 - Add new contact to group
3 - Group members
4 - Delete the group
¶ Meeting (videoconference)
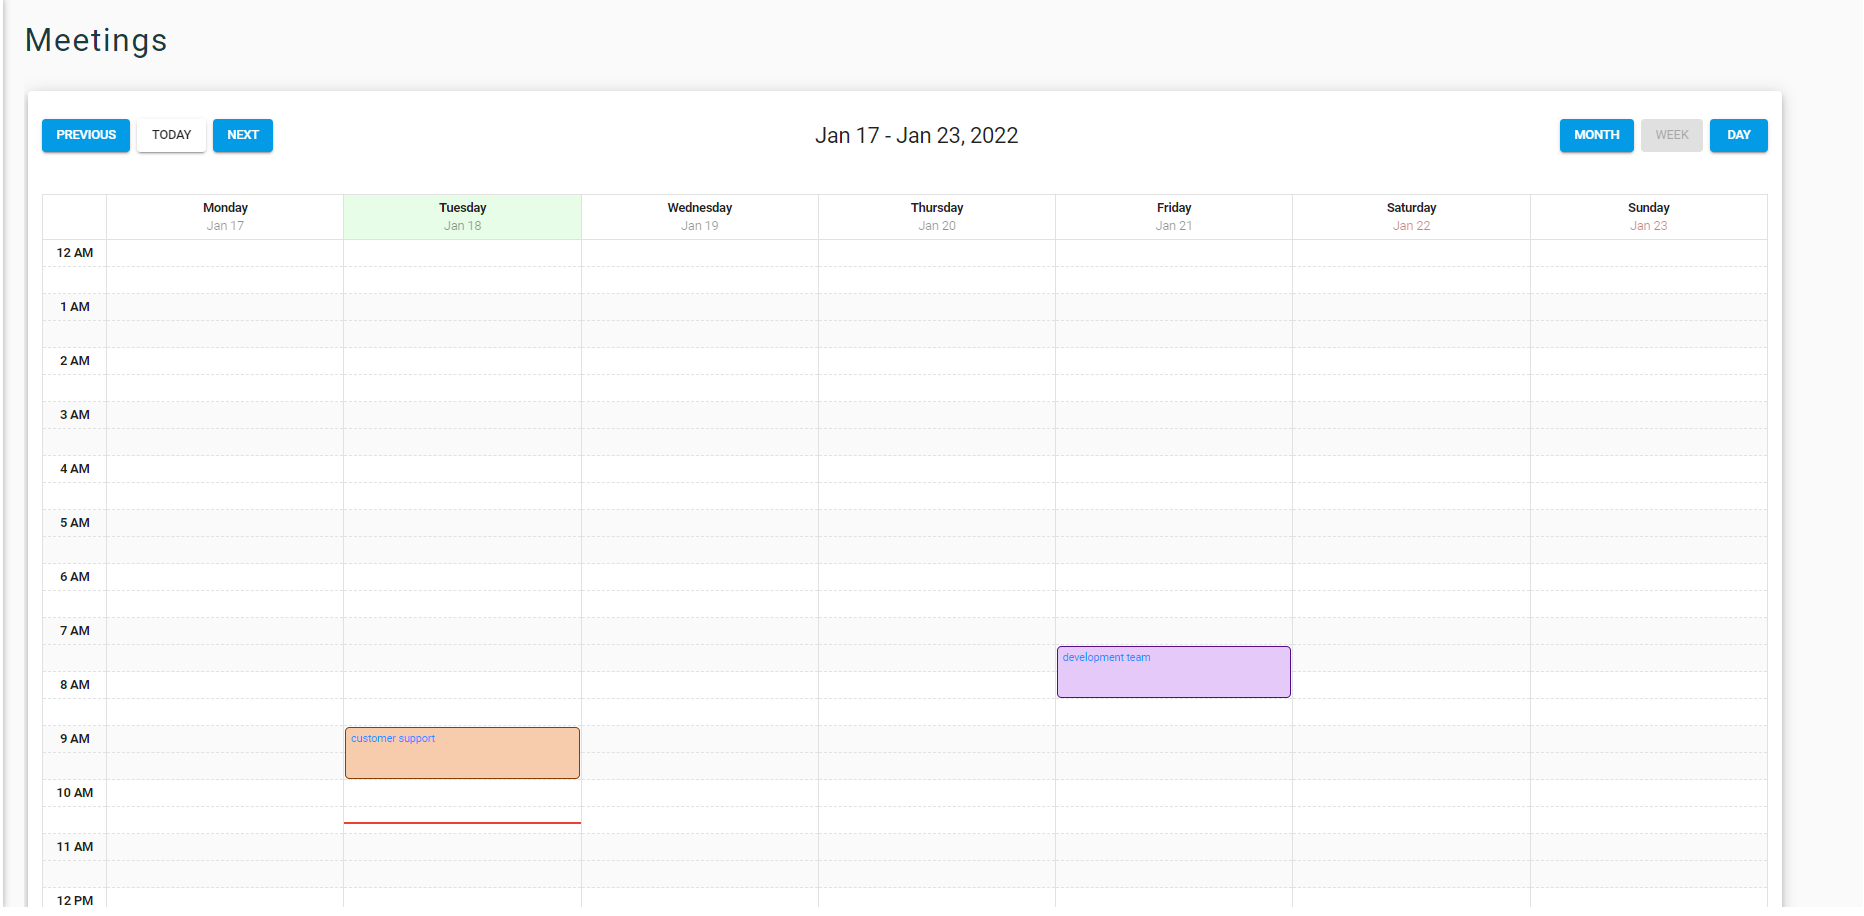
Browse Calendar to view, edit and create new meetings
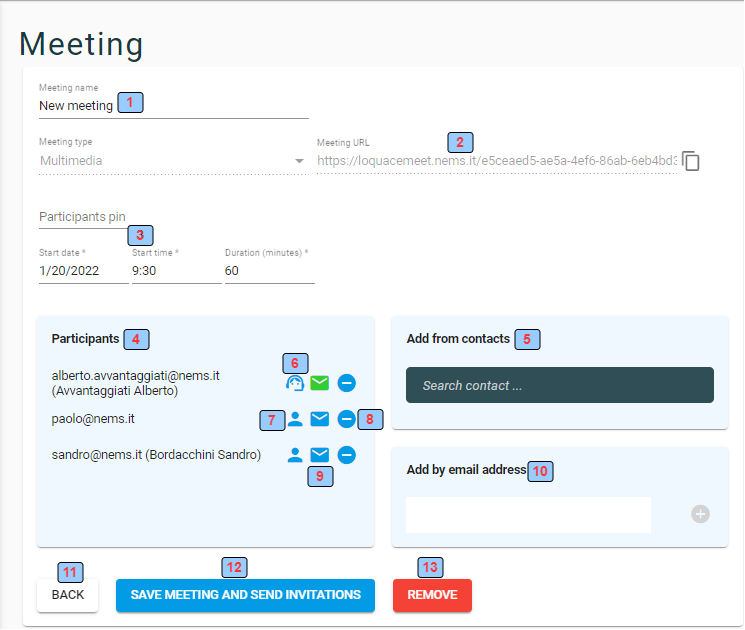
1 - Meeting name
2 - Meeting URL
3 - Meeting date and time duration
4 - Meeting partecipants
5 - Search and add a user to the meeting
6 - Meeting owner (moderator)
7 - Meeting partecipant
8 - Remove a partecipant
9 - Send invitation
10 - Add a participant by his mail
11 - Return to the calendar window without saving
12 - Save the meeting and send invitations
13 - Remove the meeting
¶ Settings
¶ Profile
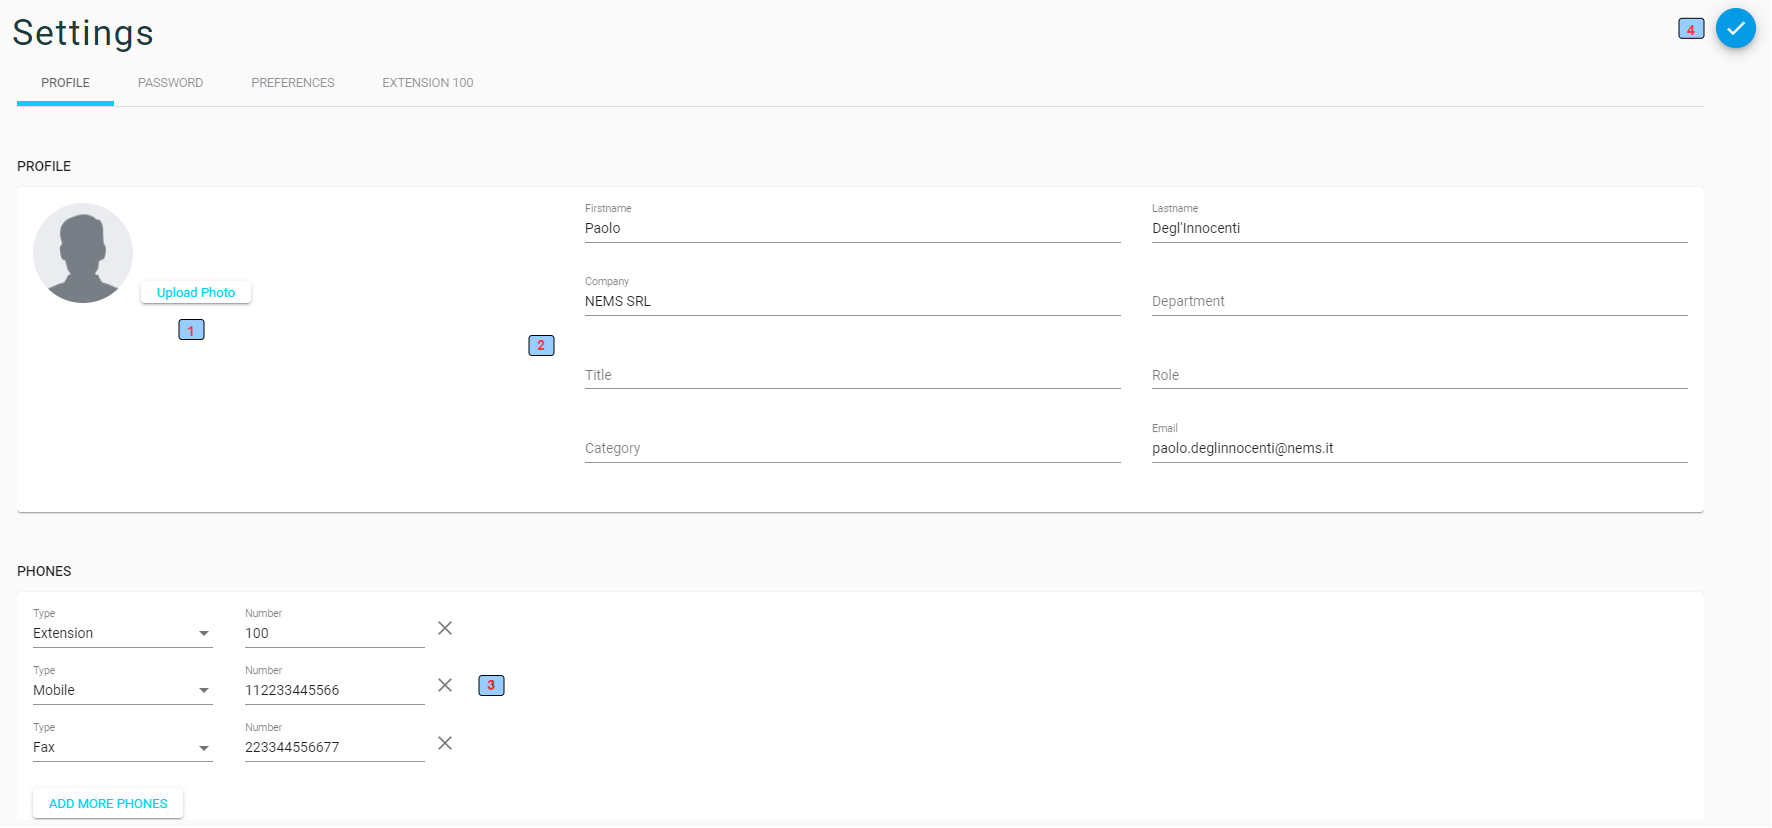
1 - Upload/Change user photo
2 - User personal data
3 - User phone numbers
4 - Save updated data
¶ Password
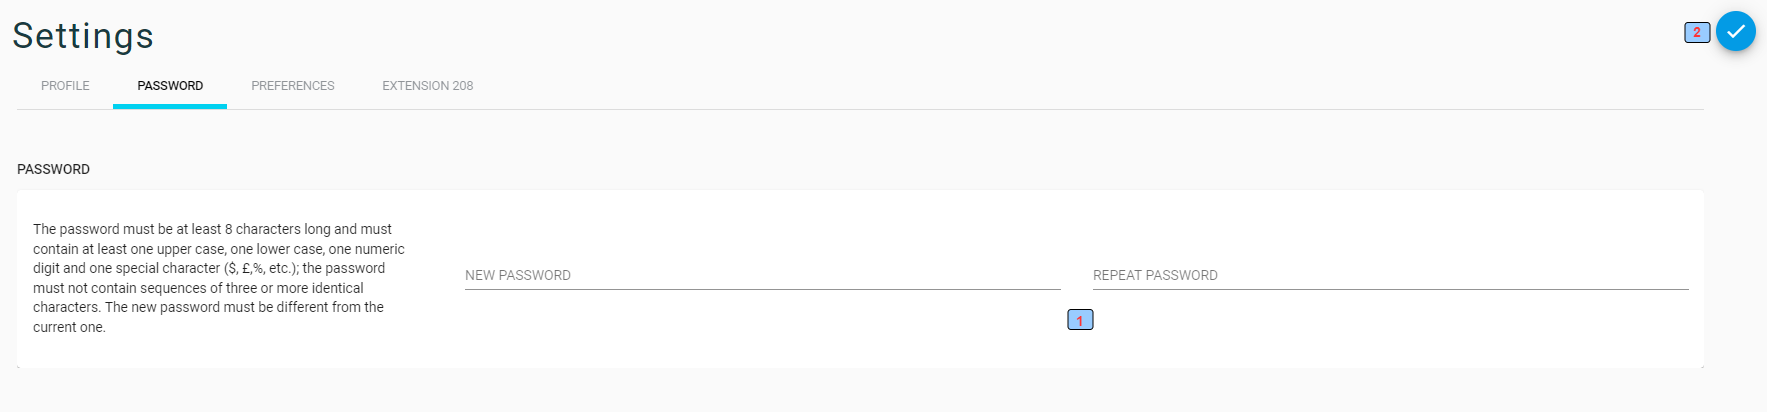
1 - New password
2 - Save updated data
¶ Preferences
¶ Calls

See Incoming and Web Call Multi-Device Management paragraph
¶ WebRTC
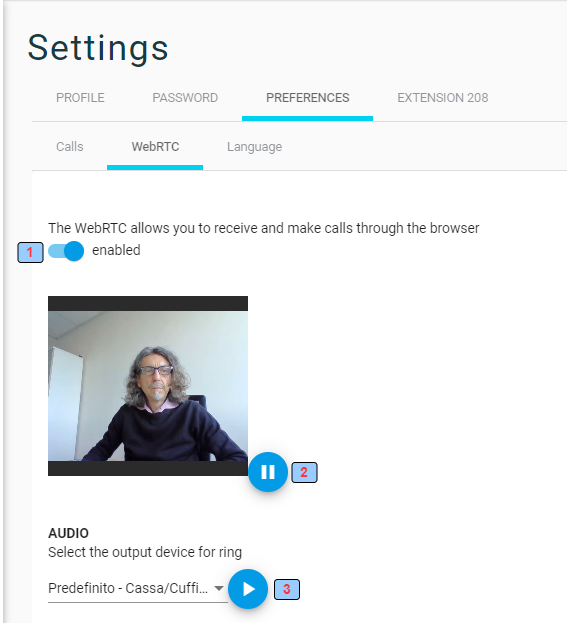
1 - Enable/Disable WebRTC softphone
2 - Audio/Video echo
3 - Select the audio device to ring and listen to the ringtone
¶ Language

1 - Select language
2 - Save updated data
¶ Extention
Forward rules for user extension
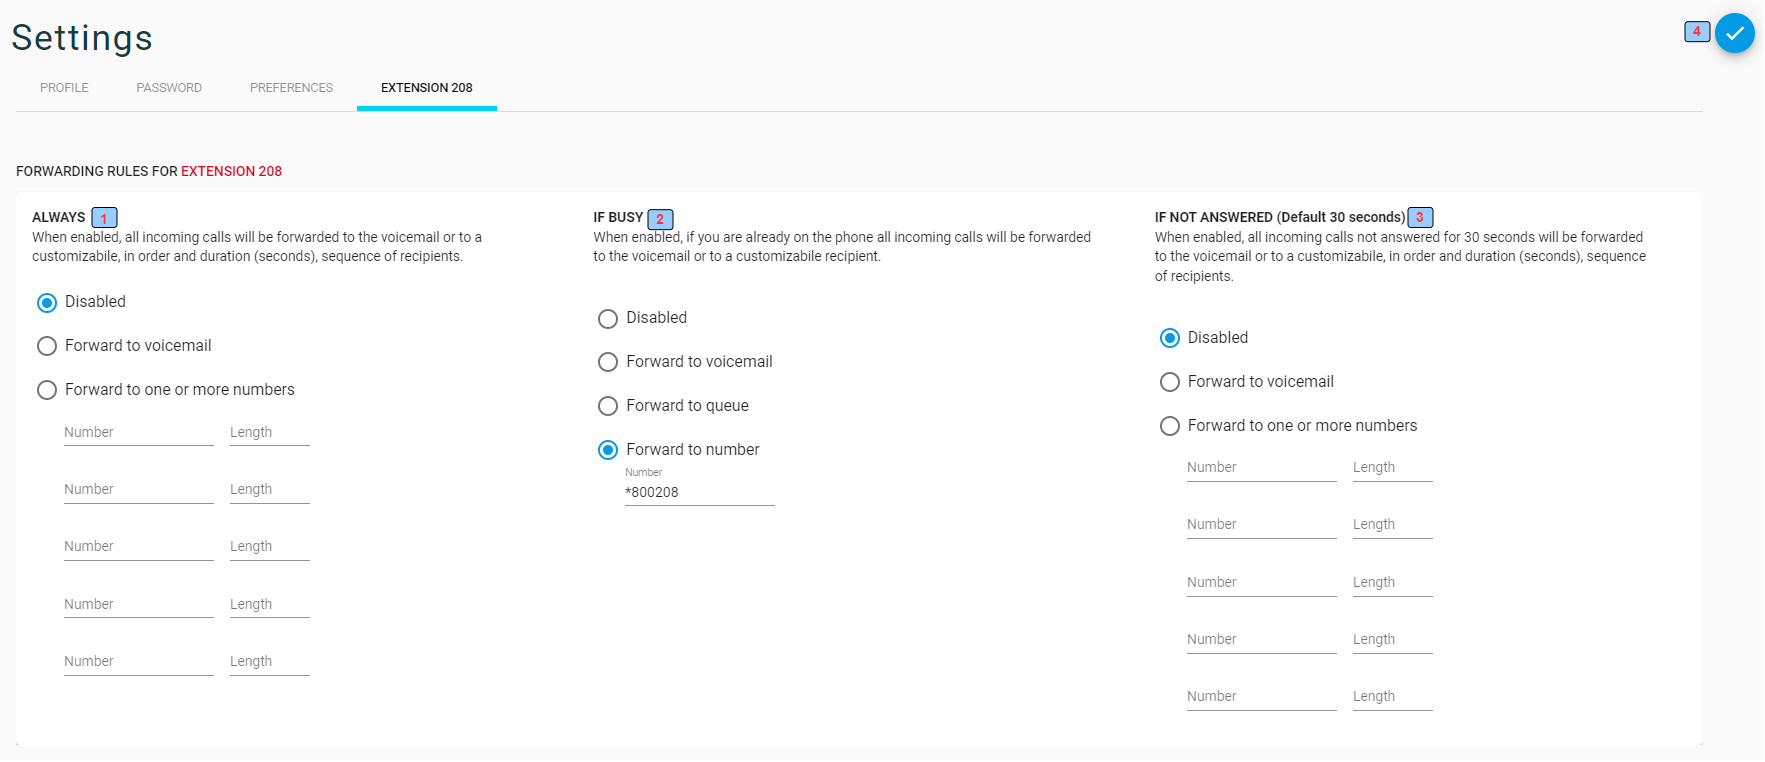
1 - Always: When enabled, all incoming calls will be forwarded to the voicemail or a customizable, in order and duration (seconds), sequence of recipients.
2 - If Busy: When enabled, if you are already on the phone all incoming calls will be forwarded to the voicemail or a customizable recipient.
3 - If Not Anwered, When enabled, all incoming calls not answered for 30 seconds will be forwarded to the voicemail or a customizable, in order and duration (seconds), sequence of recipients.
4 - Save updated data
¶ Admin Tools
Depending on the license, the user can manage some configuration features of the Loquace system.

¶ Users and extensions
1 -The user call history
2 - Edit user settings
¶ Fax Servers
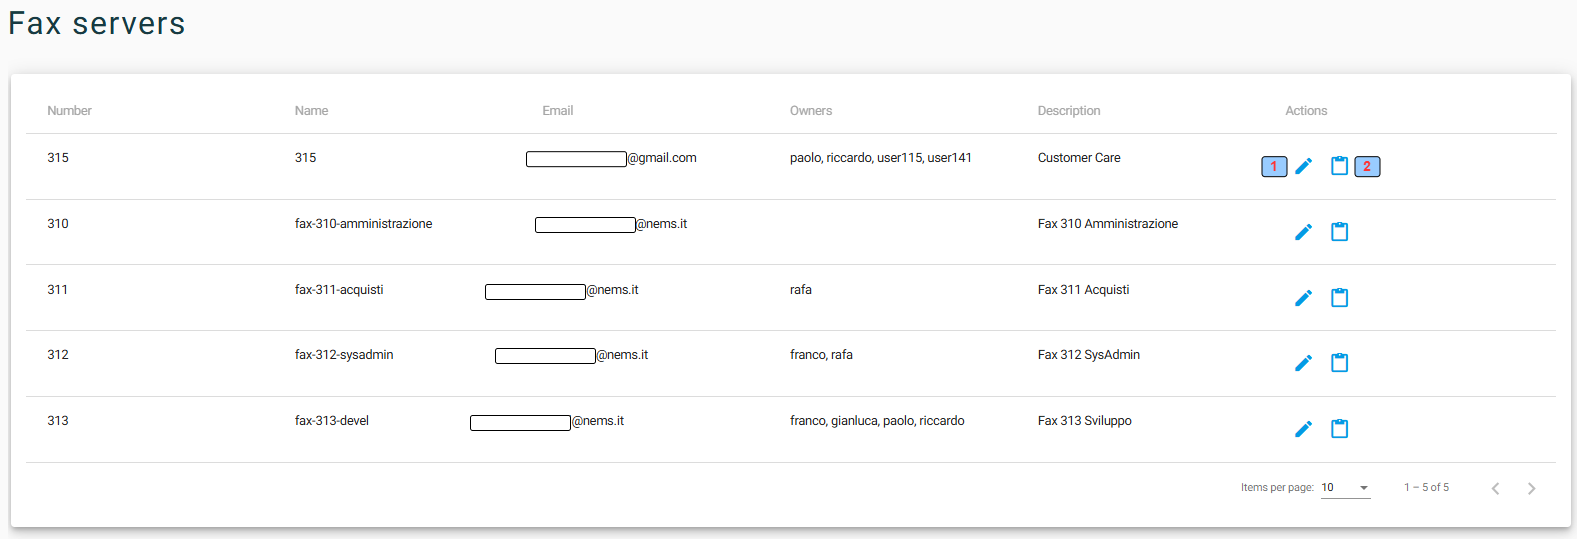
1 -Edit the fax server
2 - The fax server history
Number - Fax server extension
Name - Fax server name
Email - Email The faxes sent or received are sent to this email address
Owners - The owners of the fax server. Faxes sent or received are sent by default to the fax serve owner's email address
Description - The fax server description
¶ Edit Fax Servers

¶ Fax Servers history
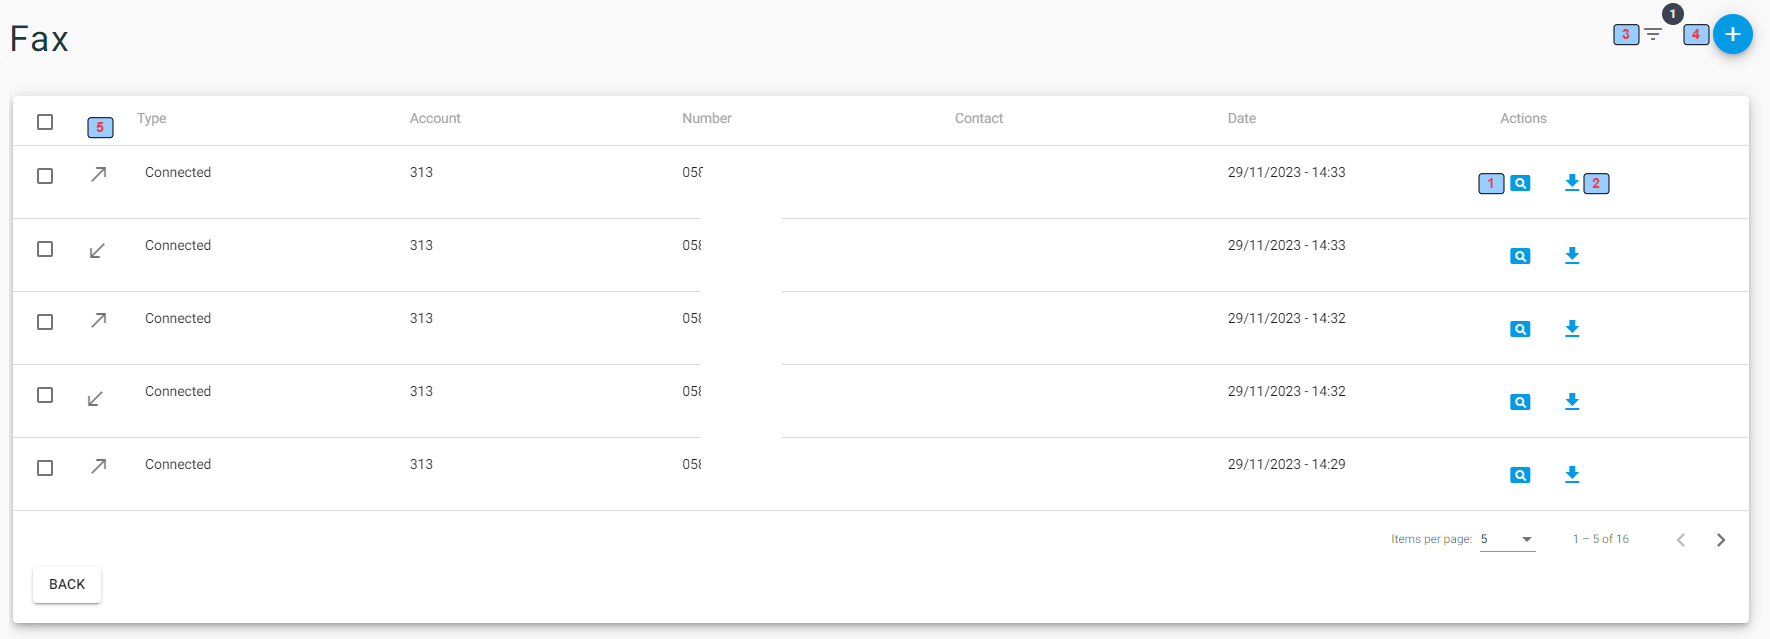
1 -View the fax
2 - Download the fax
3 - Search filter
4 - Send new fax
5 - Inbound/Outbound
¶ Ring Groups
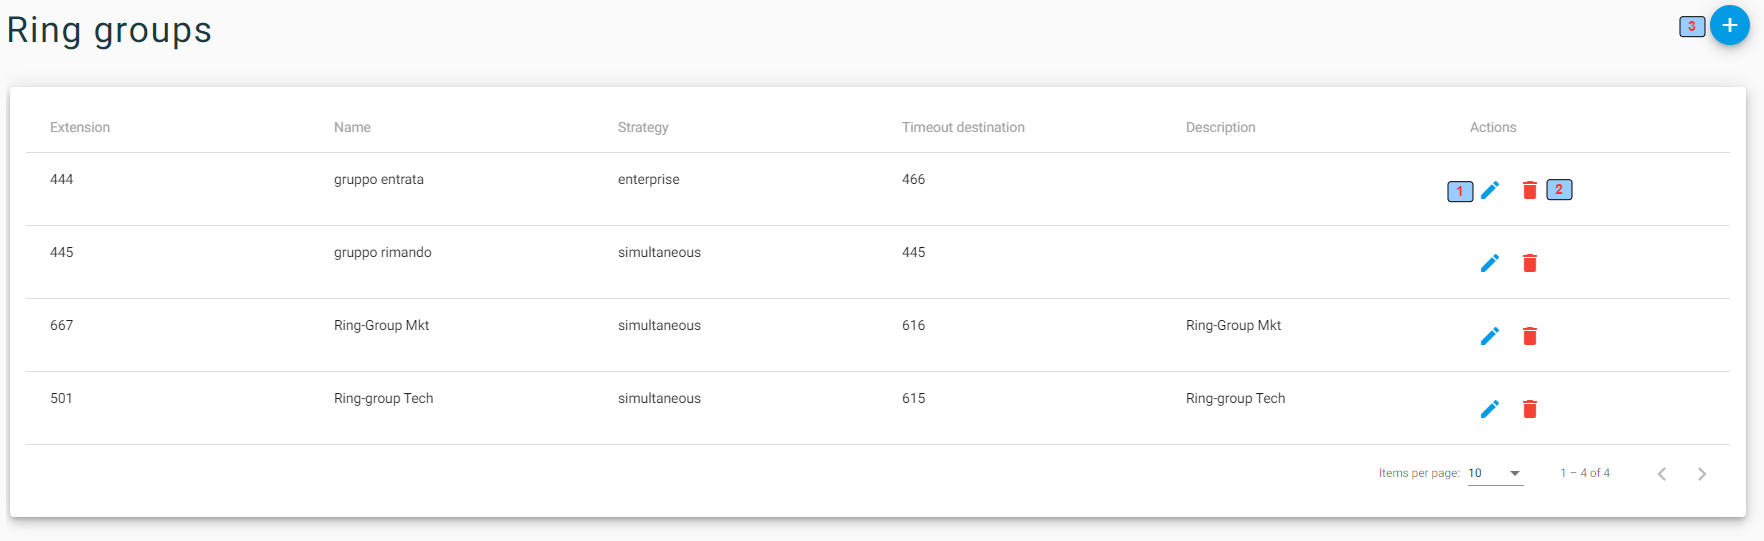
1 - Edit the ring group
2 - Delete the ring group
3 - Create a new ring group
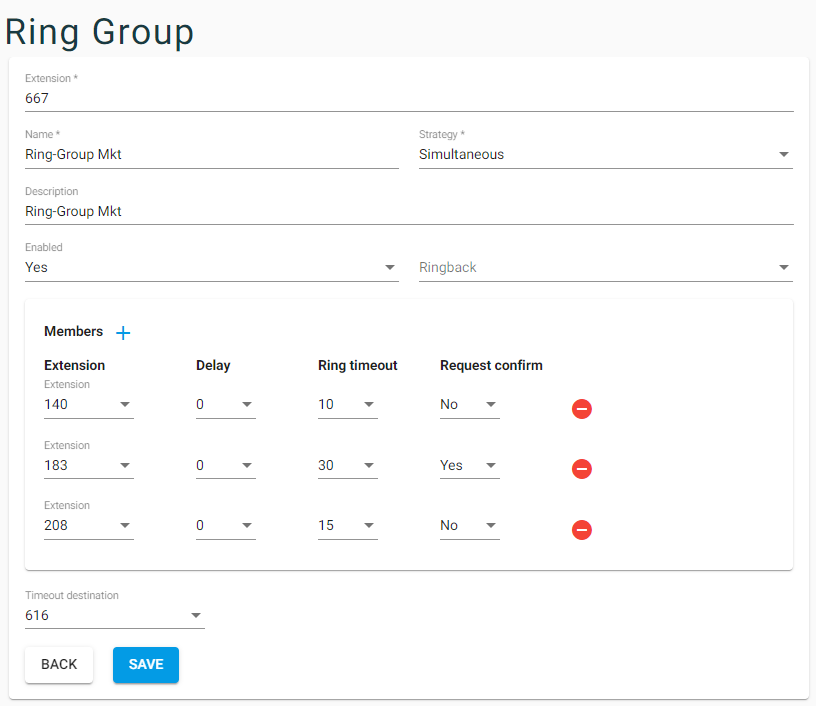
¶ Edit Ring Group
¶ Time Conditions
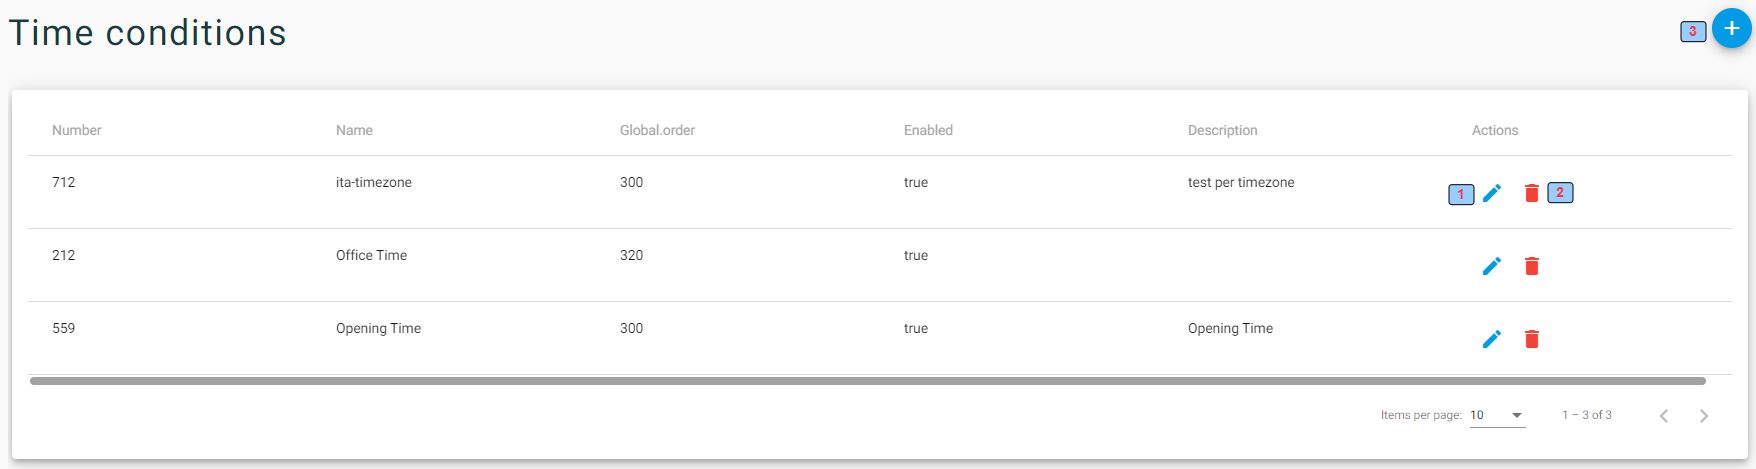
1 - Edit the time condition
2 - Delete the time condition
3 - Create new time condition
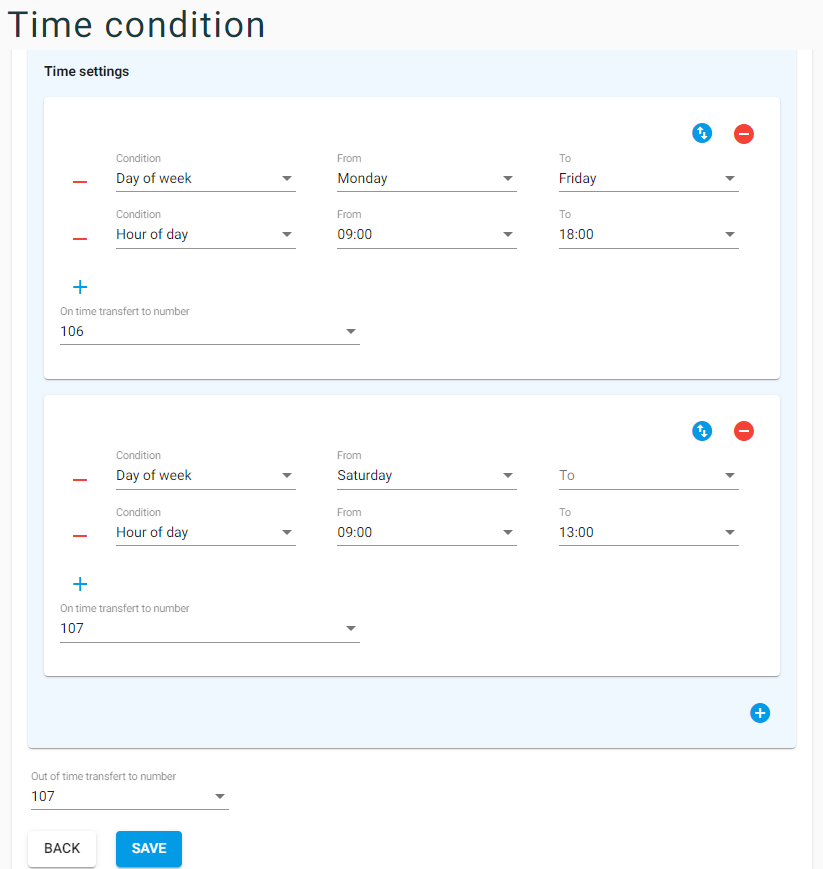
¶ Edit Tme condition
¶ IVR
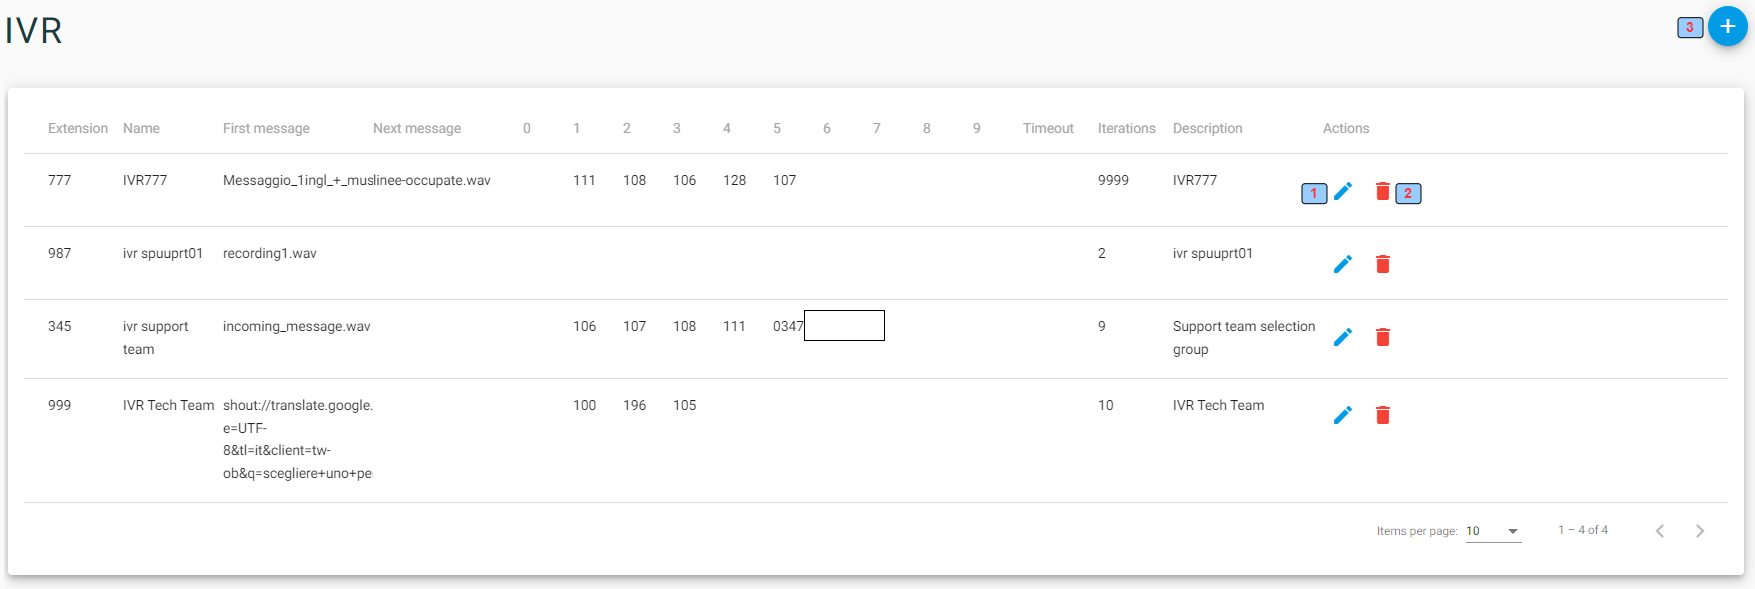
1 - Edit the IVR
2 - Delete the IVR
3 - Create a new IVR
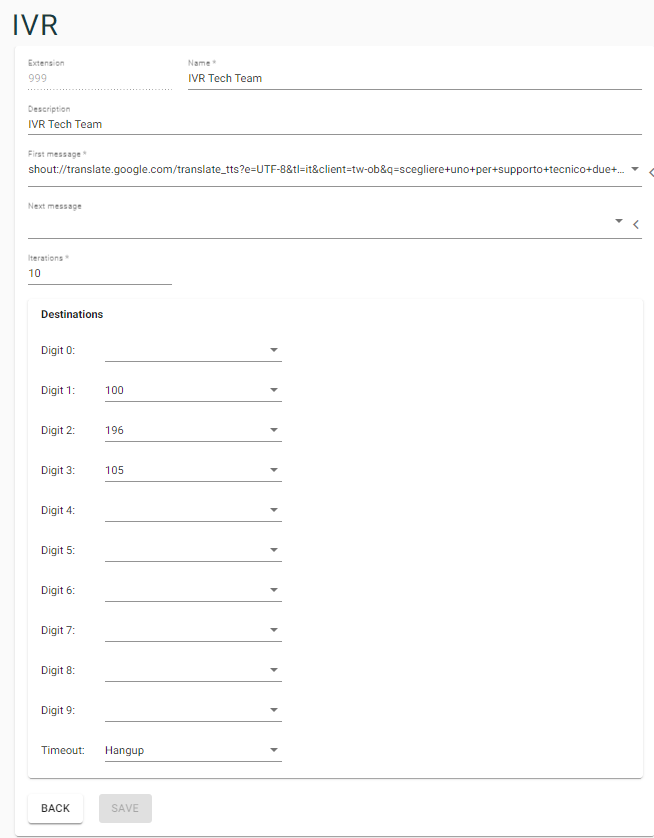
¶ Edit IVR
¶ Conference Centers and Rooms
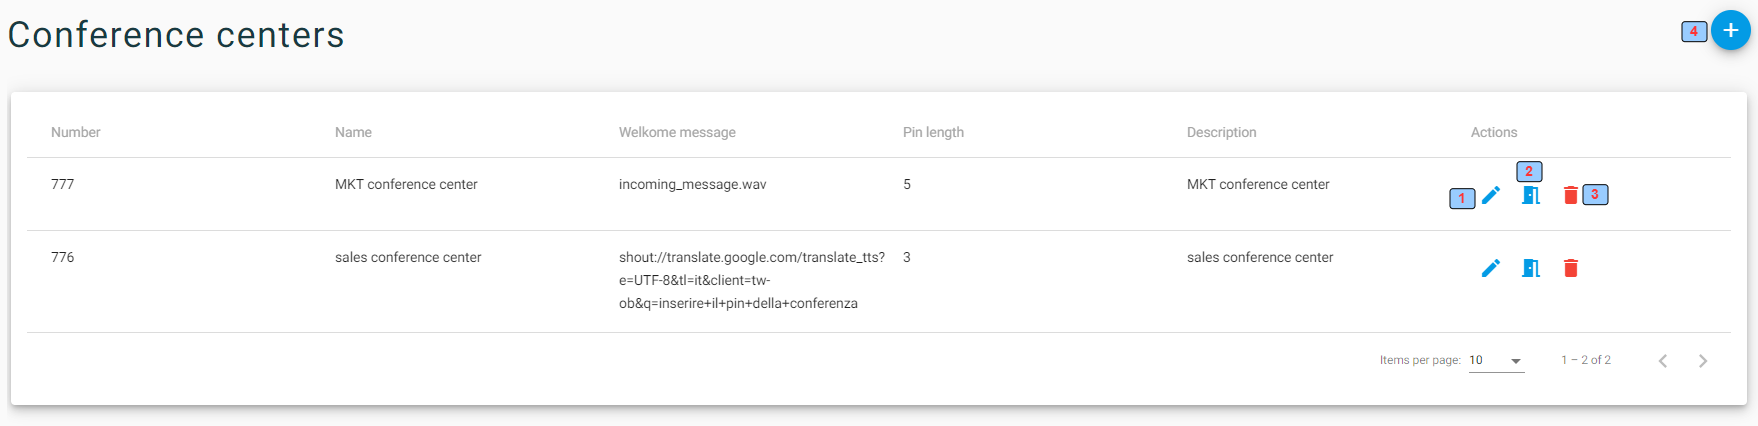
1 - Edit the conference center
2 - List conference center rooms
3 - Delete the conference center
34- Create a new conference center
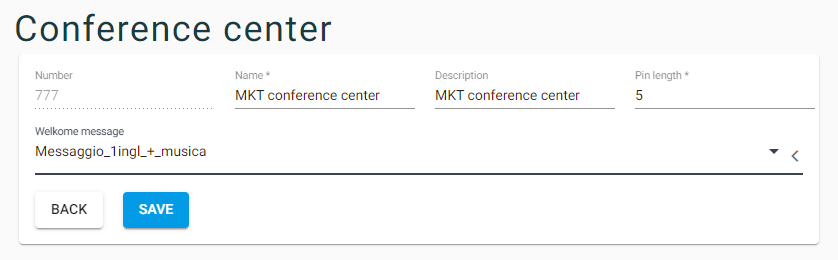
¶ Edit Conference Center
¶ List Conference Center Rooms
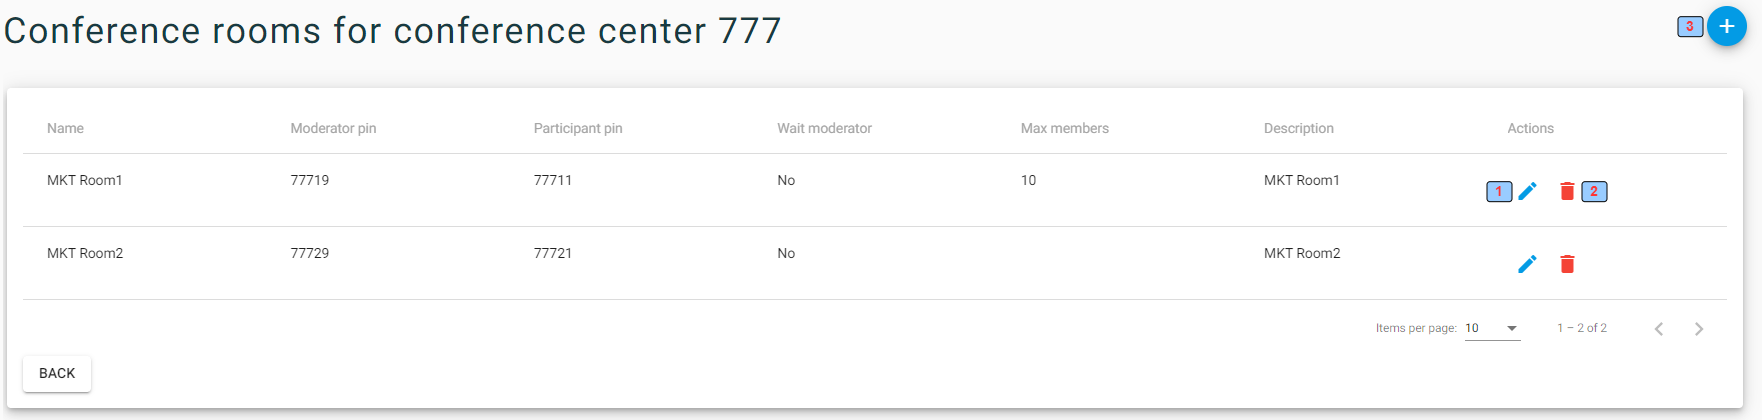
1 - Edit the conference center room
2 - Delete the conference center room
3 - Create a new conference center room
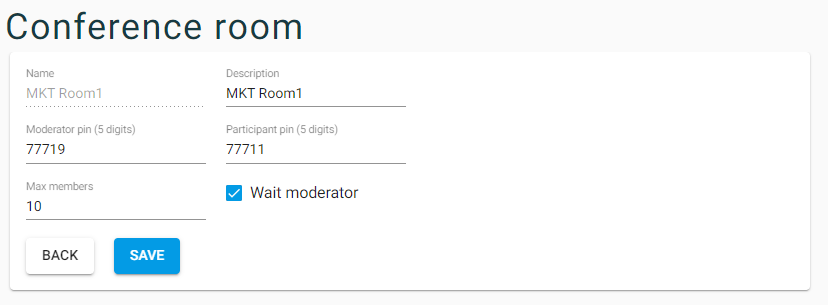
¶ Edit the Room
¶ Inbound Routes
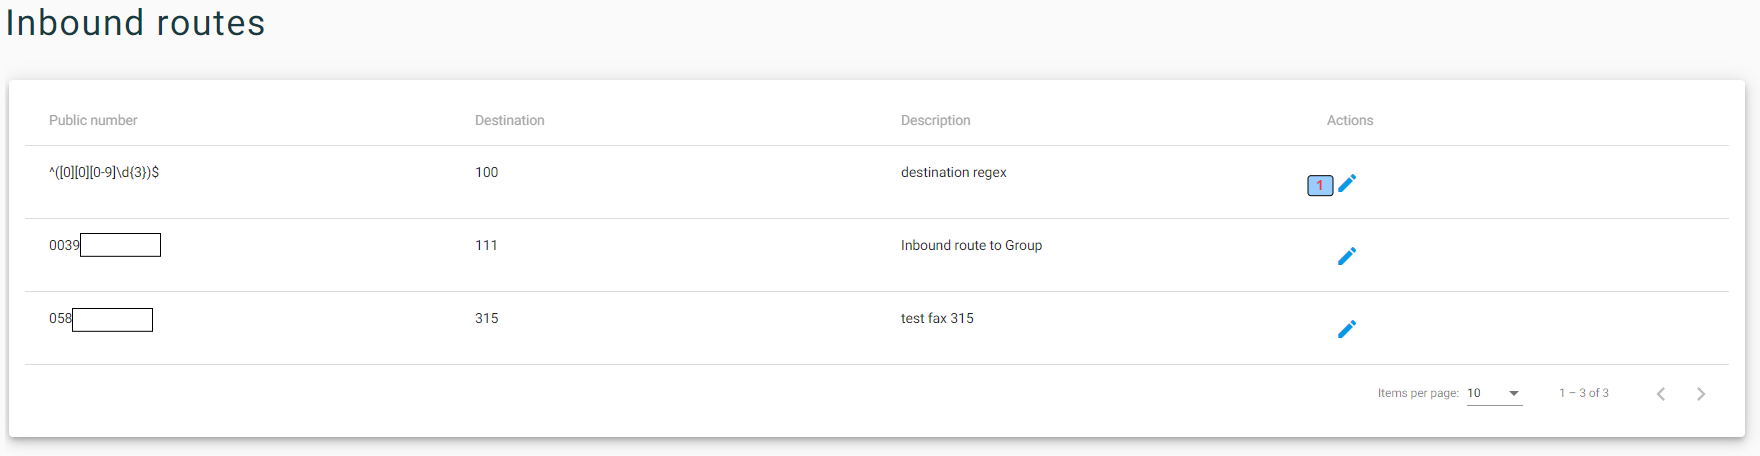
1 - Edit the inbound route
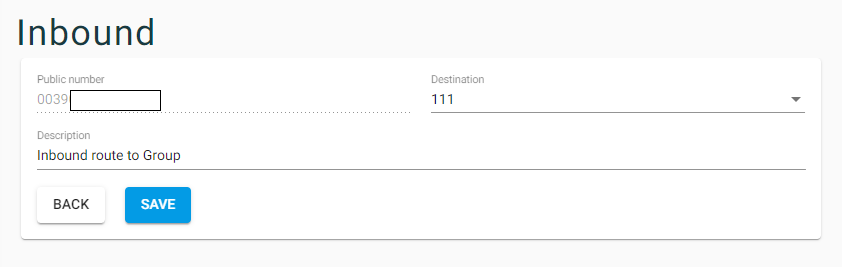
¶ Edit Inbound Route
¶ Recordings

1 - Listen to the audio message
2 - Edit the audio message
3 - Delete the audio message
4 - Create a new audio message
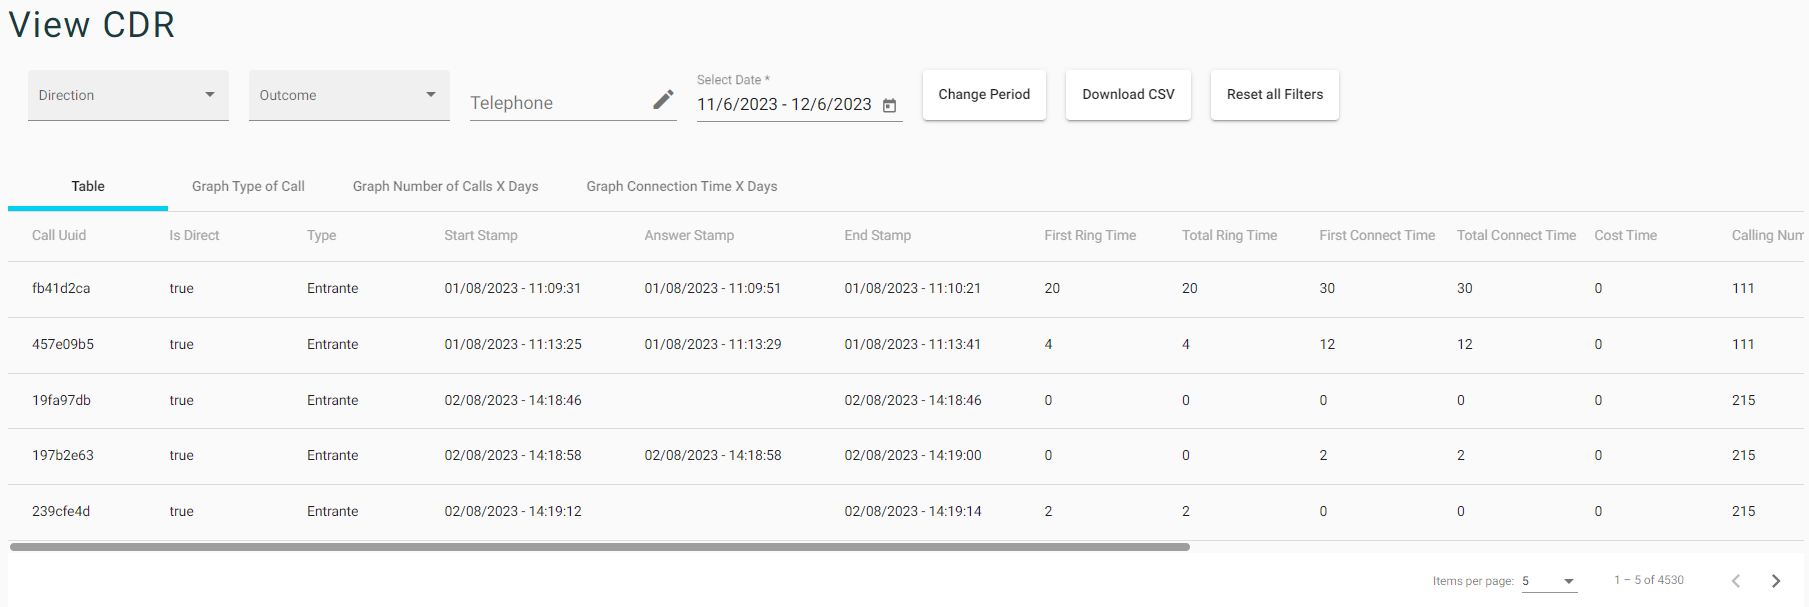
¶ CDR
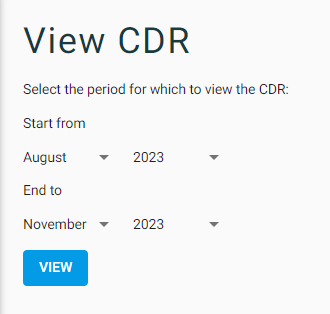
¶ CDR View
¶ About
Link to Loquace man pages
¶ Logout
Logout user from Web App