¶ Loquace Reseller App
Loquace Reseller App (Reseller App) is the Loquace Web App for Reseller management, Loquace domain management, and users/devices/dial plan configuration, both in Loquace Cloud Ecosystem deployment and On-premise/Single Machine Cloud deployment.
Loquace is a native multitenant (multi-domain) system; each domain (virtual Pbx and Unified Communication instance) is used by a Customer and each Reseller owns one or more domains.
In On-Premise/Single-Server Cloud deployment, all the Loquace modules are embedded into the single PC/Server/VM and a single Reseller is the owner of all the domains.
In the Loquace Cloud Ecosystem deployment modules can be installed on multiple Servers/VMs. The Reseller App Administrator can create several Resellers. Each Reseller can create several Reseller Users. Each Reseller User can create and manage only the domains owned by his Reseller, these domains can be distributed on several VMs.
The Reseller App has two profiles depending on the user role :
- Administrator
- Reseller
Reseller App - Administrator Role - main features are:
- Reseller and Reseller User management
- Domain management
- Domain configuration
- System configuration
- Auditing
Reseller App -Reseller Role - main features are:
- Customer management
- Domain creation
- Domain management
- Domain configuration
Only Reseller Users can create a new domain.
¶ User Login
Open the web browser
Type into the URL bar the PBX name or IP address
Enter your credentials:
- username
- password
Click the Login button to log in
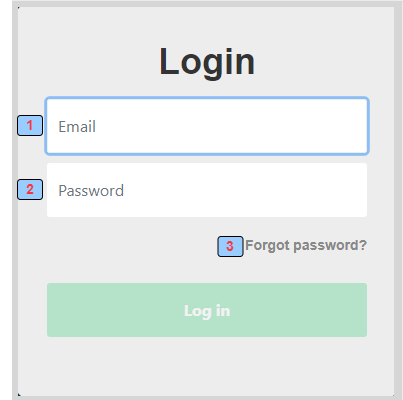
1 - Login username
2 - Password Username
3 - Password recovery
¶ Administrator Role - Administrator Main Window
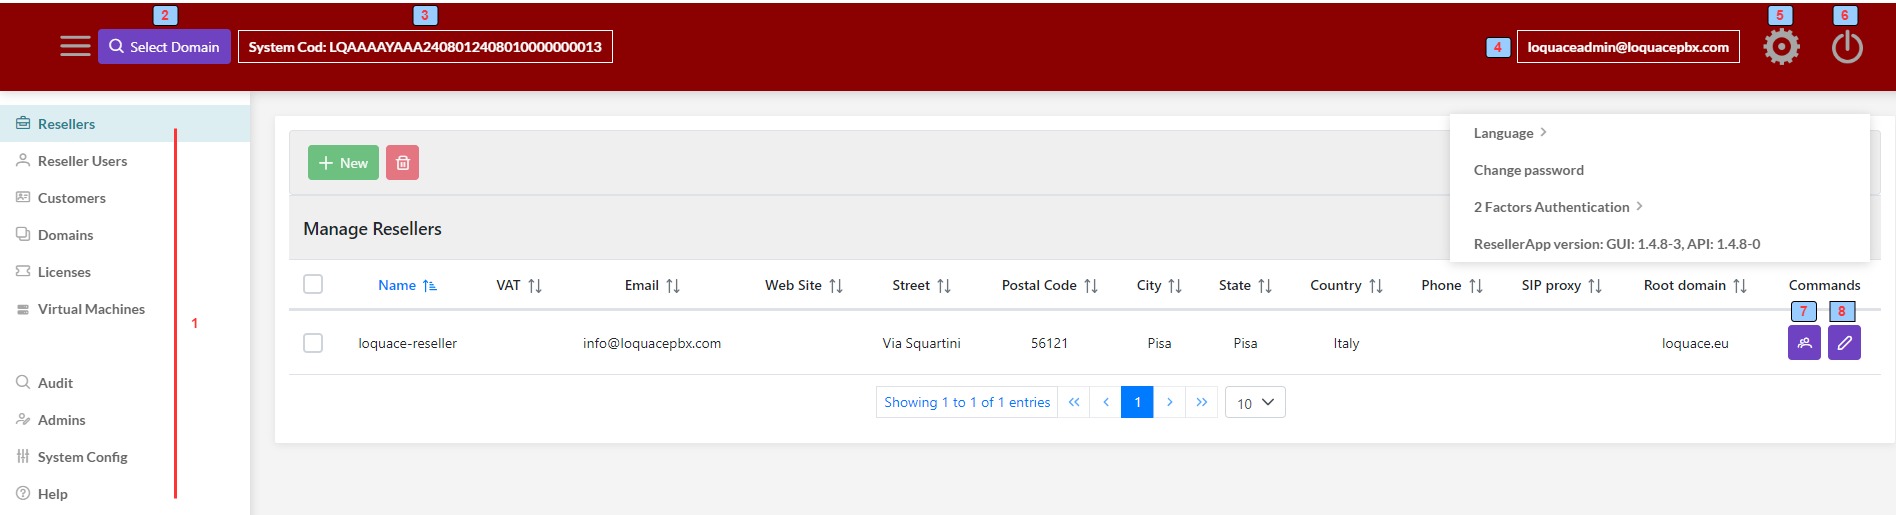
1 - Menu Bar
2 - Select Domain
3 - System Cod
4 - Admin username
5 - User settings
- language
- change password
- two factorauthentication
- app version
6 - Logout
7 - Reseller User management
8 - Reseller management
¶ Resellers
Resellers are companies that manage domains for end customers.
In single-machine On premise/Cloud deployment, there is only a Reseller and this Reseller owns all System domains.
In Loquace Cloud Ecosystem deployment, the Administrator can create several Resellers, and each Reseller owns several domains
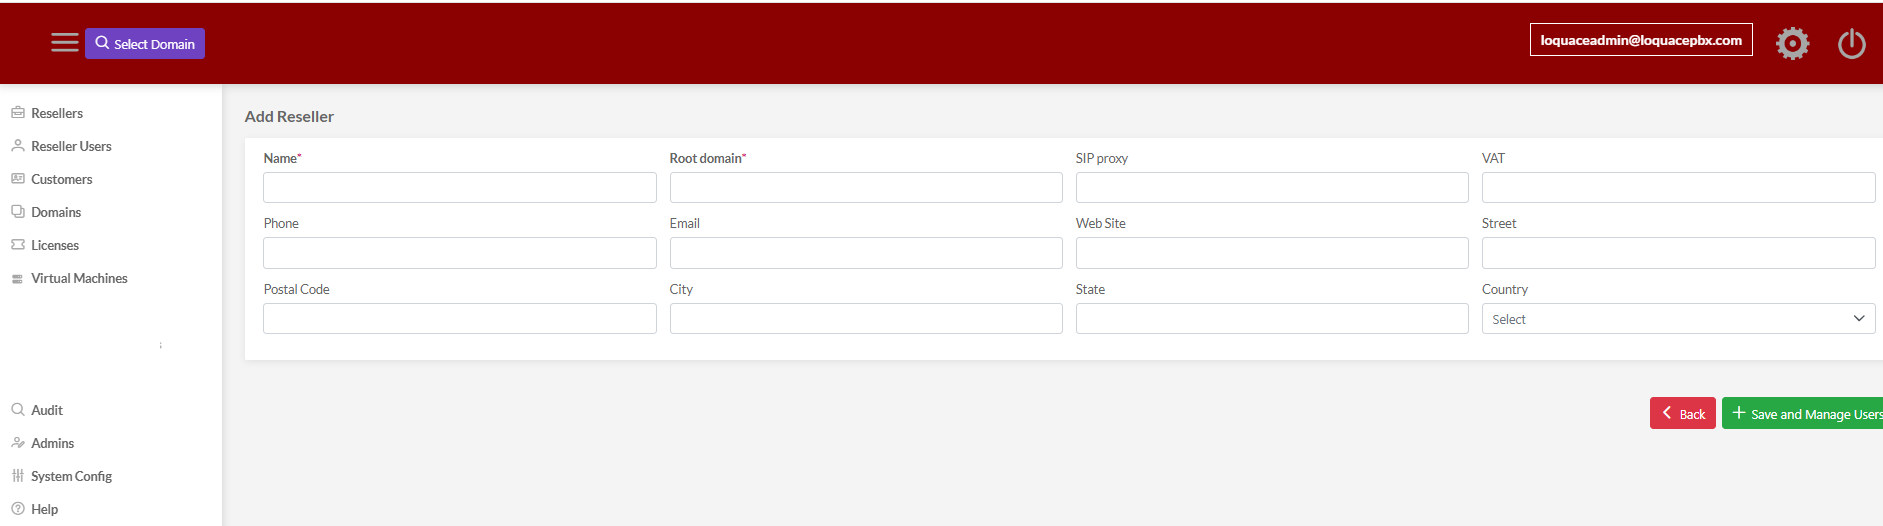
Name: The Reseller's name
VAT: The Reseller's VAT
Phone: Reseller's phone number
Email: Reseller's Email address
Web Site: Reseller's web site URL
Street, Postal Code, City, State, and Country: Reseller Address
Sip Proxy: in the case of external Sip proxy deployment architecture is the Sip proxy FQDN otherwise leave blank (default deployment)
Root Domain: the root part of the FQDN utilized to create the domains owned by this Reseller. For example, if the Reseller with the name “Reseller01” the Root domain is “loquace.net” and the “Reseller01” creates a new domain named “domain01” the FQDN will be “domain01.loquace.net”.
The Domain name, in this example “domain01.loquace.net”, does not need to have DNS resolution, these domain names are for internal Loquace management only.
For a full explanation of domain creation and name resolution refer to Creating and Managing Domains.
¶ Reseller Users
Reseller Users are the users who manage and configure Reseller's domains. A single Reseller can create several Reseller Users.
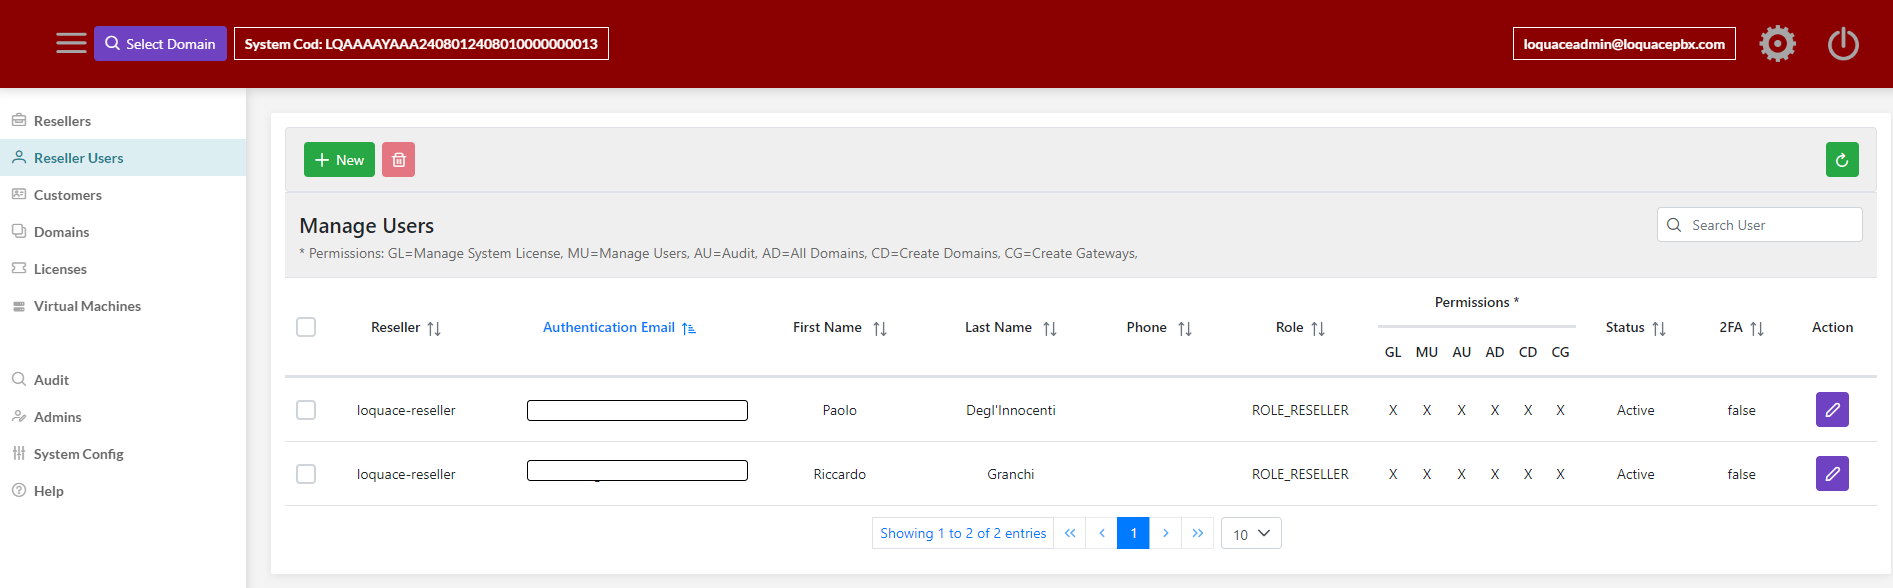
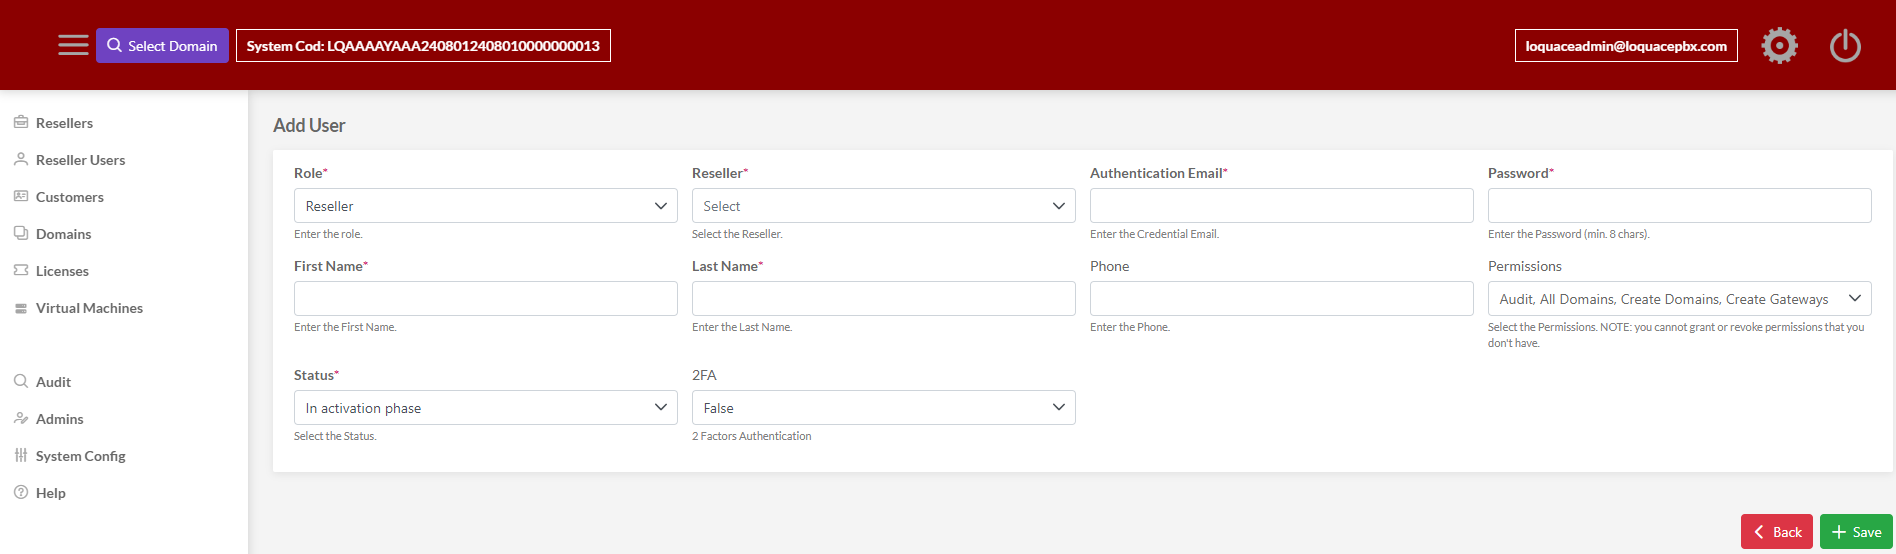
Role: User Role
- Admin: the user will be an Administrator
- Reseller: the user will be a Reseller User
Reseller: The reseller for that user
Authentication Email: The credential email (unique in the reseller App)
Password: the password for the 1st access
First Name, Last Name, and Phone: The user's name and phone number
2FA: Two Factors authentication (enable/disabled)
Permissions:
- Manage System License: the reseller user can manage the system license
- Manage Users: the reseller user can create other users
- Audit: the reseller user can access audit reporting
- Manage Users: the reseller user can create/delete domain users
- All Domains: the reseller user can manage all the domains
- Create Domains: the reseller user can create new domains
- Create Gateways: the reseller user can create new gateways
Status: When created the user will be in an “ in activation” status to let the system validate the email credential, if the email is validated the user will become “active”. If the user is in “blocked” status, the user is forbidden to log in to the Reseller App. The status ”active" can be forced in Reseller user creation to bypass email validation
¶ Customers
Customers are the companies that use the domains. A Customer can own more than one domain (e.g. a company has multiple locations and the reseller has decided to create a domain for each site)
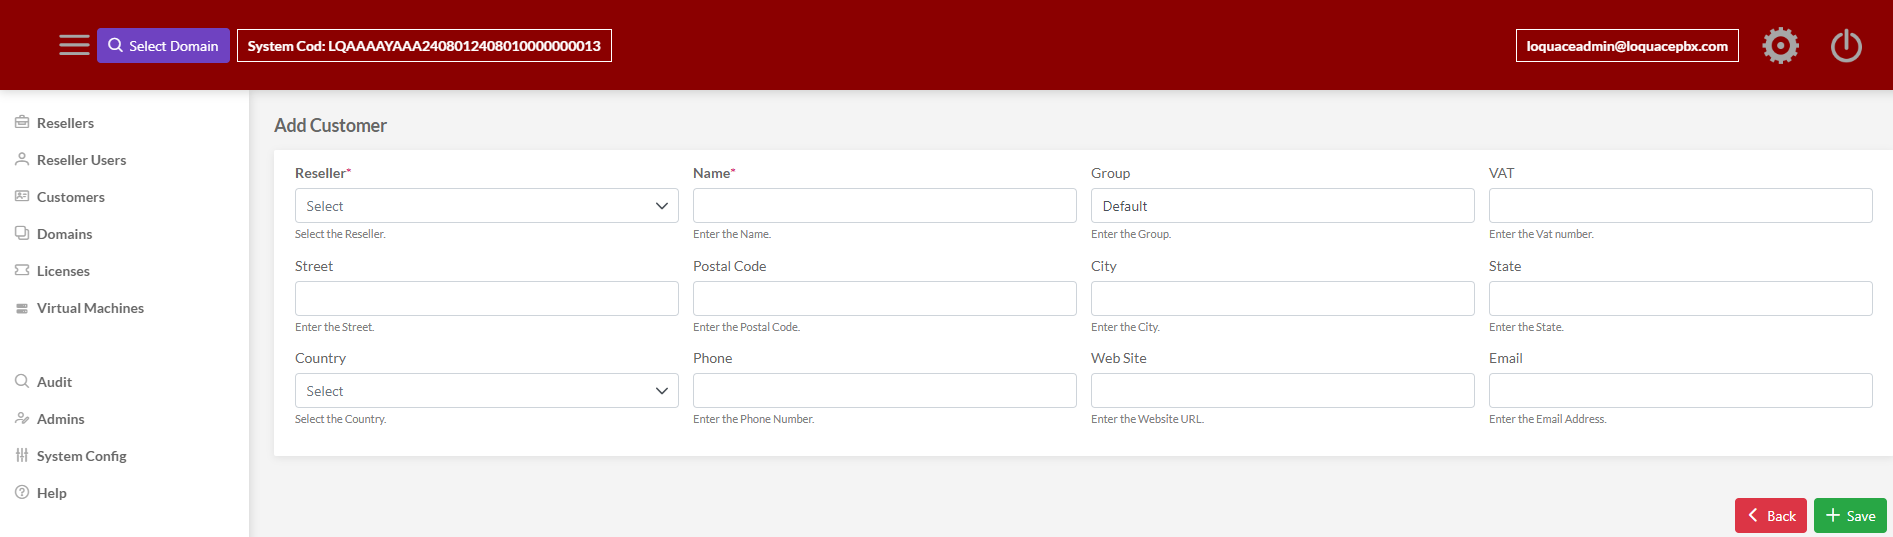
Reseller: the Reseller that owns the Customer
Name, VAT, Postal Code, City, State, Country: Customer's address
Group: A tag to group customers
Phone: Customer's phone number
Email: Customer's Email address
Web Site: Customer's website URL
¶ Domains
The Domain is the Customer's logical IpPBX and Unified Communication instance.
The Reseller User creates the domain.
¶ The domain life cycle from the Reseller User perspective
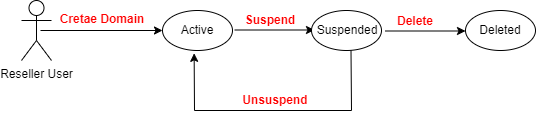
Reseller User when deletes a Domain performs a logical delete. The Domain remains in the system but is not accessible to the Customer and is not more visible to the Reseller User.
¶ The domain life cycle from the Administrator's perspective
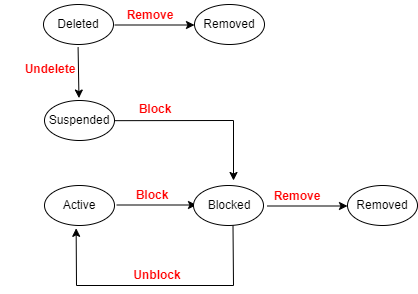
When the Administrator removes a deleted domain, the domain is removed from the system.

Name: Domain name
Status: Domain Status
Reseller: The Reseller that owns the domain
Customer: The Customer that owns the domain
Group: The Group the Domain belongs
FS VM: The Domain FreeSwitch VM ID
XMPP VM: The Domain XMPP VM ID
UCS VM: The Domain Unified Communication engine System VM ID
Sip Proxy: The Sip Proxy if deployed (generally NULL)
Note: A string note
Create date: The Domain creation date
Last Update: Last Update date
Last Update By: The administrator or Reseller User who made the last Domain update
In the Loquace Cloud Ecosystem deployment modules can be installed on multiple servers

Name: The Domain Name
Group: The Domain Group
Address: The Domain Address
Customer: The Customer's Domain
Action: The Action the Administrator can perform to the Domain depending on the Domain status
¶ License
The Form to load and activate the license file (applicable only in On-premise/Single Machine Cloud deployment)
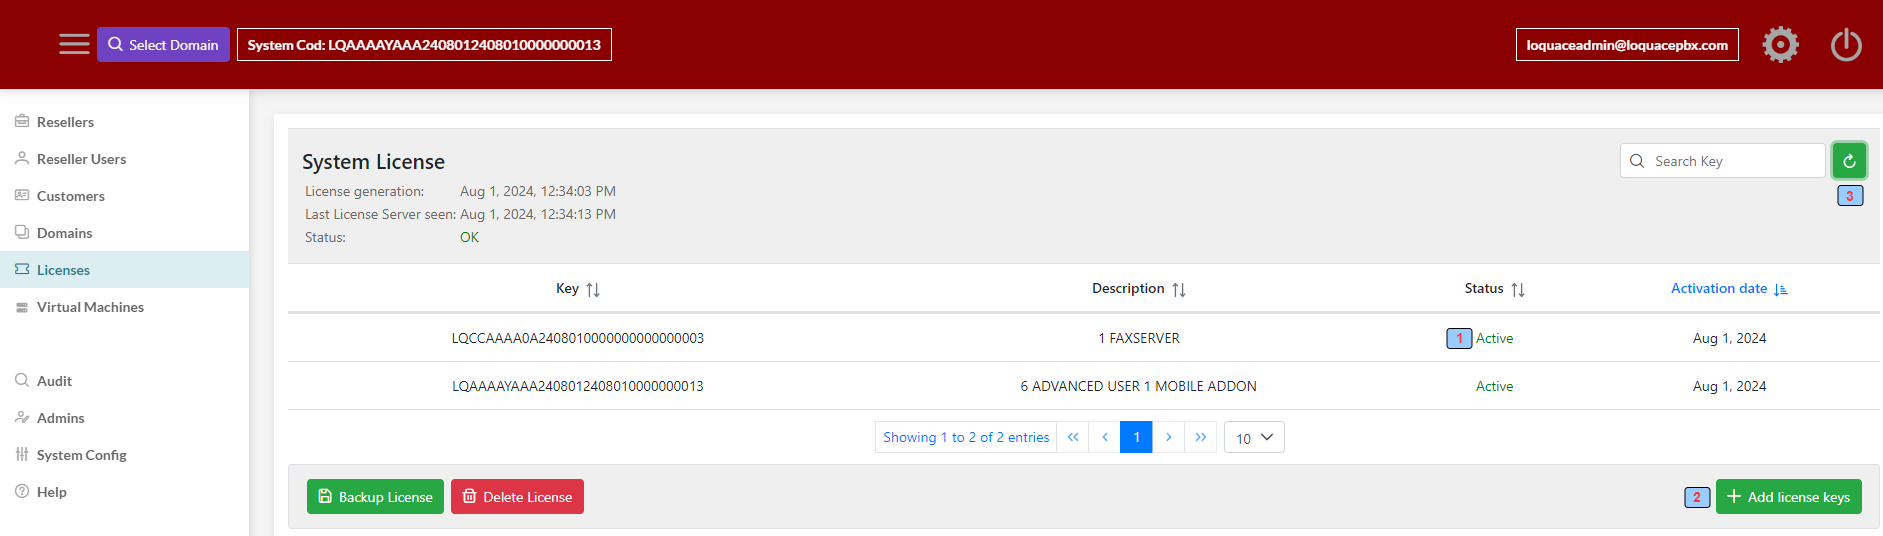
1 - The key has been successfully validated
2 - The "Add License Keys" button is enabled. You can upload new keys because the validation process is complete.
3 - Update license status. The license status is also validated in the background.
For a full explanation of license management refer to Reseller App License Management.
¶ Virtual machine
In Single-Server/On-Premise Cloud deployment all the Loquace modules are embedded into the single PC/Server/VM, there is only a Reseller and this Reseller owns all System domains.
In Loquace Cloud Ecosystem deployment modules can be installed into multiple Servers/VMs. Each Reseller can create several Reseller Users. Each Reseller User can manage only the domains owned by his Reseller, these domains can be distributed into several VMs.
For a full explanation of license management refer to Loquace Architecture.
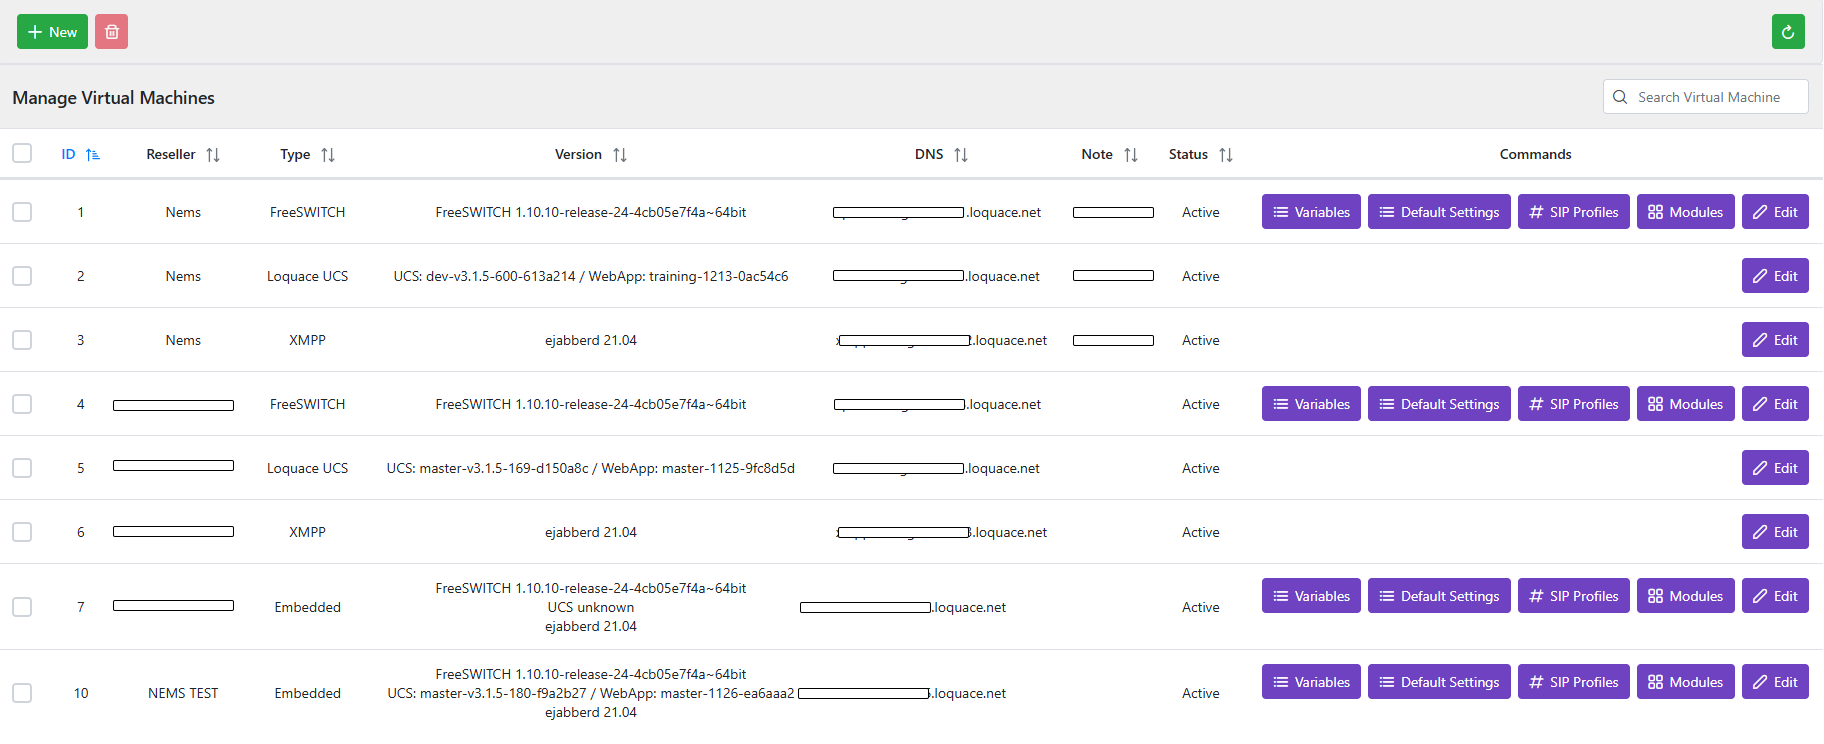

ID: The VM ID
Type: The VM type (type “Embedded” = Freeswitch, XMPP, and Loquace UCS modules are installed into the same VM)
Reseller: The Reseller that owns the VM
Note: A string note
Status: The VM status
Commands: The Commands that can be applied depending on the VM type in particular form FreeSWITCH VM:
- Variables: Freeswitch Variable management
- Default Settings: Default settings management for tenants(domains). These variables can be overridden for the specific domain in the "Domain Settings" section of the domain configuration
- Sip Profile: Freeswitch Sip Profile management
- Modules: Freeswitch module management
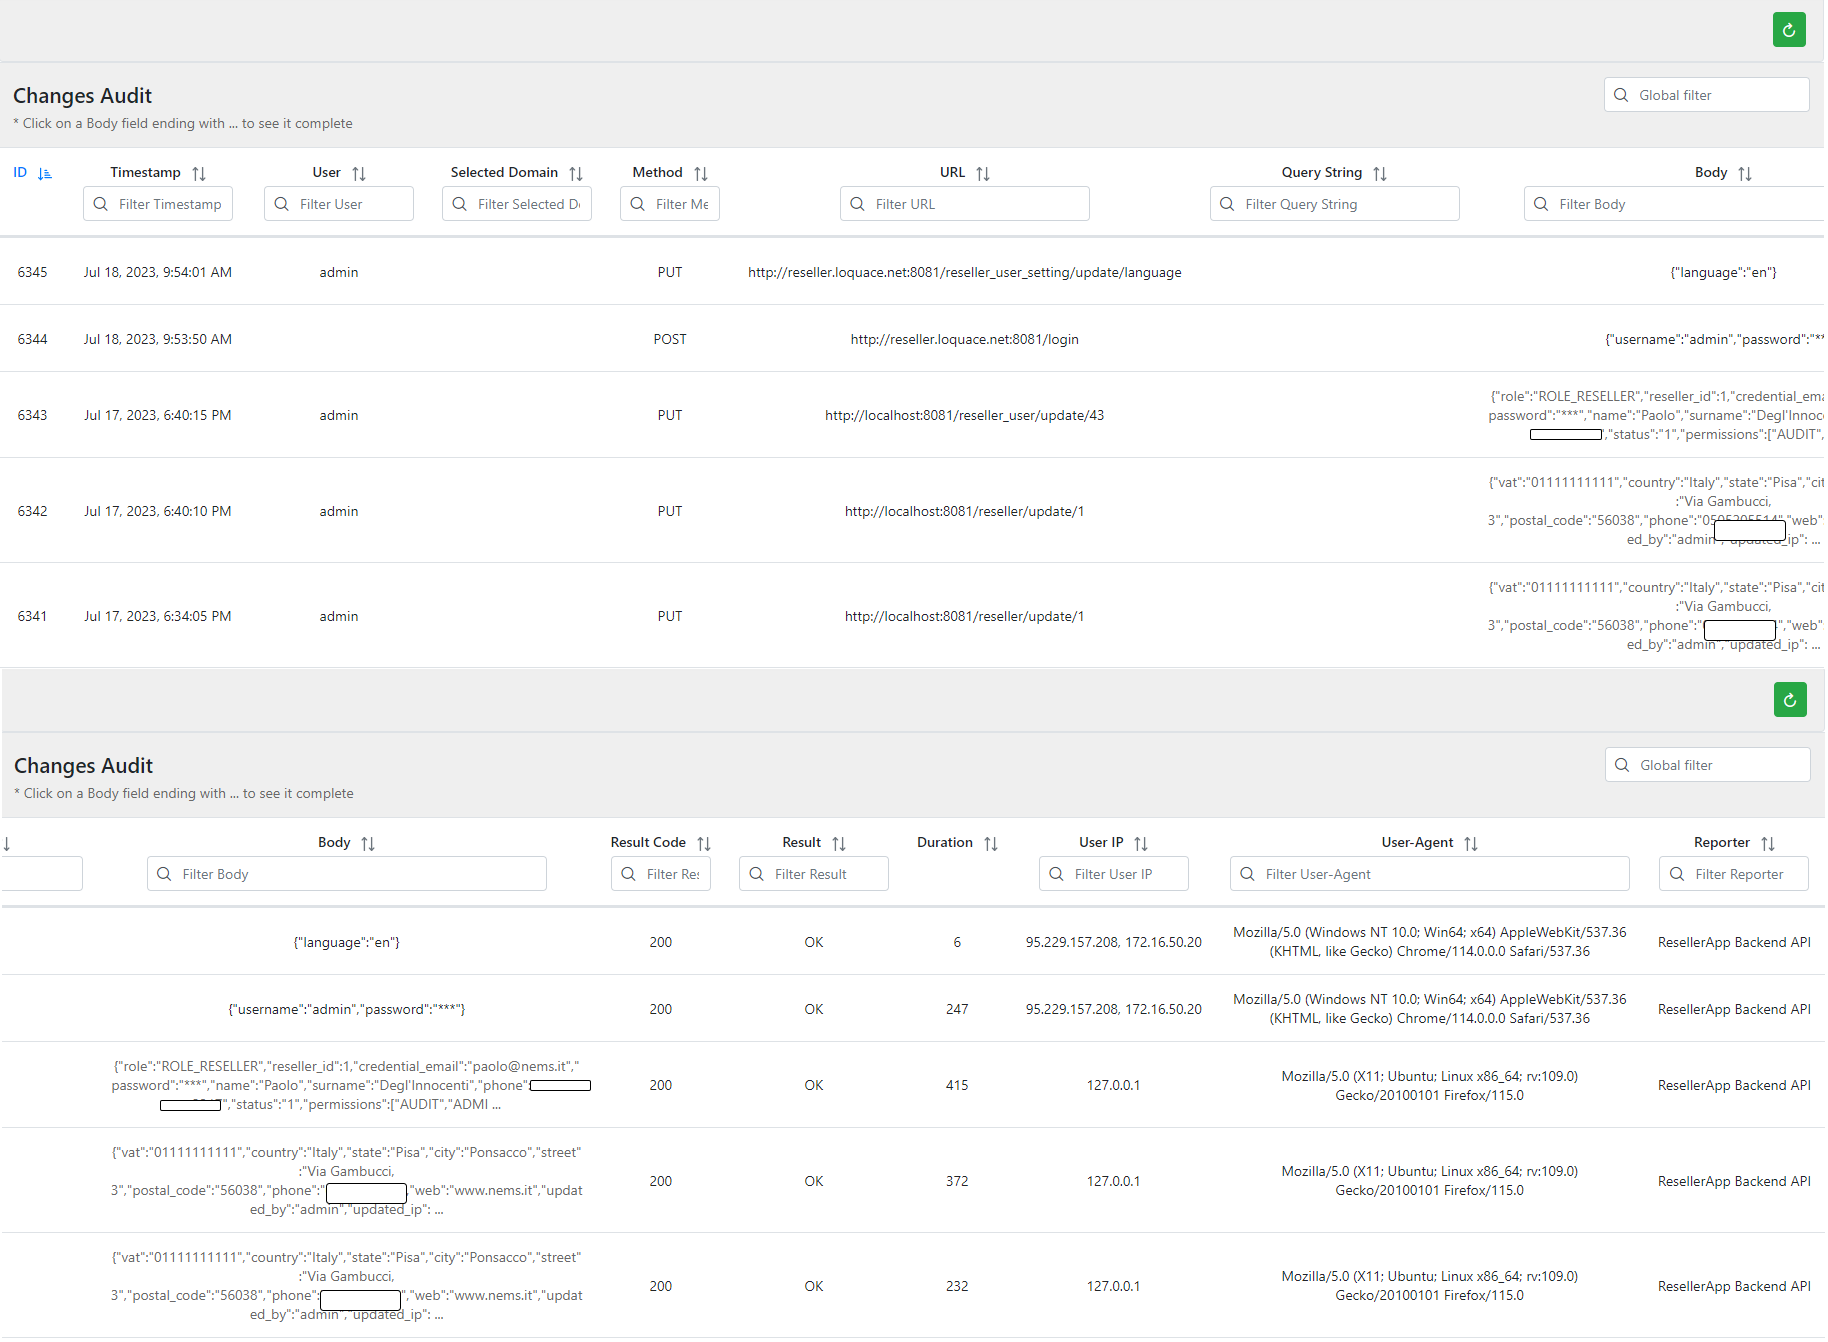
¶ Audit
The panel for monitoring system configuration changes made by Administrators or Reseller Users
¶ Admins
The form to create/manage administrator users.
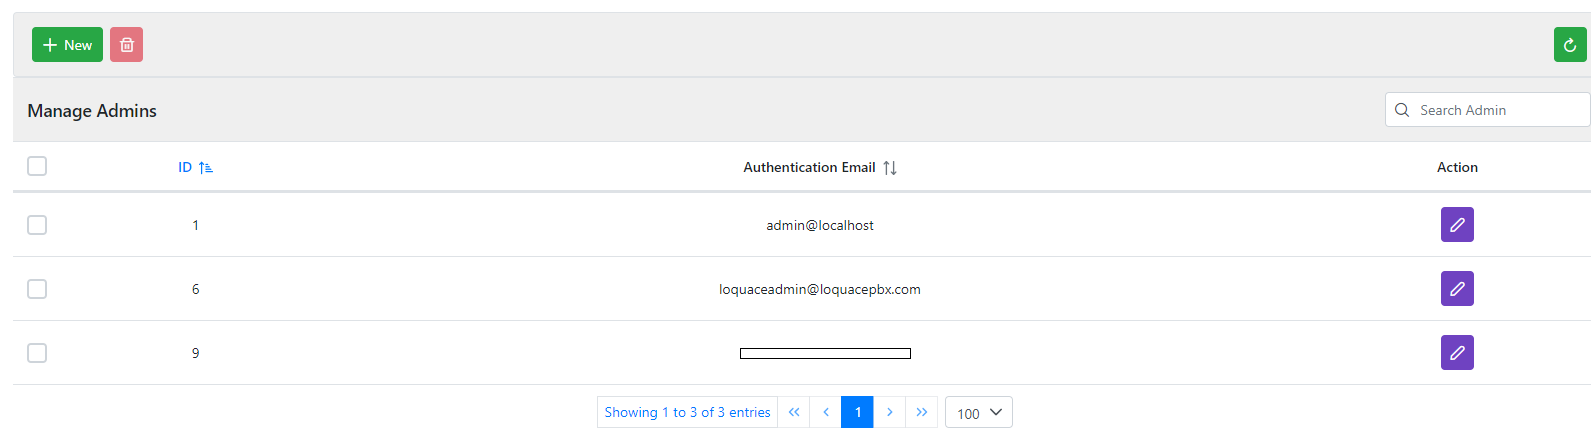
¶ Add Admin

¶ Reseller Role - Reseller Main Window
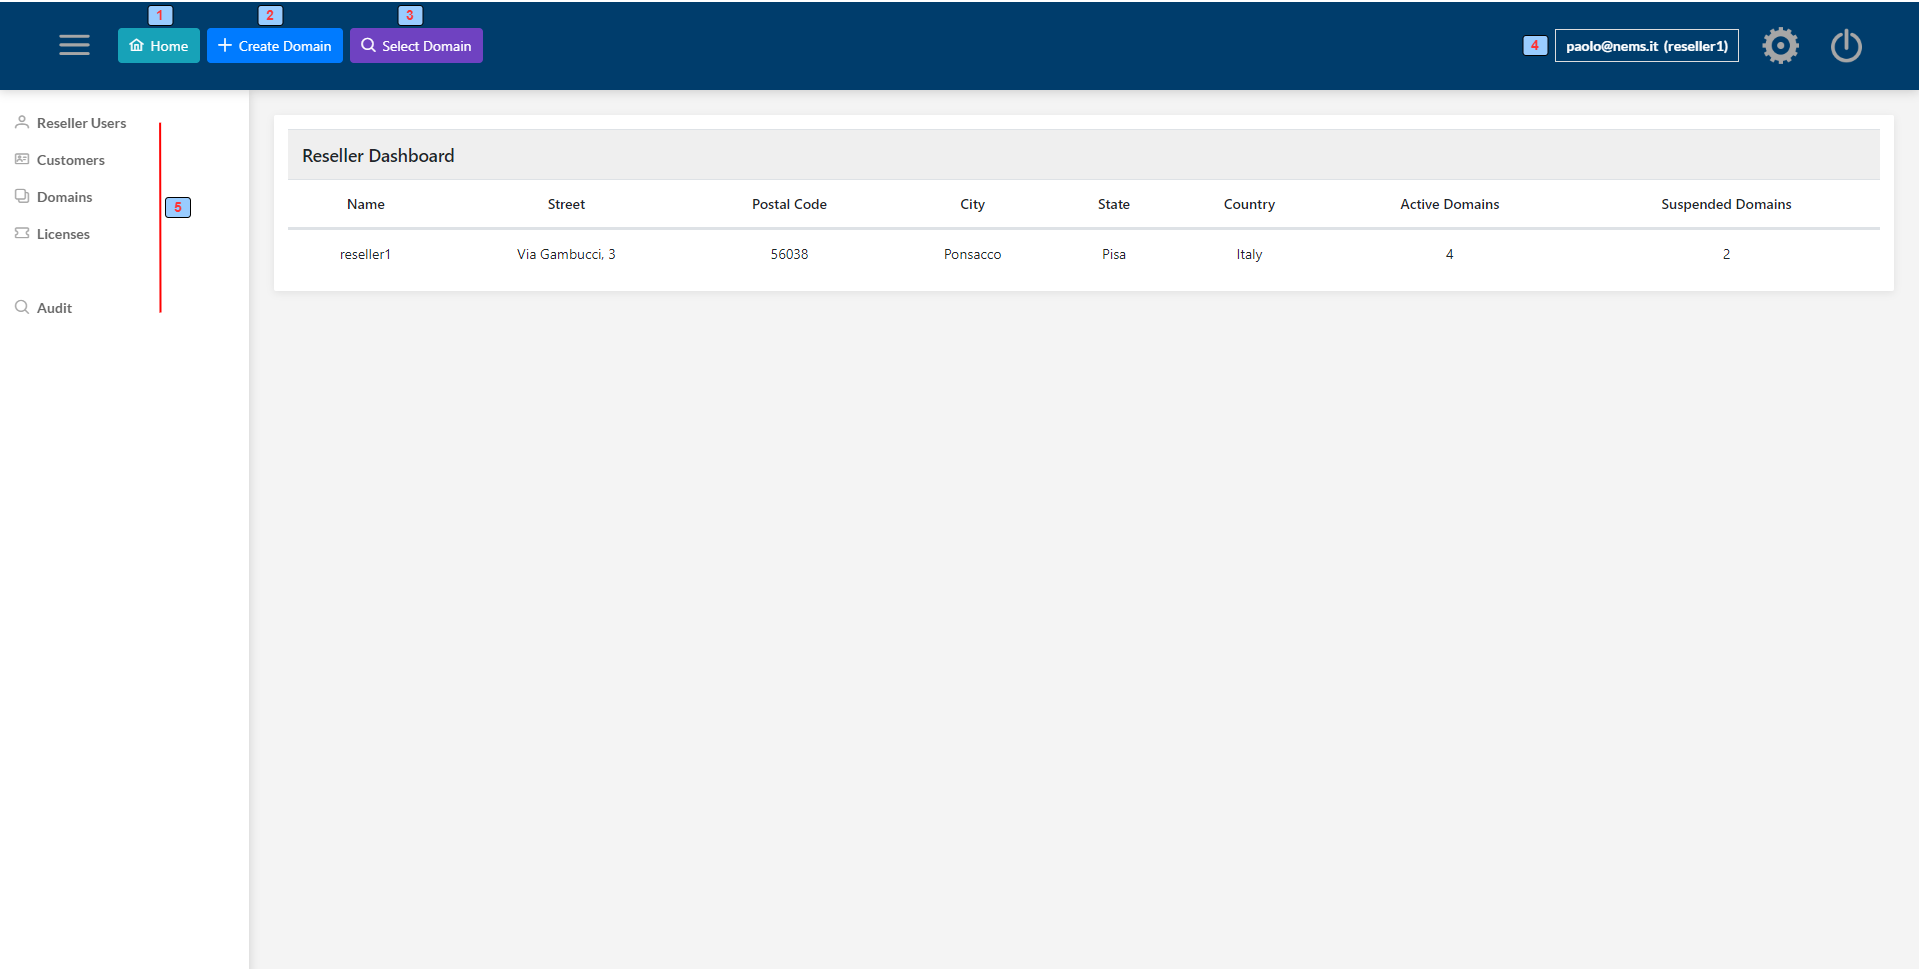
1 - Home Window
2 - Create Domain
3 - Select Domain
4 - The Reseller User (Reseller)
5 - Menu Bar
¶ Create Domain
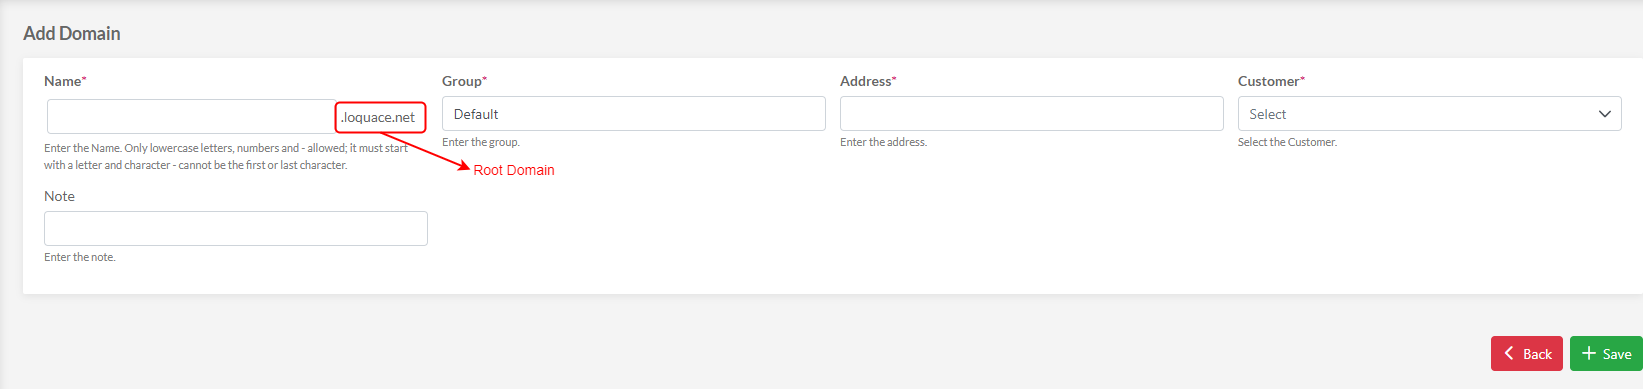
Name: The Domain name
Group: The Domain group
Address: The Domain address
Customer: The Customer that owns the Domain
Note: A description note
Creating subsequent domains depends on the type of purchased license.
For a full explanation of domain creation and management refer to Domain Creation and Management.
¶ Select Domain

Select the row corresponding to the domain to configure.
¶ Menu Bar
The same functionalities described in the section relating to the Administrator User, with the constraint of operating within the context of the Reseller
¶ Domain Configuration Dashboard
When the Reseller User has selected a domain, the Reseller App switches to the domain configuration context.
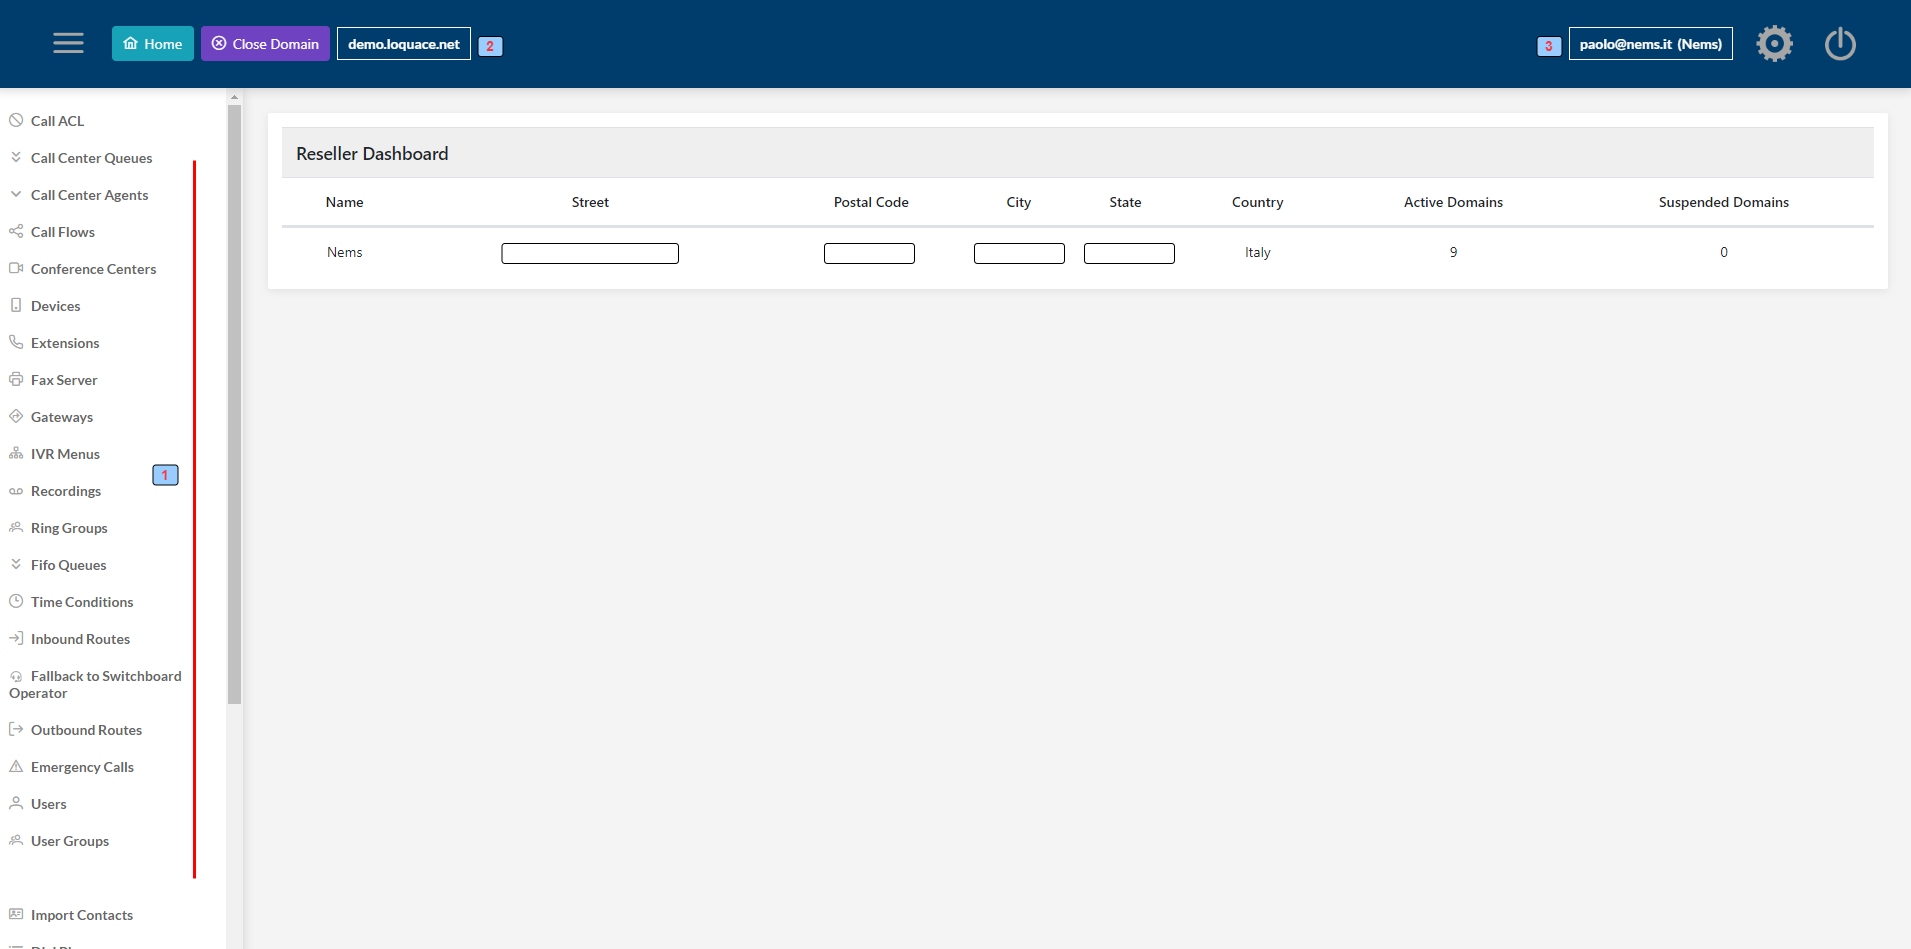
1 - Domain Configuration Bar
2 - The Selected Domain
3 - The Reseller User (Reseller)
Name, Street, Postal Code, and Country: Reseller address
Active Domains: The number of active domains
Suspended Domains: The number of suspended domains
¶ Relationship between users, extensions and devices
User: The user of a Loquace System domain
Extension: The internal PBX dial plan number (User phone number, IVR number, Time Condition number, etc.)
Device: The device corresponding to the Extension
Each User corresponds to only one Extension.
Each User corresponds to one or more devices.
The Device has a type:
- Ip Phone
- WebRTC (the browser softphone embedded into Loquace Web App)
- Loquace Mobile (Smartphone App)
Loquace Users can select which device or devices are enabled to receive calls or to manage “click and dial” Web call
¶ Users

1 - Create new User
2 - Import Users from the CSV file
3 - Export Users to CSV file
4 - Delete selected Users
5 - Edit the User Outbound Routes
4 - Edit the User
¶ Add User
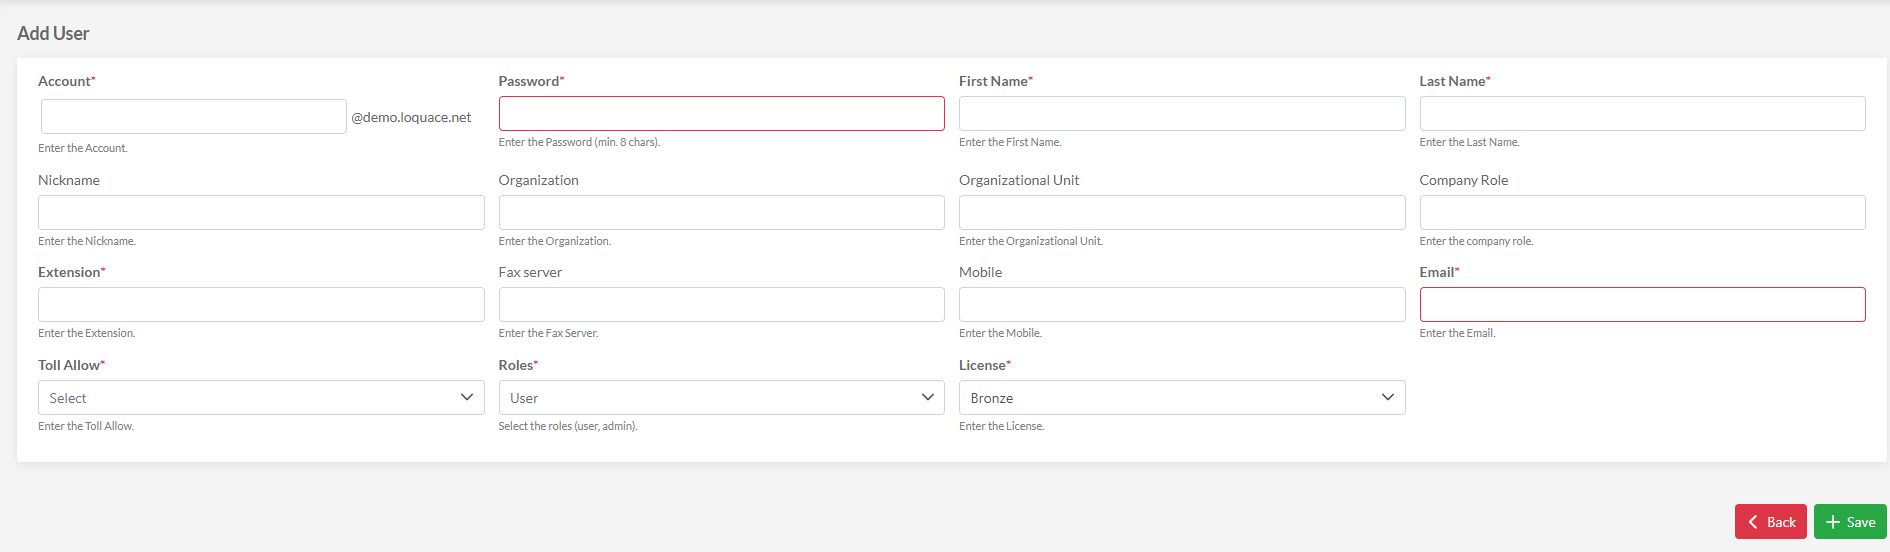
Account: The User credential
Password: The Password
First name, Last Name, Nickname, Organization, Organization Unit, Company Role, and Mobile: The User information
Extension: The User Extension. It must be unique in the domain. if it not exists it will be created
Fax server: The User Extension. if it not exists it will be created
Email: The User Email (unique in the domain) utilized for the recovery password procedure
Toll Allow: The User Toll Allow
Roles: The User Role
- User
- Administrator - The User can access to “Telco Manager”
License: The User license
¶ Extensions
In this case, by extension it means the internal dial plan user phone number, and the relative Ip Phone device provisioning settings
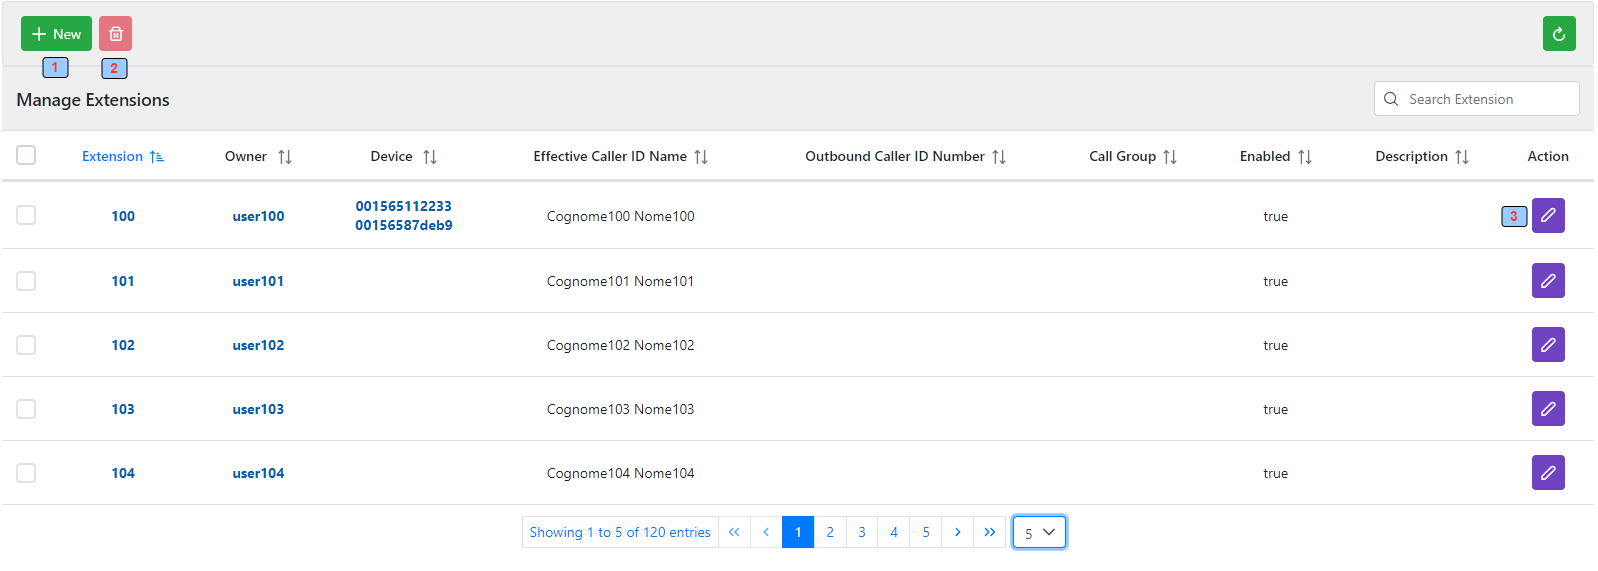
1 - Create new Extension
2 - Delete selected Users
3 - Edit the Extension
Owner: The User that owns the Extension
Device: Devices Mac Address relating to the Extension (utilized in Ip Phone provisioning procedure). In this example, Extension 100 is provisioned to two different Ip Phones.Only Ip Phones are provisioned by Mac Address, WebRTC softphone, and Loquace Mobile App are automatically provisioned by the system
Effective Caller Id: The Extension internal caller ID number
Call Group: The Extension Call group
Enabled: True/False
Description: Description note
¶ Add Extension
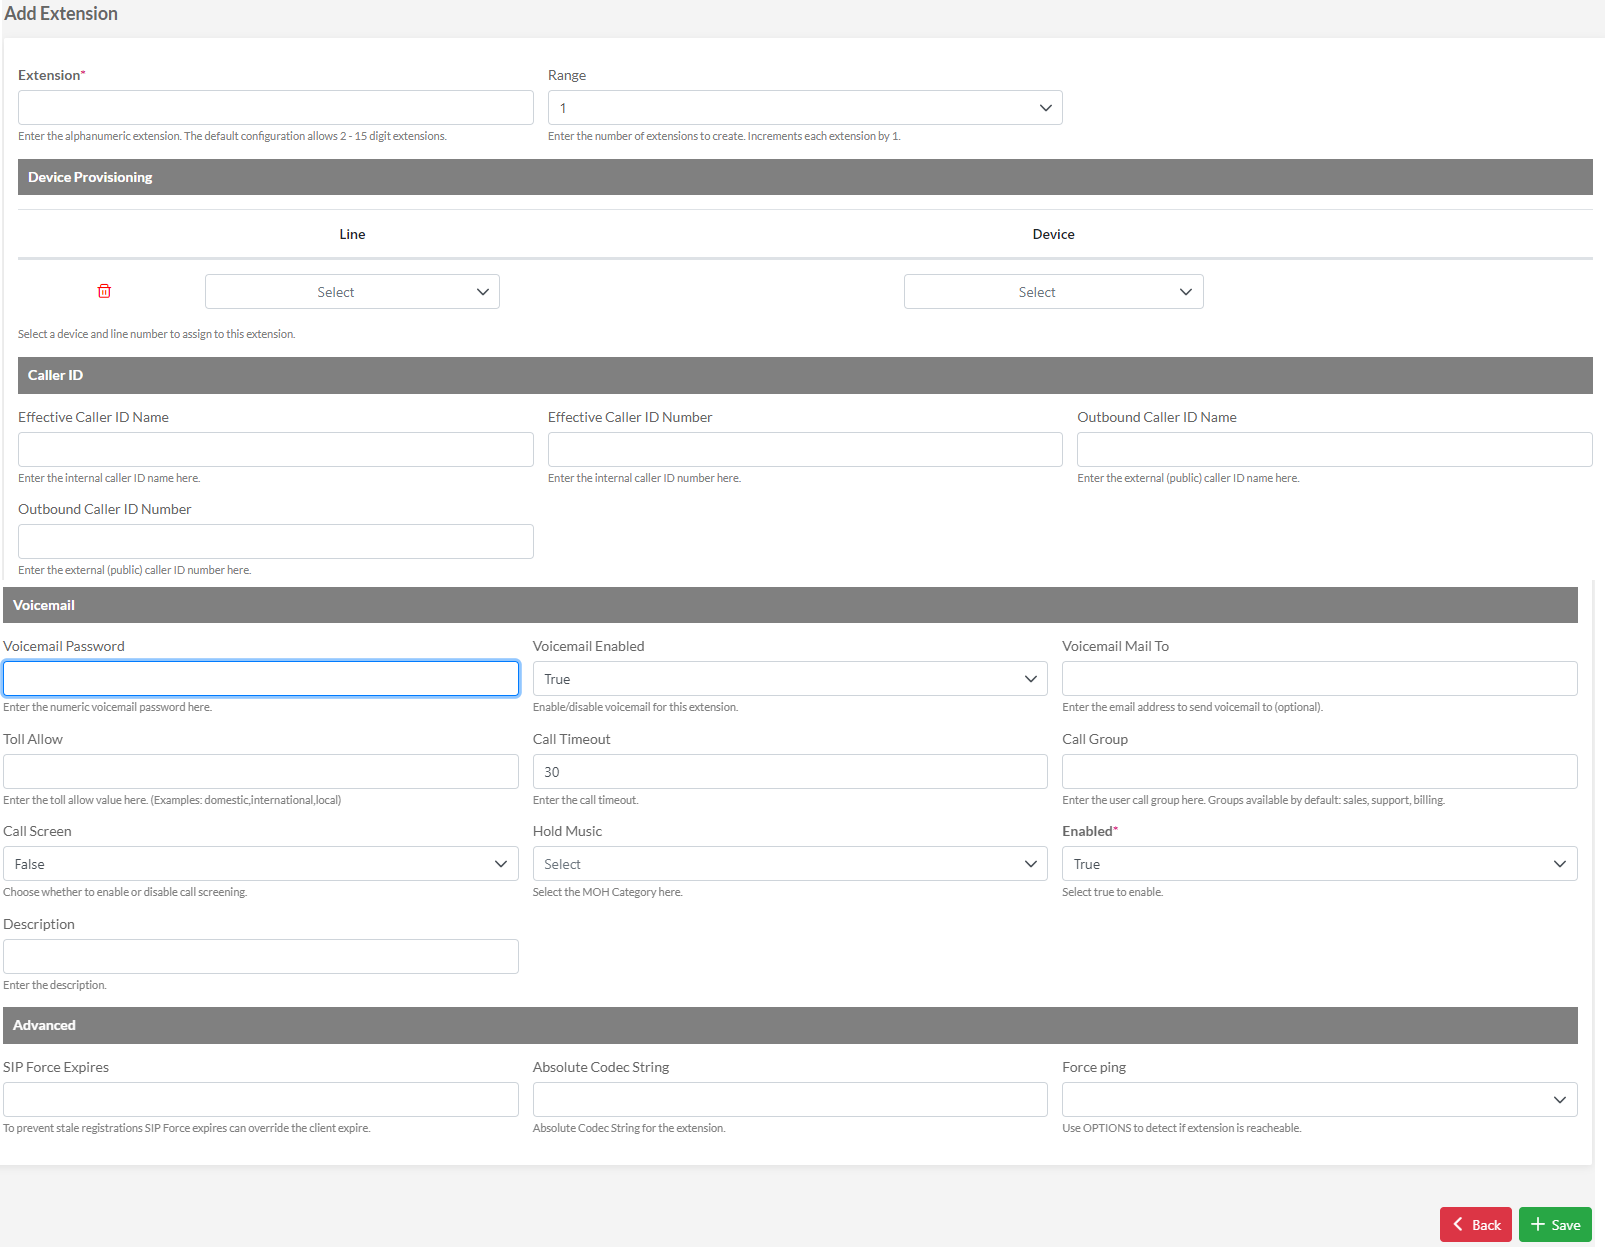
Extension: The Extension
Line - Device: The provisioning settings for this extension
Effective Caller ID Name : The Caller ID name for internal calls
Effective Caller ID Number : The Caller ID number for internal calls
Outbound Caller ID Name : The Caller ID name for external calls
Outbound Caller ID Number : The Caller ID number for external calls
Voicemail Password: The voicemail password
Voicemail Enabled: True/False
Voicemail To: Another email to send a voicemail message to (voicemail messages are sent to extension owners by default)
Toll Allow: The Extension Toll Allow
Call Timeout: The extension ring timeout (in seconds)
Call Group: The extension call group (used to call intercept)
Call Screen: If Yes the caller is asked to identify himself. Their response will be recorded and offered to the person receiving the call (for inbound calls)
Hold Music: The extension hold music
Enabled: True/False
Description: Description note
Sip Force Expires: Force client Sip expire time (in seconds)
Absolute Codec String: Absolute Codec String for the extension
Force Ping: Use Sip OPTIONS to detect if extension is reacheable
¶ Devices
Devices are IP Phones identified by their Mac Addresses to be associated with the respective extensions and provisioned by the Loquace system
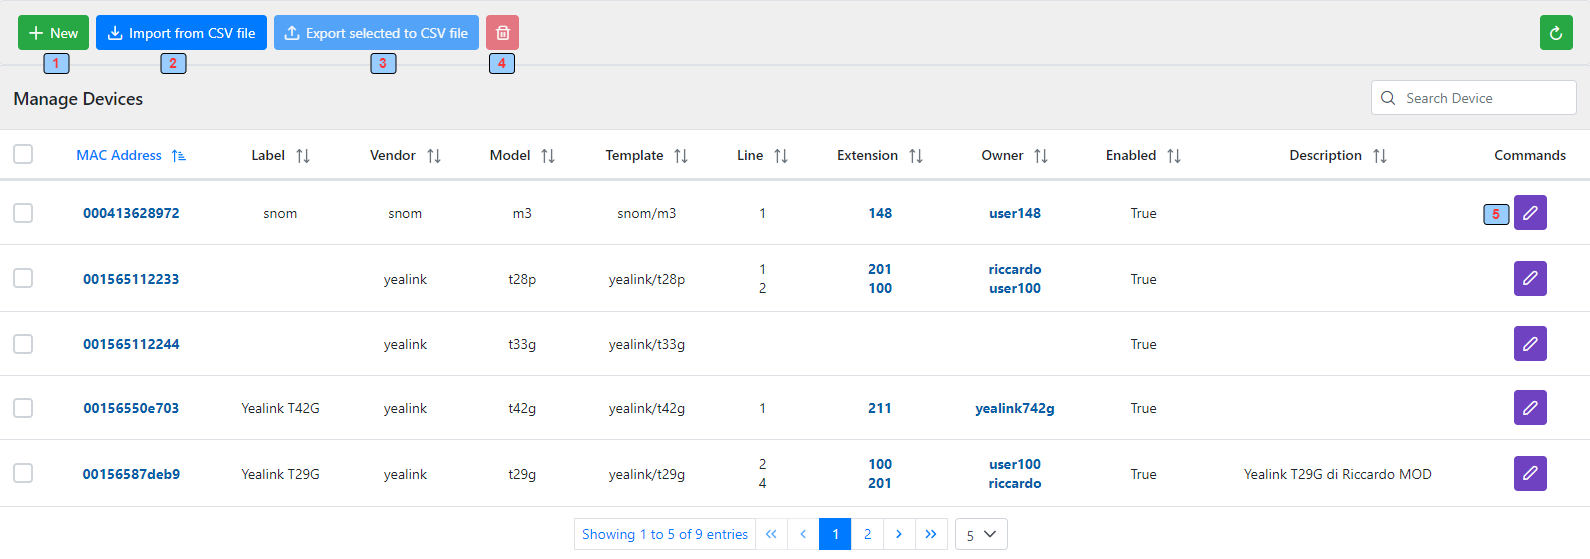
1 - Create a new Device
2 - Import Devices from CSV file
3 - Export Devices to CSV file
4 - Delete selected Devices
5 - Edit the Device
Mac Address: The Device Mac Address
Label: A label
Vendor: Device Vendor
Model: Device Model
Template: Device Template
Line: The Device line to be associated with the extension
Owner: The User that owns the Device
Enabled: True/False
Description: Description note
For a full explanation of domain creation and management refer to Phone Provisioning.
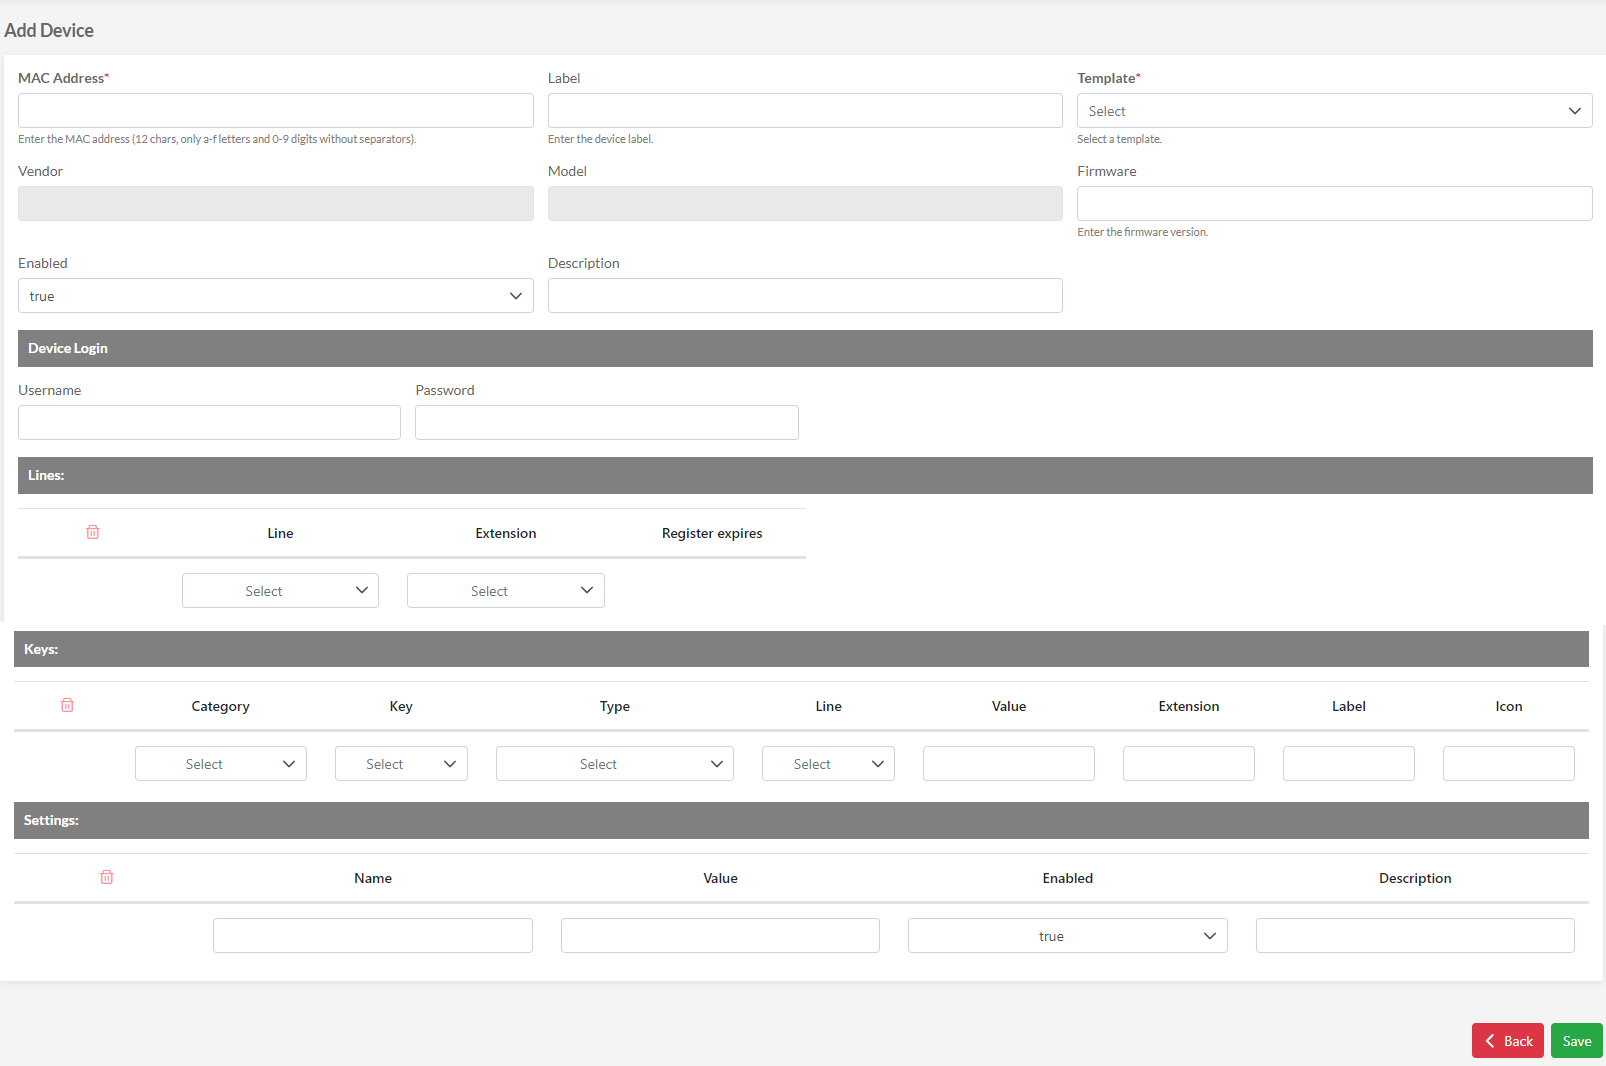
¶ Add Device
¶ Call Acl
CALL Acl allows you to manage a list of rules to filter incoming calls.
The policy of each rule can be Allow (the call is allowed) or Deny (the call is not allowed).
In each rule, the calling and called numbers can be regular expressions.
In the case of the Allow policy, only the Caller Number will be allowed to call that Called Number.
The rules are evaluated from top to bottom.
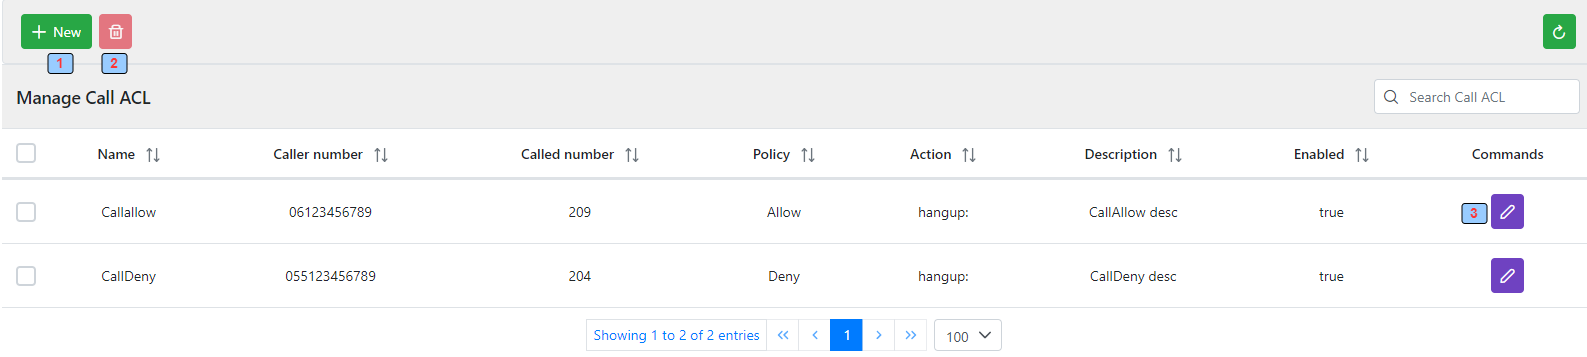
1 - Add a new call block record
2 - Delete selected call block records
3 - Edit selected call block record
¶ Add Call Acl
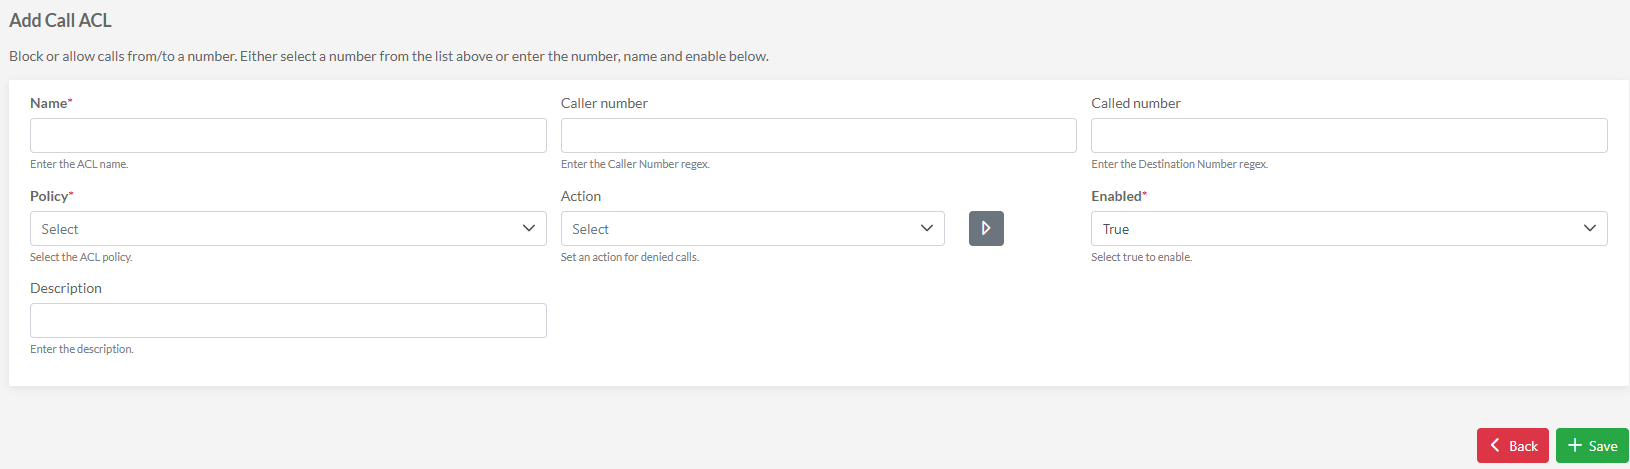
Name: Name of this rule
Caller Number: The caller number
Called Number: The called number
Policy: Allow or Deny
Action: The action to perform when the rule is matched
Enabled: Enable/Disable the call block
Description: Record description
¶ Call Flow
The Call flow is a dial plan 2-way switch (es. switch dial plan from day/night). It is activated/deactivated by dialling a feature code.

1 - Add a new call flow record
2 - Delete the selected call flow records
3 - Edit the selected call flow record
¶ Add Call Flow
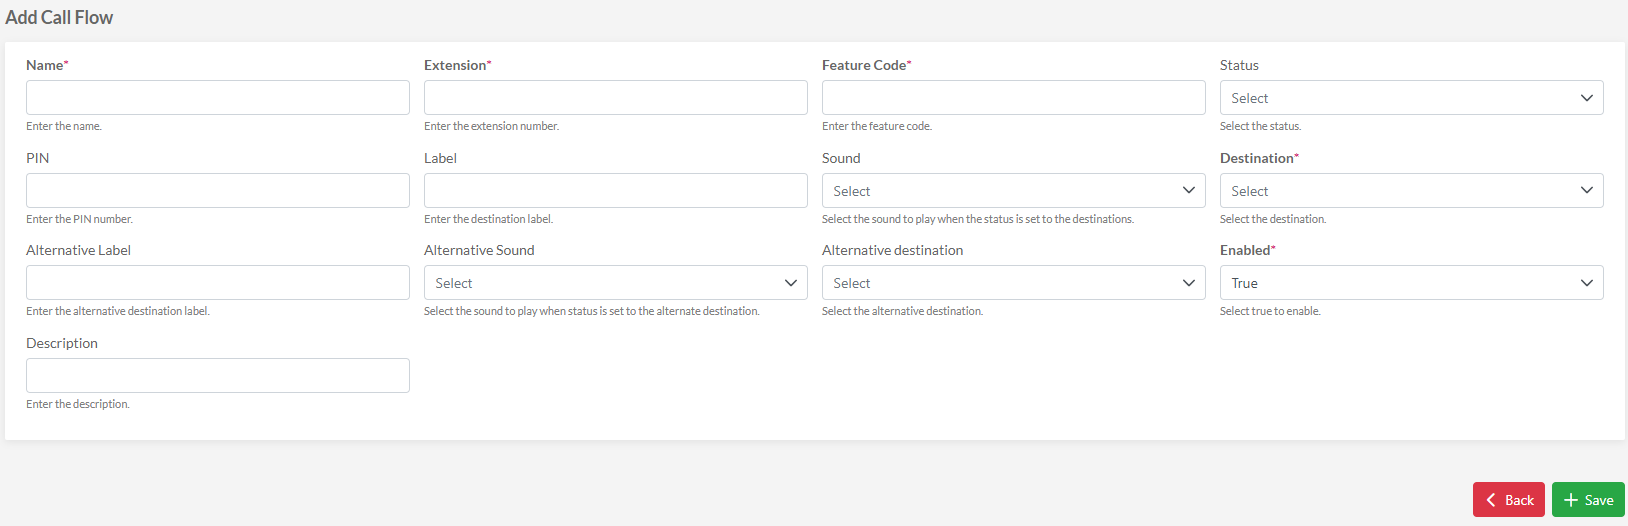
Name: The Call flow name
Extension: The Call flow Extension (dial plan extension number/string)
Feature code: The dial plan number/string to dial to switch
Status: The Call flow record status (true/false)
Pin: The PIN number to enter when dialing the function code
Label: The Label of the main destination
Sound: The Sound to play to confirm that the main destination is activated
Destination: Main call flow destination
Alternative Label: The alternative destination Label
Alternative Sound: The Sound to play to confirm that alternative destination is activated
Alternative Destination: The Alternative call flow destination
Enabled: Enable/disable the call flow
Description: The Record description
¶ Call Center Queues
The call center module provides call center functionality by distributing calls to agents using various scenarios and rules. A score-based system is used to distribute inbound calls. The callcenter application also has a tiered system for creating different agent 'priorities' as needed.

1 - Add a new call center queue record
2 - Delete the selected call center queue records
3 - Edit the selected call center queue record
Name: The call center queue name
Extension: The call center queue Extension (dial plan extension number/string)
Strategy: The call center queue strategy
Tier Rules Apply: Enable/disable tier roule
Description: The Record description
¶ Add Call Center Queue
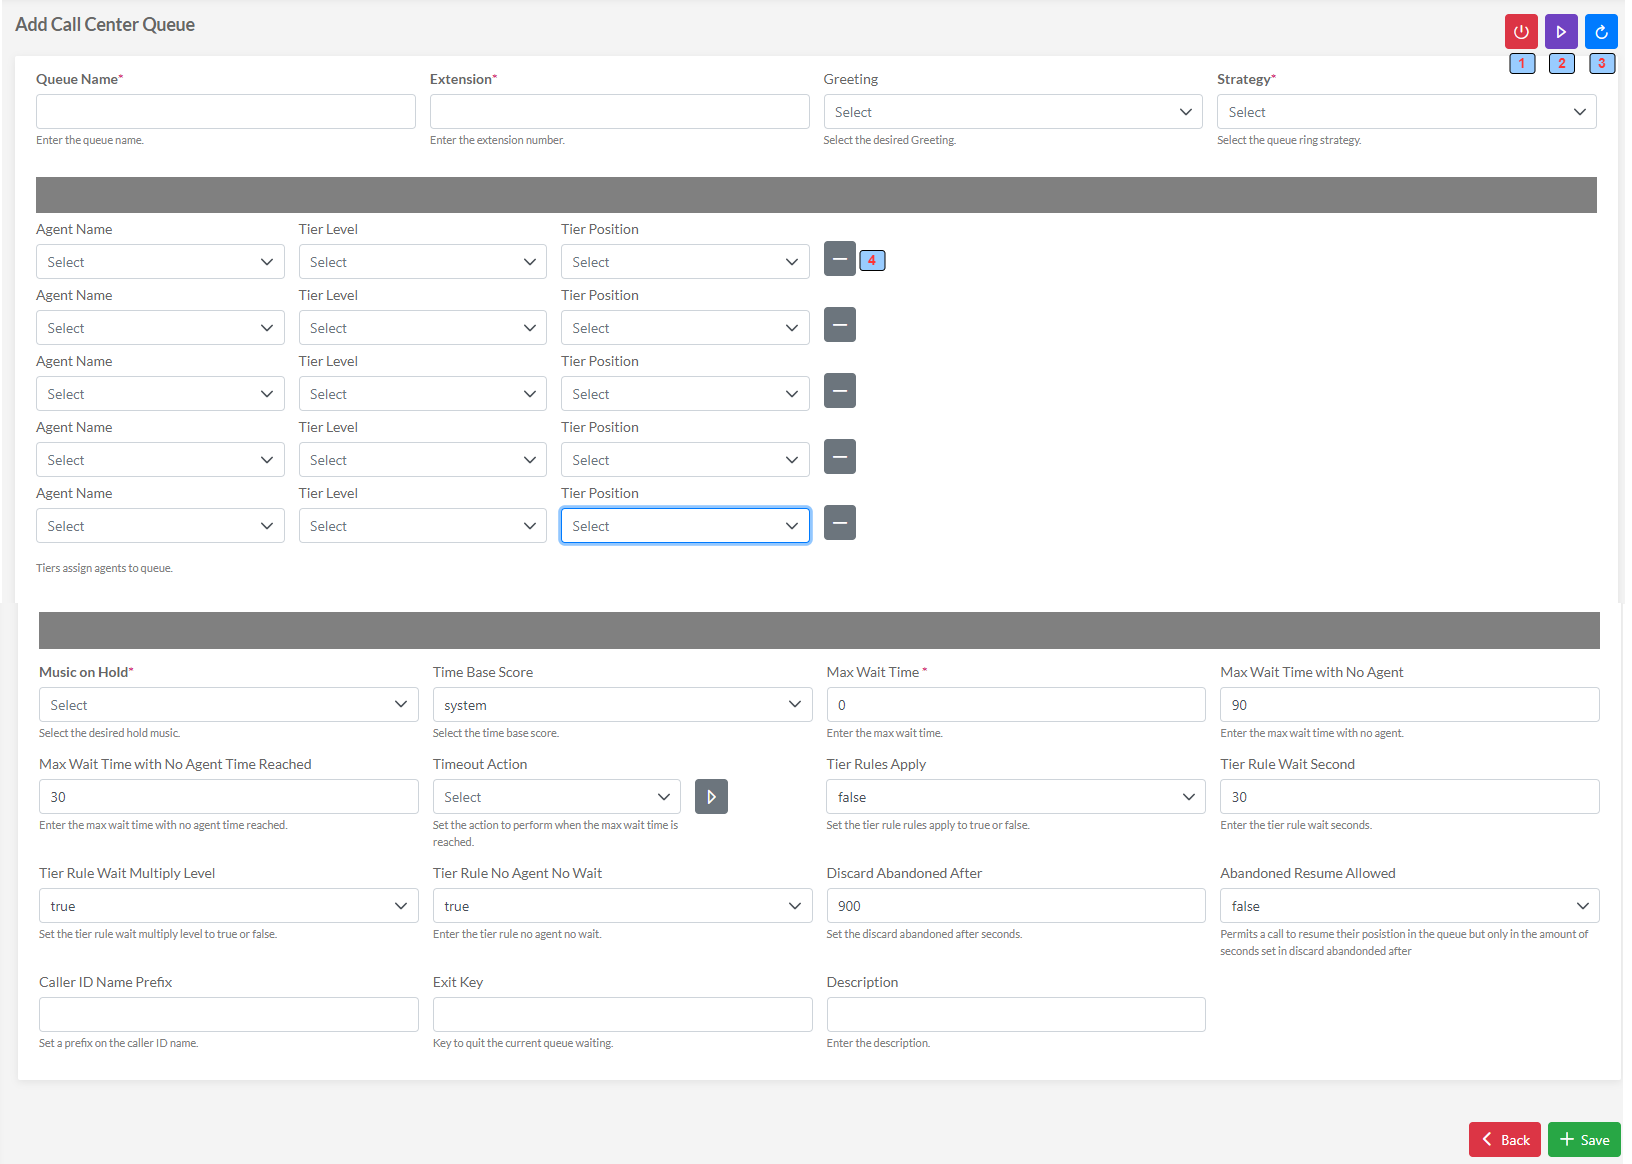
Name: The call center queue name
Extension: The call center queue Extension (dial plan extension number/string)
Greeting: The call center queue greeting
Strategy: The call center queue strategy:
- Agent With Least Talk Time: Rings the agent with the least talk time
- Agent With Fewest Calls: Rings the agent with the fewest calls
- Longest Idle Agent: Rings the agent who has been idle the longest taking into account tier level
- Ring All: Rings all agents simultaneously
- Random: Rings agents in random order
- Ring Progressively: Rings agents in the same way as top-down, but keeping the previous members ringing (it basically leads to ring-all in the end)
- Round Robin: Rings the agent in position but remember the last tried agent
- Sequentially By Agent Order: Rings agents sequentially by tier & order
- Top Down: Rings the agent in order position starting from 1 for every member
4 - Add/Remove an agent from the queue
Agent Name: The agent
Tier Level: The agent tier level
Tier Position: The agent tier level position
Music on Hold: The queue music played to callers
Time Base Score:
- Queue: The caller in queue time will start. If the caller goes to another queue the time will start over.
- System: The caller in the queue will have their wait calculated as soon as they enter the system. If a caller chooses the wrong queue, when they get to the correct queue the timer won’t start over again.
Max Wait Time: Default to 0 to be disabled. Any value are in seconds, and will define the delay before we quit the callcenter application IF the caller haven't been answered by an agent. Can be used for example for sending call in voicemail if wait time is too long
Max Wait Time With No Agent: Default 90 sec. Enter the max wait time with no agent. Timeout Action will be used if there are no agents available
Max Wait Time With No Agent: Time Reached: Default to 5. Any value are in seconds, and will define the length of time after the max-wait-time-with-no-agent is reached to reject new caller.
Time Out Action: Set the action to perform when the max wait time is reached
Tier Rule Apply: Can be True or False. This defines if we should apply the following tier rules when a caller advances through a queue's tiers. If False, they will use all tiers with no wait
Tier Rule Wait Second: The time in seconds that a caller is required to wait before advancing to the next tier
Tier Rule Wait Multiply Level:
- True: The amount of seconds the caller waits until the next tier. This value will increase(multiply) if Tier Rule Wait Multiply Level is marked true
- False: Tier Rule Wait Multiply Level is marked false then after the set amount of seconds pass the tiers in order will execute with no wait
Tier Rule No Agent Wait:
- True: Callers will skip tiers that don't have agents available
- False: Callers are be required to wait before advancing
Discard Abandoned After: The number of seconds before we completely remove an abandoned member from the queue. When used in conjunction with abandoned-resume-allowed, callers can come back into a queue and resume their previous position
Abandoned Resume Allowed:
- True: The caller who has abandoned the queue can re-enter and resume their previous position in that queue. In order to maintain their position in the queue, they must not abandoned it for longer than the number of seconds defined in 'discard-abandoned-after'.
- False: The Caller does not resume the position
Caller ID Name Prefix: The prefix on the caller ID name
Description: The Record description
¶ Call Center Agents
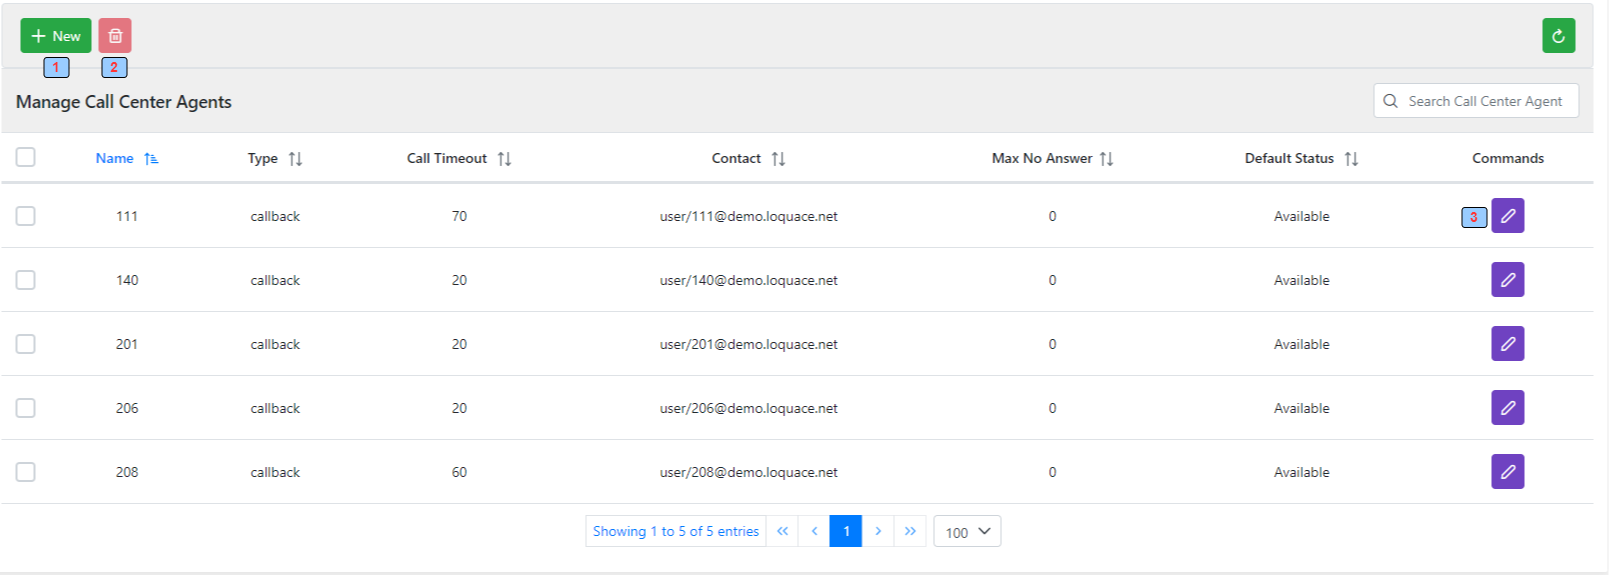
1 - Add a new call center agent
2 - Delete the call center agent
3 - Edit the selected call center agent
¶ Add Call Center Agent

Name: The call center agent name
Extension: The call center agent type: callback (default) or uuid-standby
Call Timeout: The call ring timeout for the agent
Contact: The freeswitch contact string for the agent
Default status: The default status for the agent
No answer delay time: If the agent does not answer the call, wait this defined time before trying him again
Wrap up time: The amount of time to wait before putting the agent back in the available queue to receive another call, to allow her to complete notes or other tasks
Reject delay time: If the agent presses the reject button on her phone, wait this defined time amount
Busy delay time: If the agent is on Do Not Disturb, wait this defined time before trying him again
¶ Conference Center
The conference center is the conference call module. Each conference call record can group several conference rooms by setting the same properties such as greeting sound and pin length.
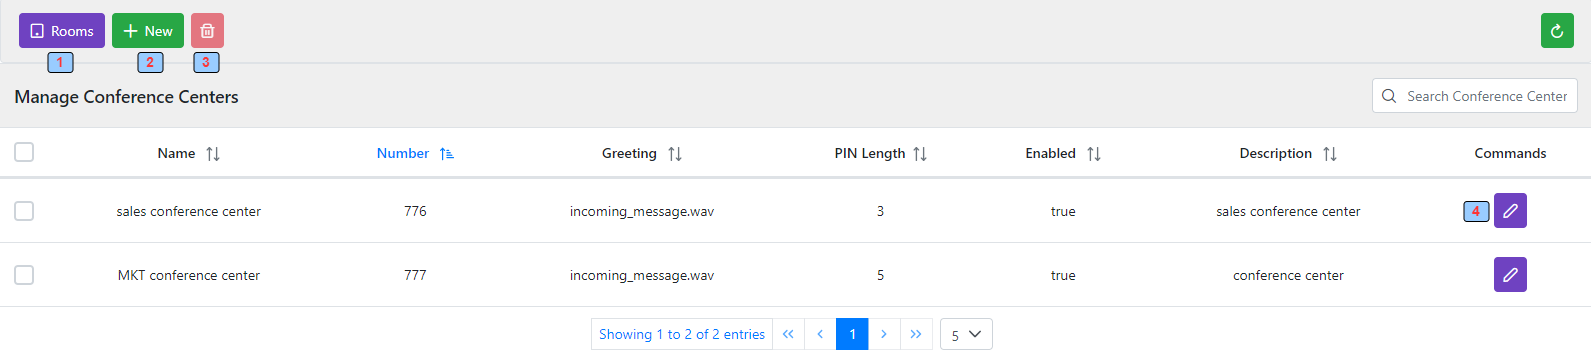
1 - Conference rooms management
2 - Add new conference center record
3 - Delete selected conference center records
4 - Edit selected conference center record
¶ Add Conference Center
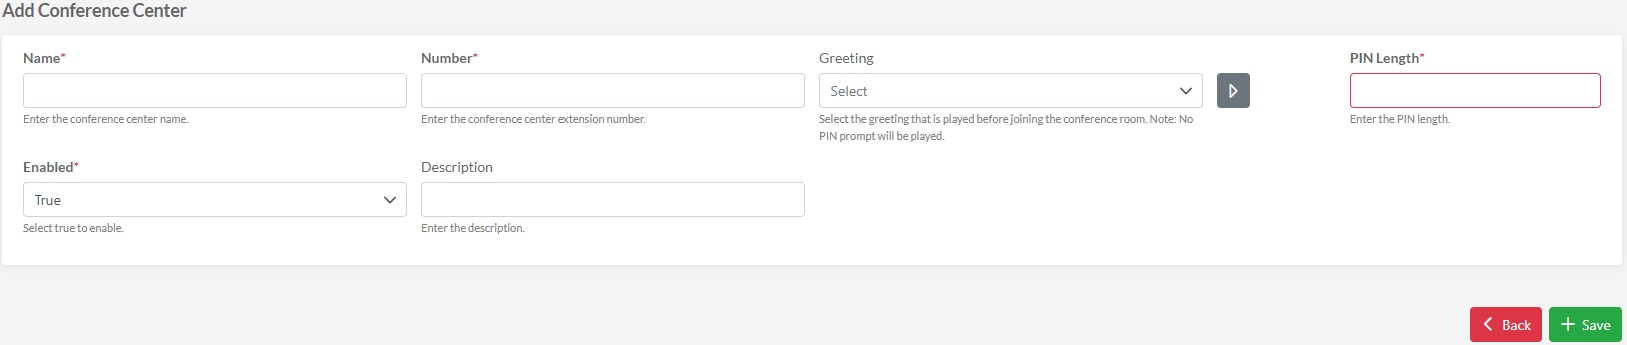
Name: The Conference center name
Number: The Conference center Extension (dial plan extension number/string)
Greeting: The Conference Center greeting file
PIN: The Conference center Pinf length
Enabled: Enable/disable the conference center
Description: Conference center record description
¶ Conference Room
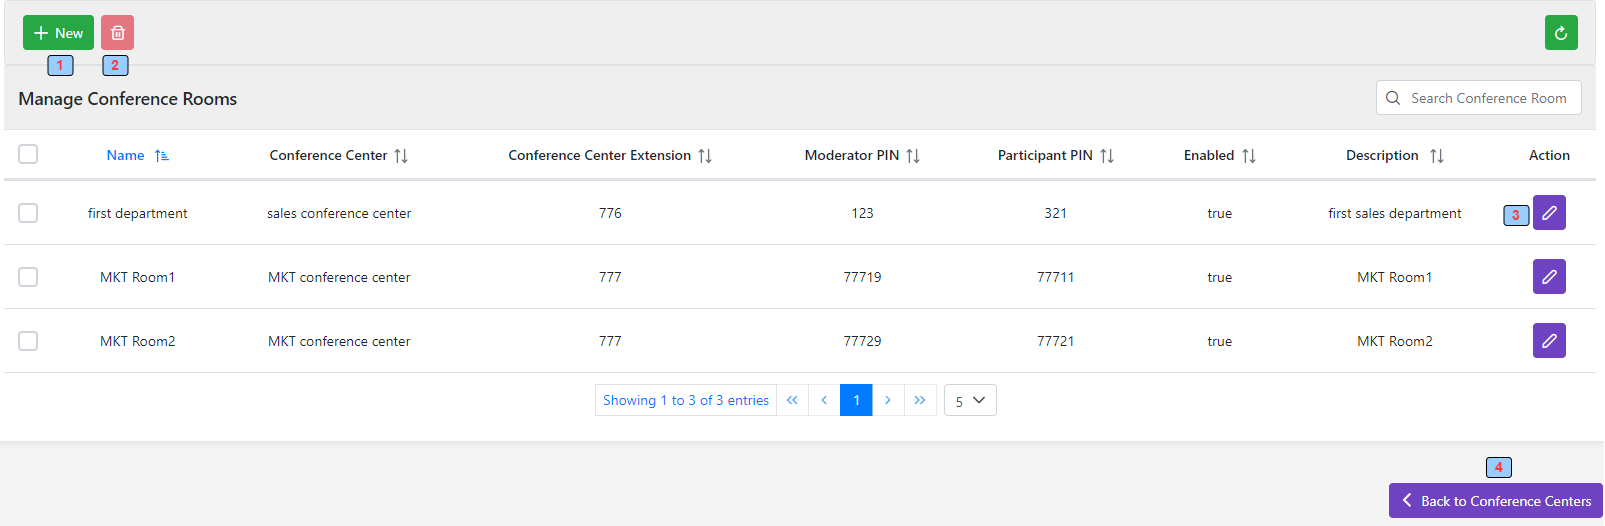
1 - Add new conference room record
2 - Delete selected conference room records
3 - Edit selected conference room record
4 - Back to the Conference center
¶ Add Conference Room
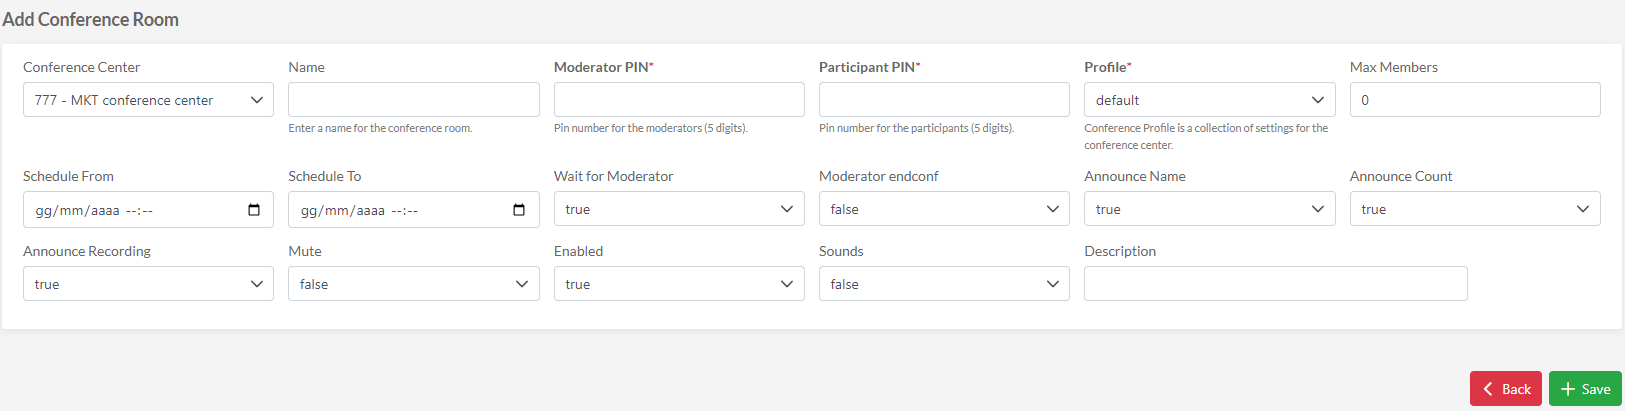
Conference Center: The Conference center belonging
Name: The Room name
Moderator PIN: The Moderator Pin
Participant PIN: The Participant Pin
Conference Profile: The Conference profile
Max Members: The maximum number of conference members (0=unlimited)
Schedule From/To: Conference schedule
Wait for Moderator: If members have to wait for the moderator to begin the conference
Moderator endconf: If the conference ends when the moderator leaves the conference
Announce Name: Announce name and member number of when a new member enters the conference
Mute: Mute feature
Enabled: Enable/disable the conference room record
Description: The Record description
¶ IVR
Interactive Voice Response
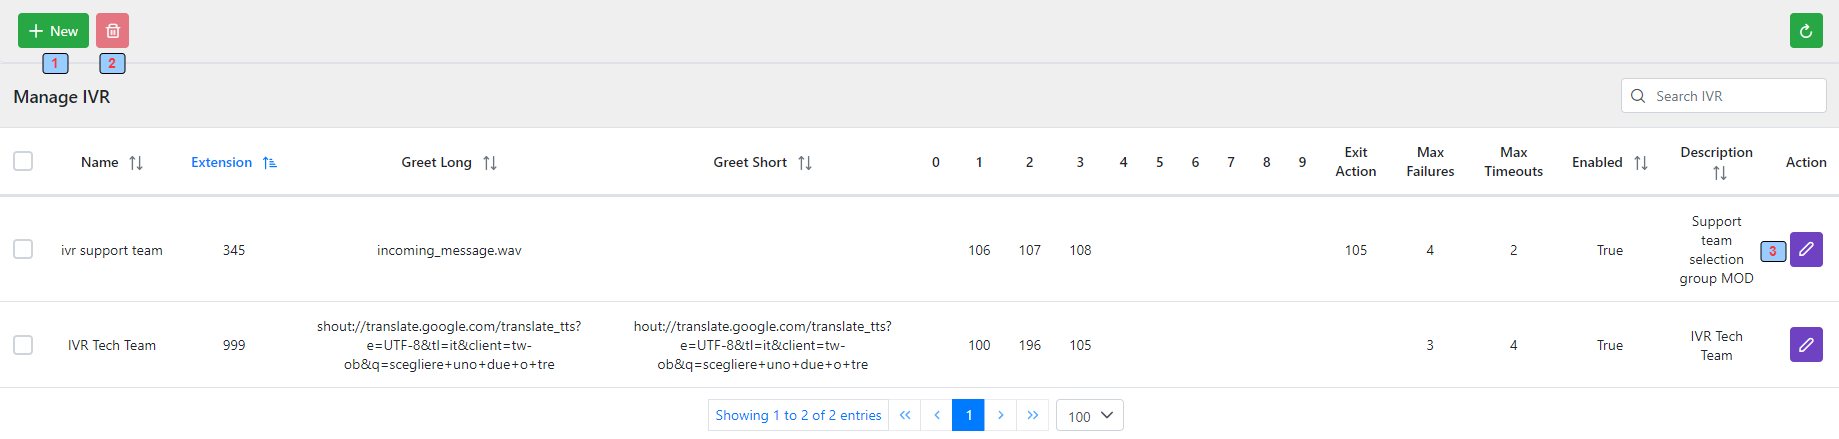
1 - Add new conference IVR
2 - Delete selected IVR
3 - Edit selected IVR
¶ Add IVR
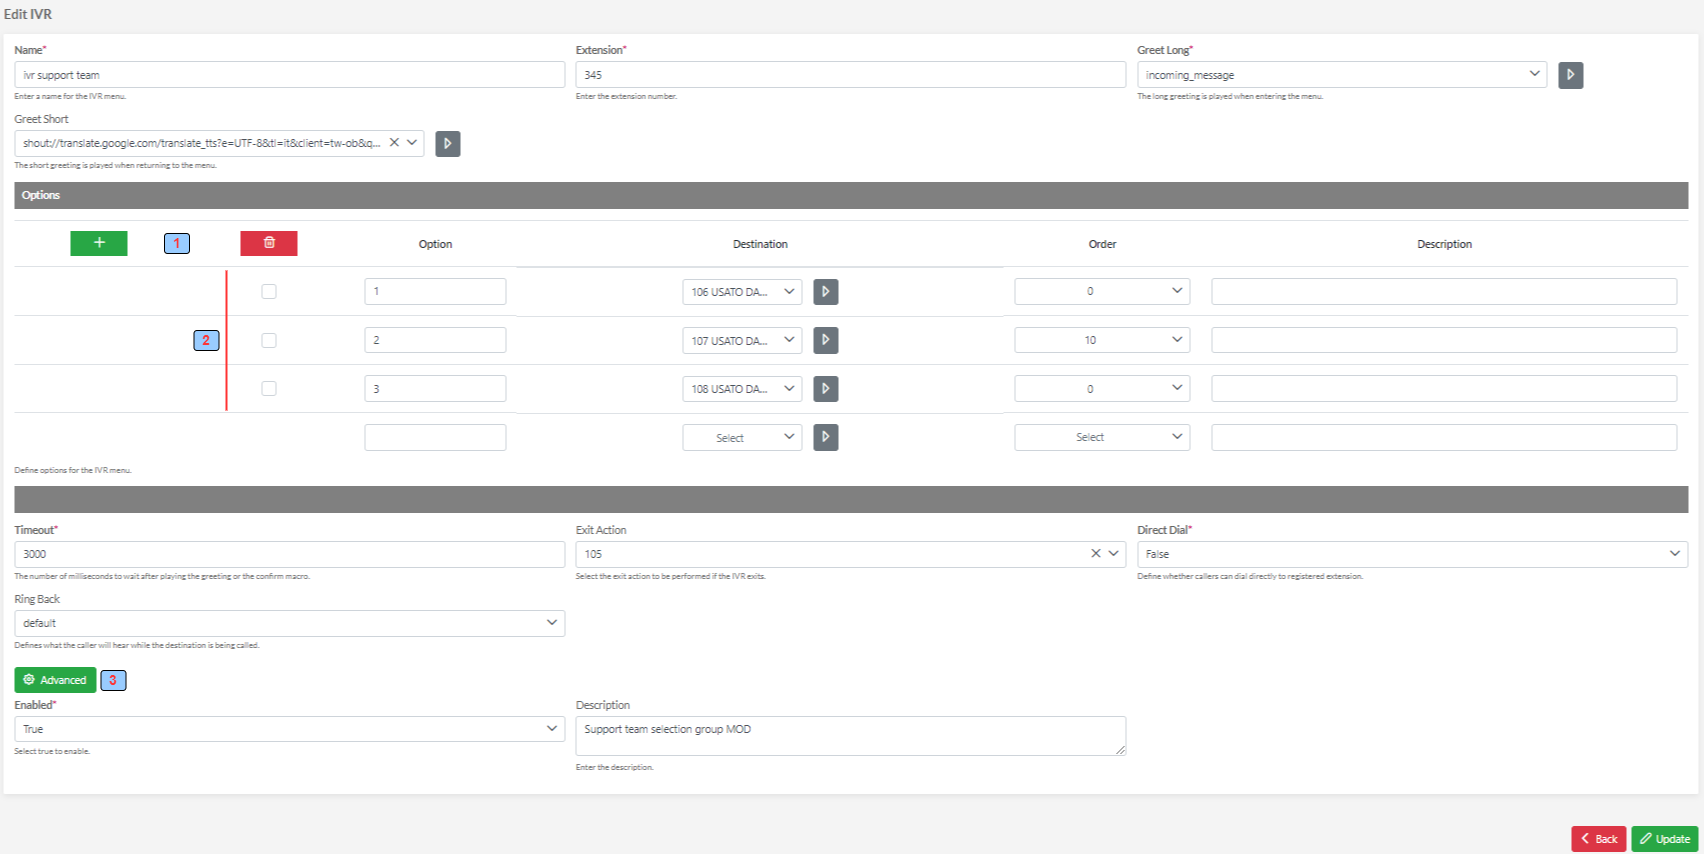
Name: The IVR name
Extension: The IVR Extension (dial plan extension number/string)
Greet Long: The IVR greeting played when entering ivr menu. The message is played only the first time if set Short greeting otherwise it is repeated n times based on the "Maximum Timeout" field
Greet Short: The IVR greeting played when returning to the IVR menu (if the previous greeting is set)
1 - Add/Delete IVR menu option
2 - IVR menu option
Timeout: The IVR timeout in milliseconds before repeating the IVR message (in case more the one digit needs to be collected this value must be ≥ Timeout between key presses)
Exit Action: The IVR action performed when exit IVR menu
Direct Dial: Define whether callers can dial directly to a registered extension (caller can directly dial an extension)
Ring Back: The IVR ring back
3 - Advanced IVR options
Enabled: Enable/disable the IVR menu
Description: The IVR description
¶ IVR Advanced Options

Invalid Sound: The IVR invalid sound (sound played when the user selects a wrong menu option)
Exit Sound: The IVR exit sound (sound played when the user exits the IVR after reaching the maximum number of failures)
Confirmed Key: The IVR confirmed key (if IVR menu collects more than one digit)
Inter Digit Timeout: The IVR inter digit timeout (max time in seconds to wait for interdigit)
Max Failure: The IVR max failures. Number of maximum input failures before exiting
Max Timeout: The IVR max timeout. The number of message repetition cycles (in case more the one digit needs to be collected this value must be ≥ Timeout between key presses)
Digit Length: The IVR number of digits to collect
¶ Fax Server
Loquace Fax Server module.
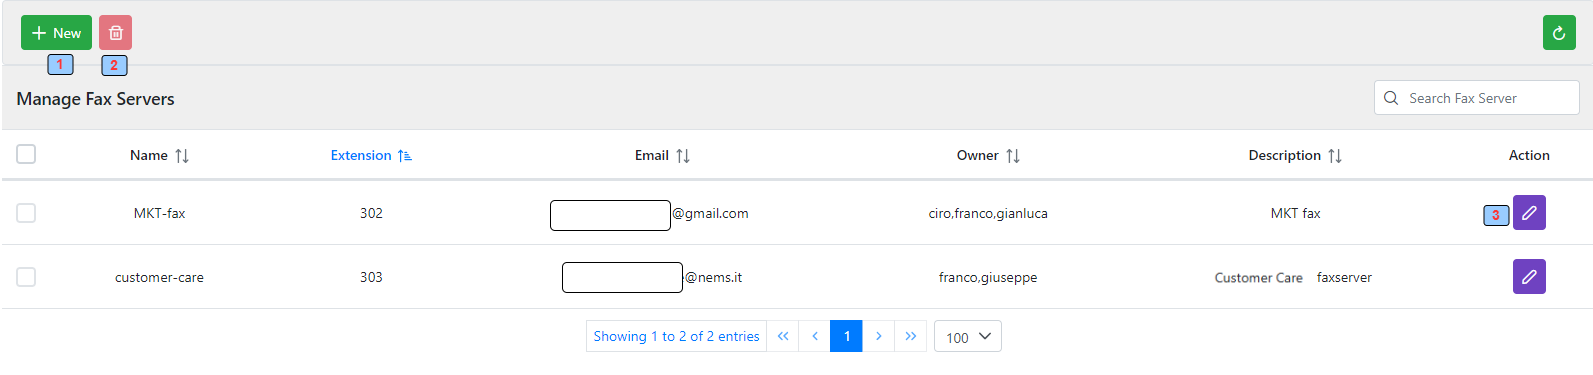
1 - Add new conference Faxserver
2 - Delete selected Faxserver
3 - Edit selected Faxserver
Extension: The Fax server Extension (dial plan extension number/string)
Email: Another email to send the received fax to (the received fax is always sent to the owner's email address)
Owner: Fax server owner
Description: The Record description
¶ Add Faxserver
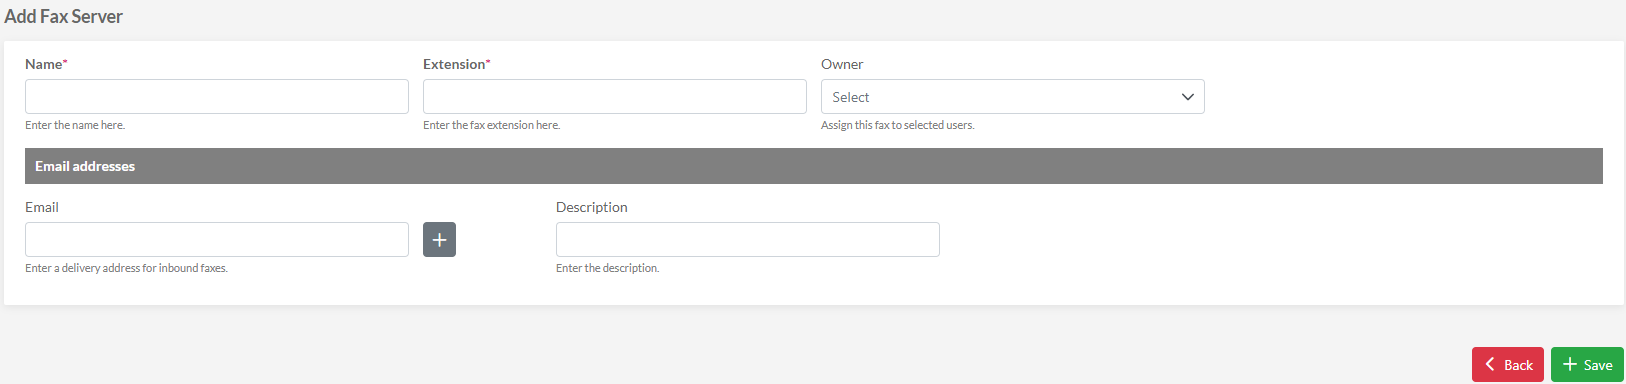
Name: Faxserver name
Extension: The Fax server Extension (dial plan extension number/string)
Owner: Faxserver owners
Email: Another email to send the received fax. By default, the fax is sent to email users' addresses
Description: The fax server description
¶ Gateways
Voip Sip Trunks.
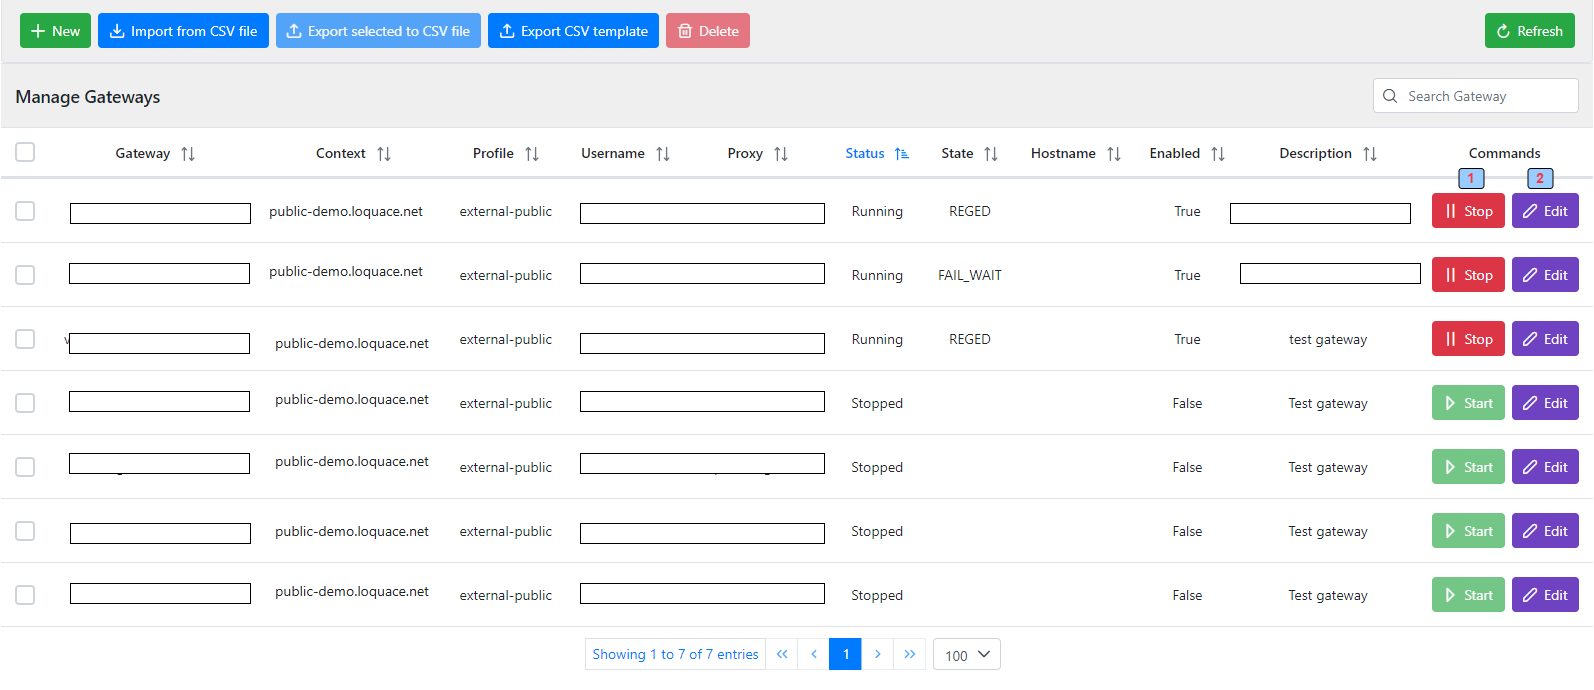
1 - Add new conference Gateway
2 - Delete selected Gateway
3 - Start/Stop Gateway command
4 - Edit Gateway
Name: The Gateway name
Context: The Gateway context
Profile: The Gateway profile
Username: The Username to the Proxy register
Proxy: The provider Proxy
Status: The Gateway status (Running or Stopped)
State: The Gateway State (if Running: registered or fail)
¶ Add Gateway
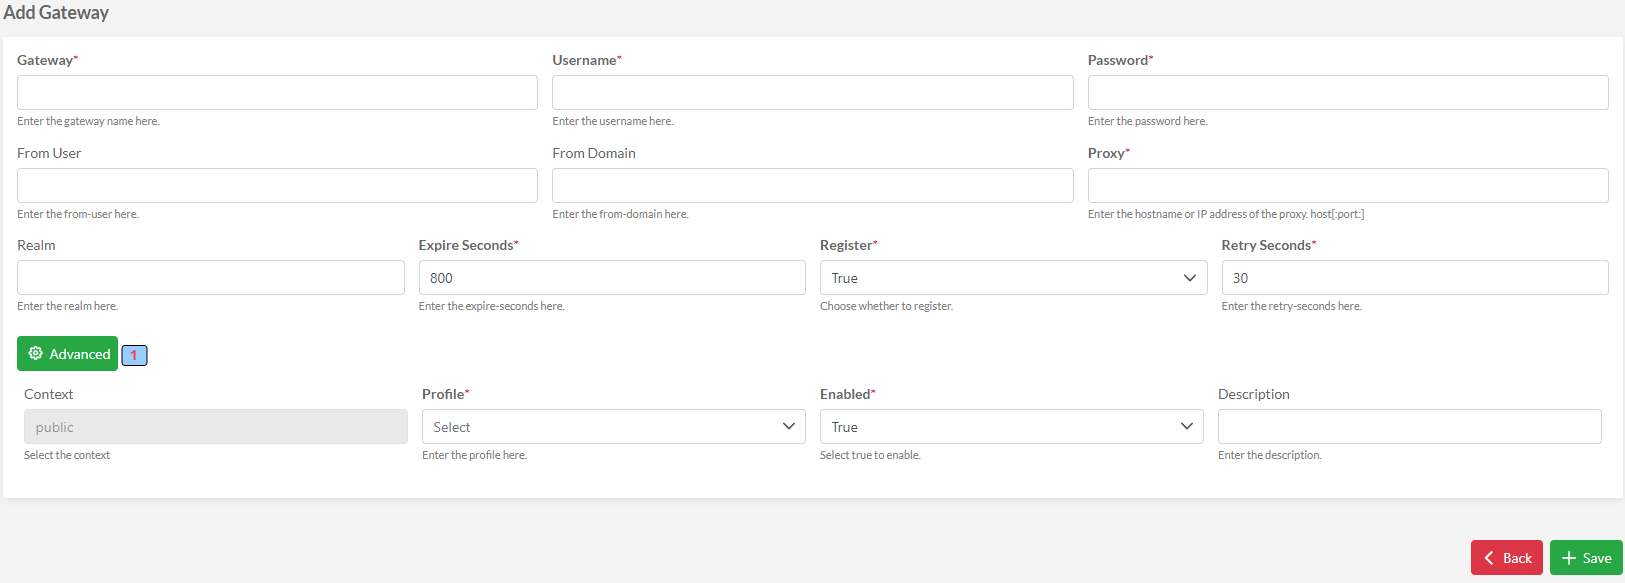
1 - Advanced settings
Gateway: The name of the Gateway.
Username: The username for SIP registration provided by the carrier.
Password: The SIP registration password
From User: Set a specific SIP From User
From Domain: Sets a specific SIP From Domain.
Proxy: The Proxy server address.
Realm: The Sip Realm
Expire Seconds: The time until the registration expires.
Register: Set to true if the carrier uses a username and password. It is set to false if the carrier uses IP authentication. If false, you will need to specify all of the carrier IP’s in the Advanced > Access Controls.
Profile: The SIP profile used by this Gateway.
Hostname: This should usually be left empty. When the hostname is set the gateway will only start on the matching server with the same hostname. If the hostname is left blank the gateway will start regardless of the server’s hostname.
Enabled: Enable/Disable the gateway
Description: Description note.
¶ Gateway Advanced Options
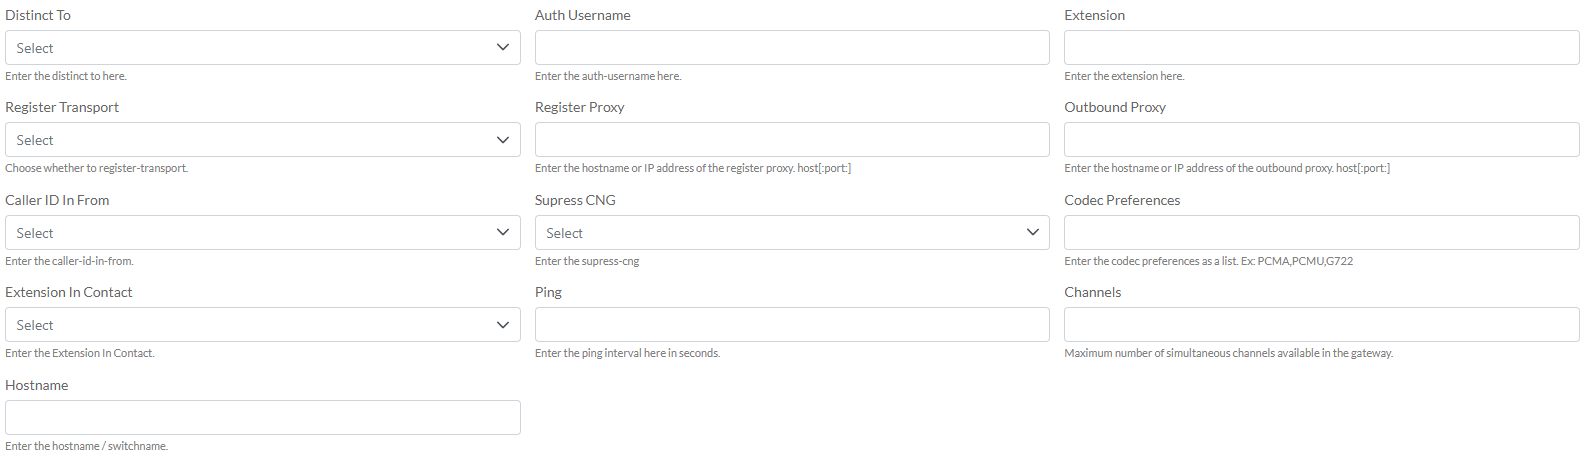
Distinct To: Enable/disable
Auth Username: The Auth username
Extension: Forces all calls from this gateway to be routed to this extension
Register Transport: Sets the SIP with TCP, UDP or TLS.
Register Proxy: The hostname or IP address of the register proxy. host[:port].
Outbound Proxy: The hostname or IP address of the outbound proxy. host[:port].
Caller ID In From: If your caller ID isn’t working setting this to true will often fix the problem.
Suppress CNG: Set this value to true to disable comfort noise.
Sip CID Type: The SIP caller id type: none, pid, and rpid.
Codec Preferences: Enter the codec preferences as a list. Ex: PCMA, PCMU, G722, OPUS
Extension In Contact: Option to set the Extension In Contact.
Ping: If your server is behind NAT then the ping option can be used to keep the connection alive through the firewall. The ping interval is in seconds.
Channels: Maximum simultaneous calls available in this gateway
¶ Recordings
To store audio files to utilize in IVR, Hold music, etc.
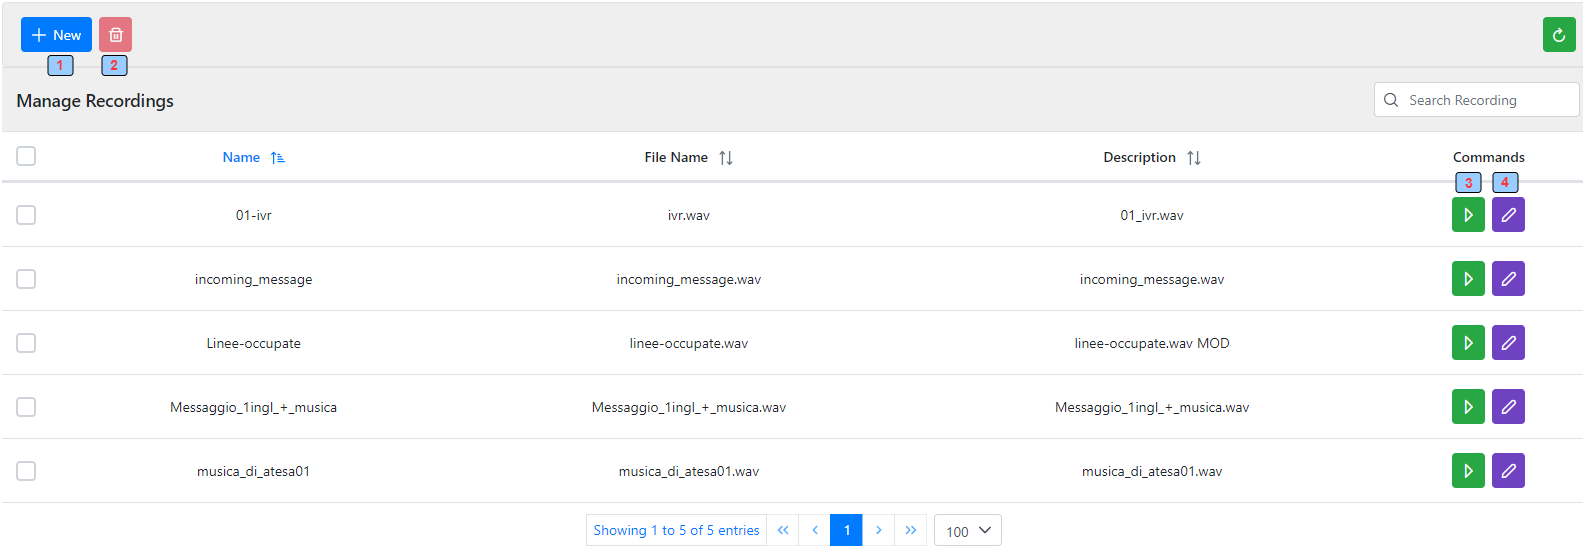
1 - Add a new audio file
2 - Delete the selected audio files
3 - To listen to the audio file
4 - Edit the audio file
¶ Ring Groups
A ring group is a set of extensions that can be called with a ring strategy.
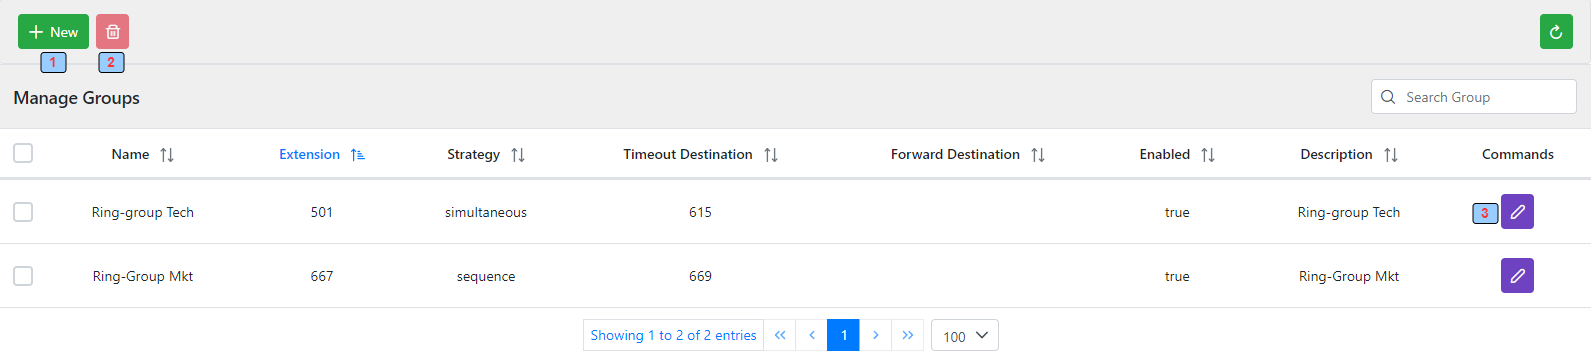
1 - Add new ring group
2 - Delete selected ring group
3 - Edit the ring group
¶ Add Ring Group
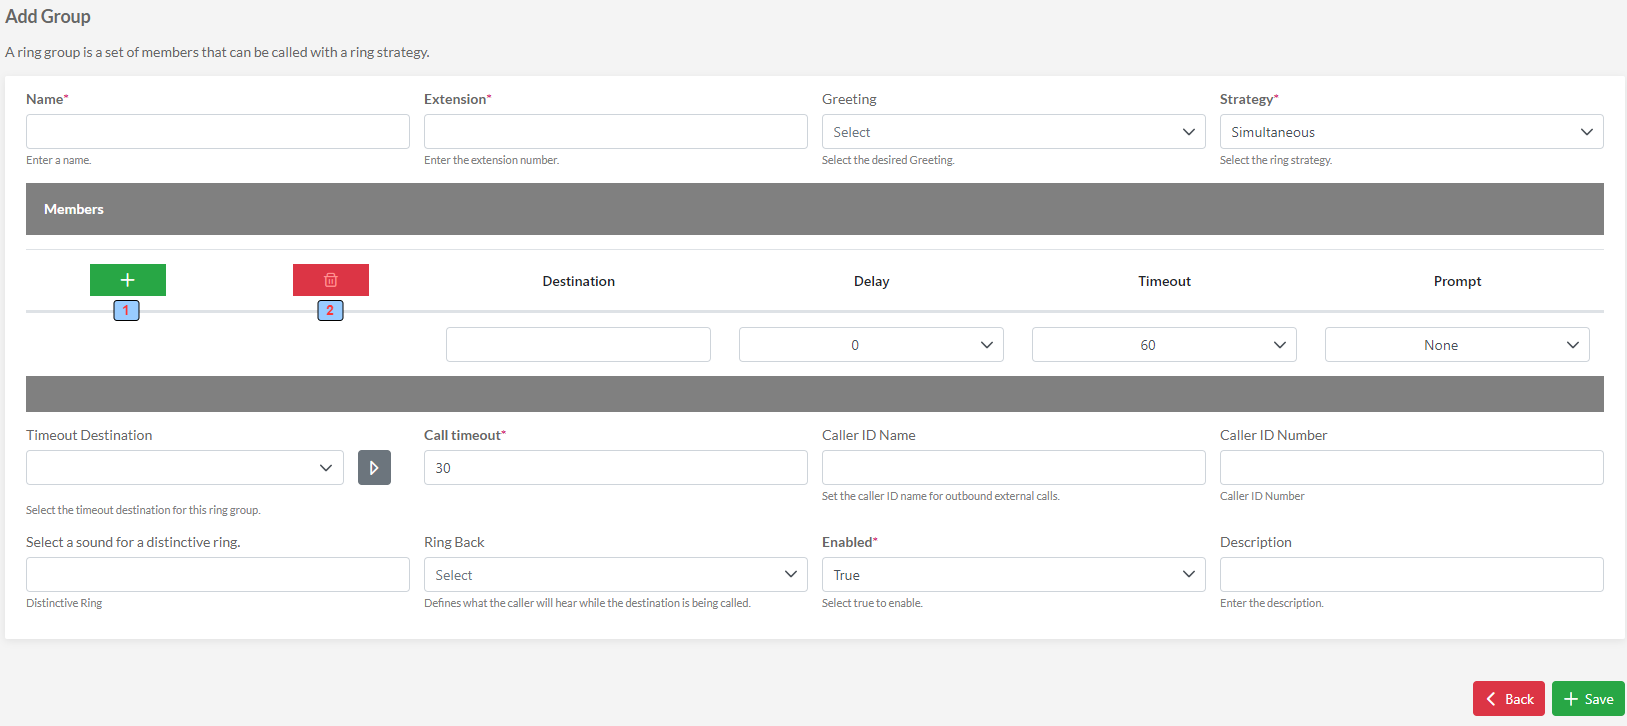
Name: The ring group name
Extension: The ring group extension (dial plan extension number/string)
Greeting: The ring group greeting
Strategy: The selectable way in which the destinations are being used:
- Simultaneous Rings all destinations. All destination share the same thread.
- Sequence Calls destinations in sequence where order that is lower goes first.
1 - Add new destination (ring group number)
2 - Remove selected destination
- Destination: The ring group destination
- Delay: The ring delay of this destination
- Timeout: The ring timeout of this destination
- Prompt: If the call must have a dial to confirm before a pickup event
Timeout Destination: The destination to route the call to if the call timeout is increased or no answer
Call Timeout: The call timeout (in seconds)
Caller ID Name : The Caller ID name for outbound calls
Caller ID Number : The Caller ID number for outbound calls
Select a distinctive ring : The distinctive ring
Ring Back : The ring back
Enabled: Emable/Disable the ring group
Description: Description note.
¶ Ring Group Queues
FIFO Queues for Ring Groups

1 - Add new ring group queue
2 - Delete selected ring group queue
3 - Edit the ring group queue
¶ Add Ring group Queue
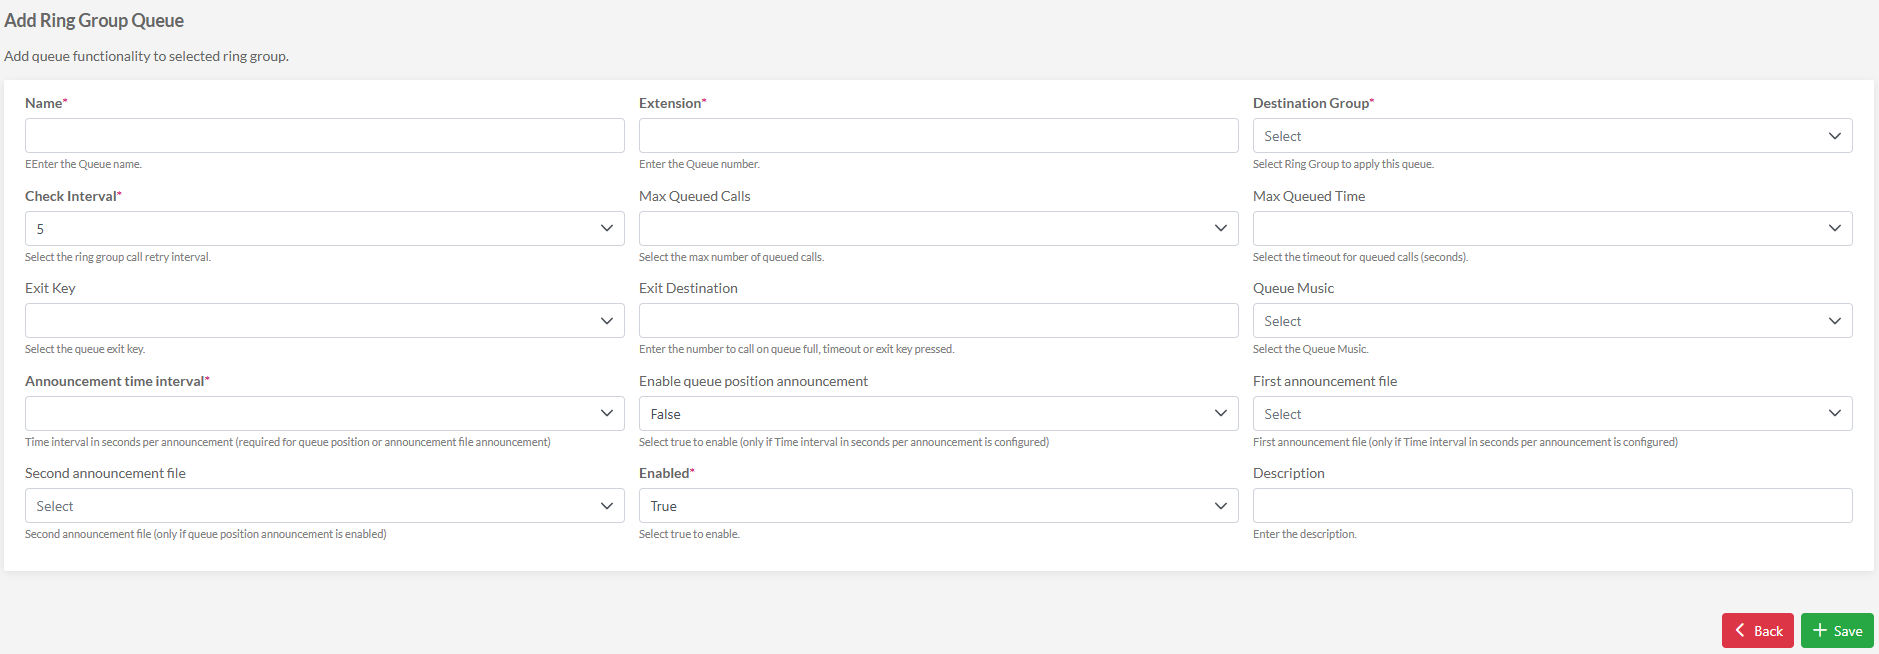
Name: The ring group queue name
Extension: The ring group queue extension (dial plan extension number/string)
Destination Group: The ring group of this queue
Check Interval: The interval (in seconds) to send the first call in the queue to the group
Max Queued Calls: Maximum number of queued calls. If reached, the next calls will be sent to Exit Destination
Max Queued Time: Maximum time (in seconds) a call can stay in the queue. If reached, the next calls will be sent to Exit Destination
Exit Key: The DTMF the user can digit to leave the queue. In this case, the call will be sent to Exit Destination.
Exit Destination: The number to route the call in case of previous conditions are fulfilled
Queue Music: The ring group queue music
Announcement time interval: Time interval in seconds per announcement. Time interval in seconds for the announcement. Required for queue announcement position or file announcement. If not set, the queue position announcement fields and announcement audio files are not saved
Enable queue position announcement: Select true to enable. Only if the Time interval in seconds per announcement is configured
First announcement file: First announcement file. Only if the Time interval in seconds per announcement is configured
Second announcement file: Second announcement file. Only if queue position announcement is enabled
Enabled: Enable/Disable the ring group queue
Description: Description note.
¶ Time Conditions
To route calls based on time conditions.
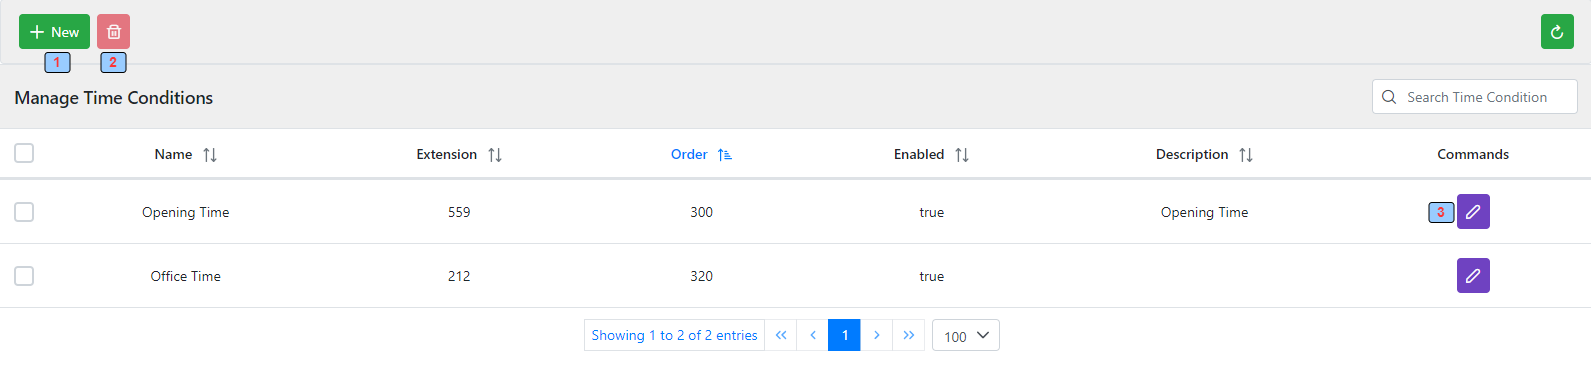
1 - Add new Time Condition
2 - Delete selected Time Conditions
3 - Edit the Time Condition
¶ Add Time Condition
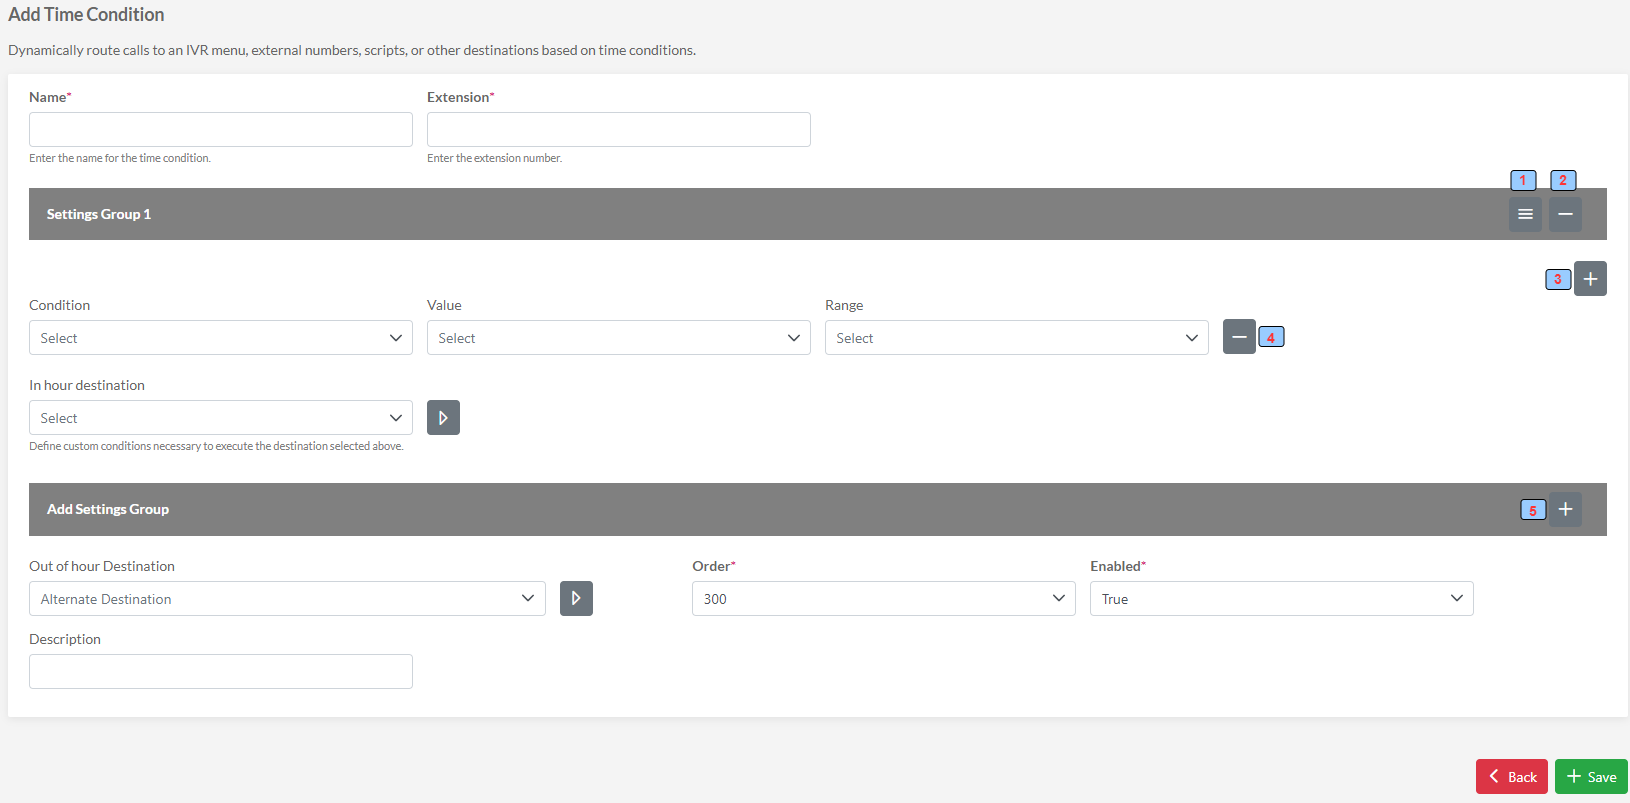
1 - Drag and Drop to order Setting Groups
2 - Remove the Setting Group
3 - Add a Condition
4 - Remove the Condition
5 - Add a Setting Group
Name: The time condition name
Extension: The time condition extension (dial plan extension number/string)
Condition, Value, and Range: The condition to check
In hour destination: The extension to route the call if the setting group conditions are true
Out of Hour destination: The extension to route the call if all the setting group conditions are false
Order: Dial Plan order
Enabled: Enable/Disable
Description: Description note
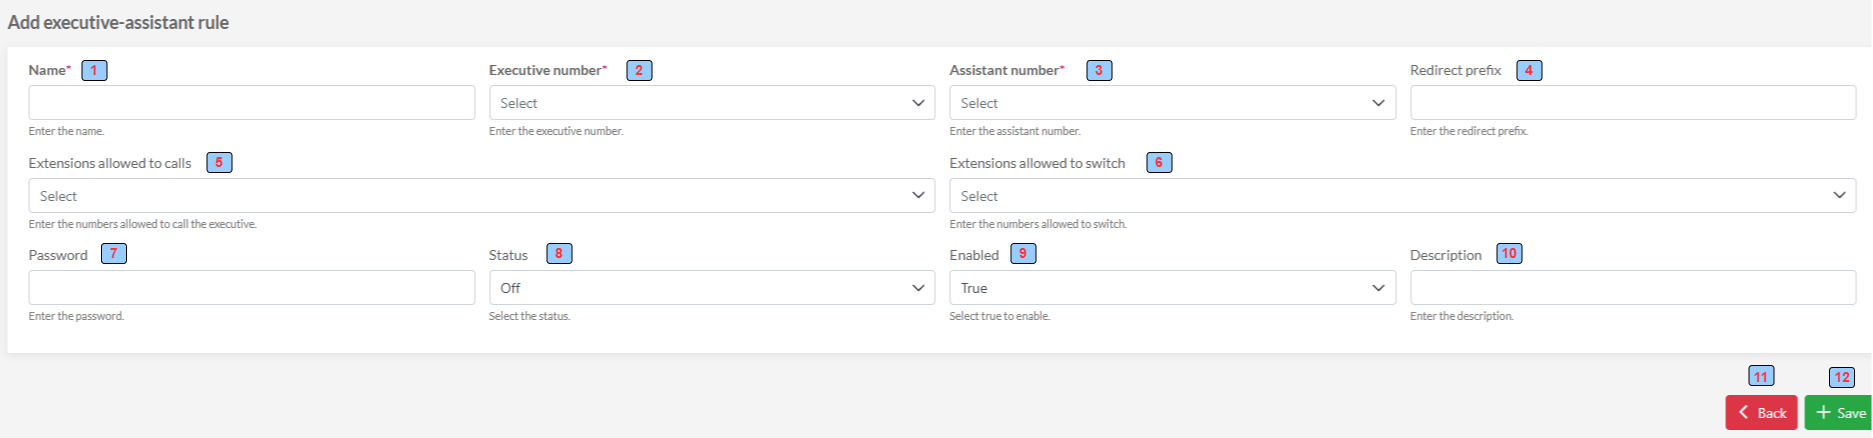
¶ Executive Assistant
Executive Assistant feature allows an assistant to manage calls on behalf of an executive—screening, redirecting, placing calls, and handling availability to ensure efficient communication flow.

1 - Add new Executive Assistant rule
2 - Delete selected Executive Assistant rule
3 - Edit the Executive Assistant rule
¶ Add Executive Assistant Rule
¶ Inbound Routes
Route the incoming call (call from an external number) within the PBX internal dial plan.
The rules are evaluated from top to bottom.
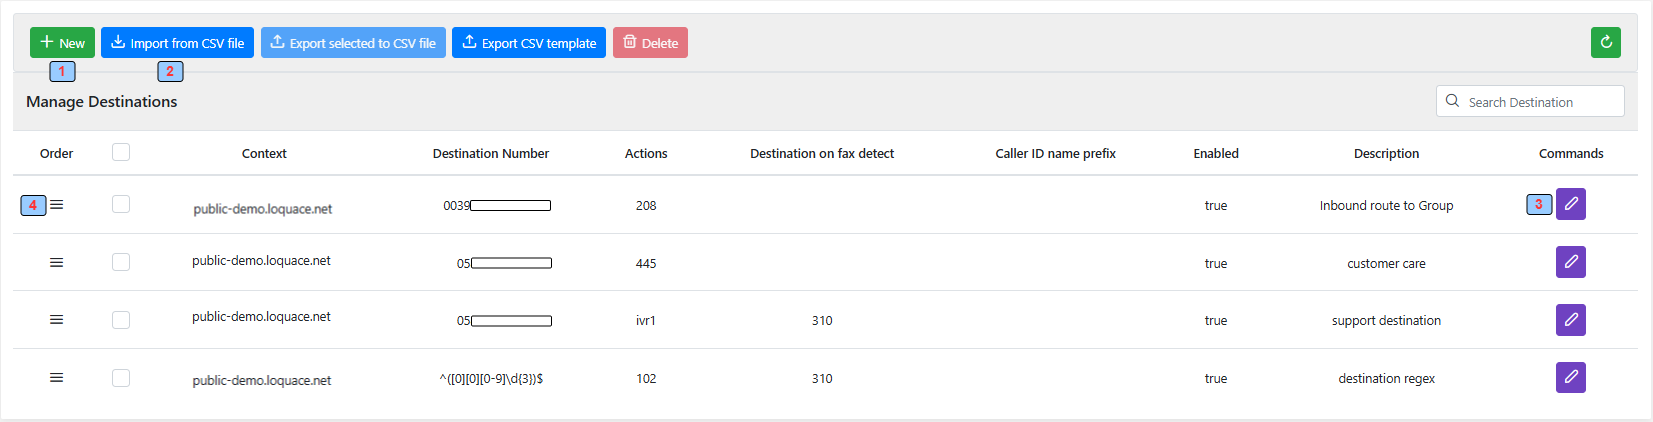
1 - Add new Inbound Route
2 - Delete selected Inbound Routes
3 - Edit the Inboud Route
4 - Reorder Inbound Route
Context: The dialpan context
Destination number: The carrier PBX number (DID)
Action: The dial plan extension the call will go after it enters Loquace PBX
Destination on fax detect: The dial plan extension the call will go on fax detect
¶ Add Inbound Route
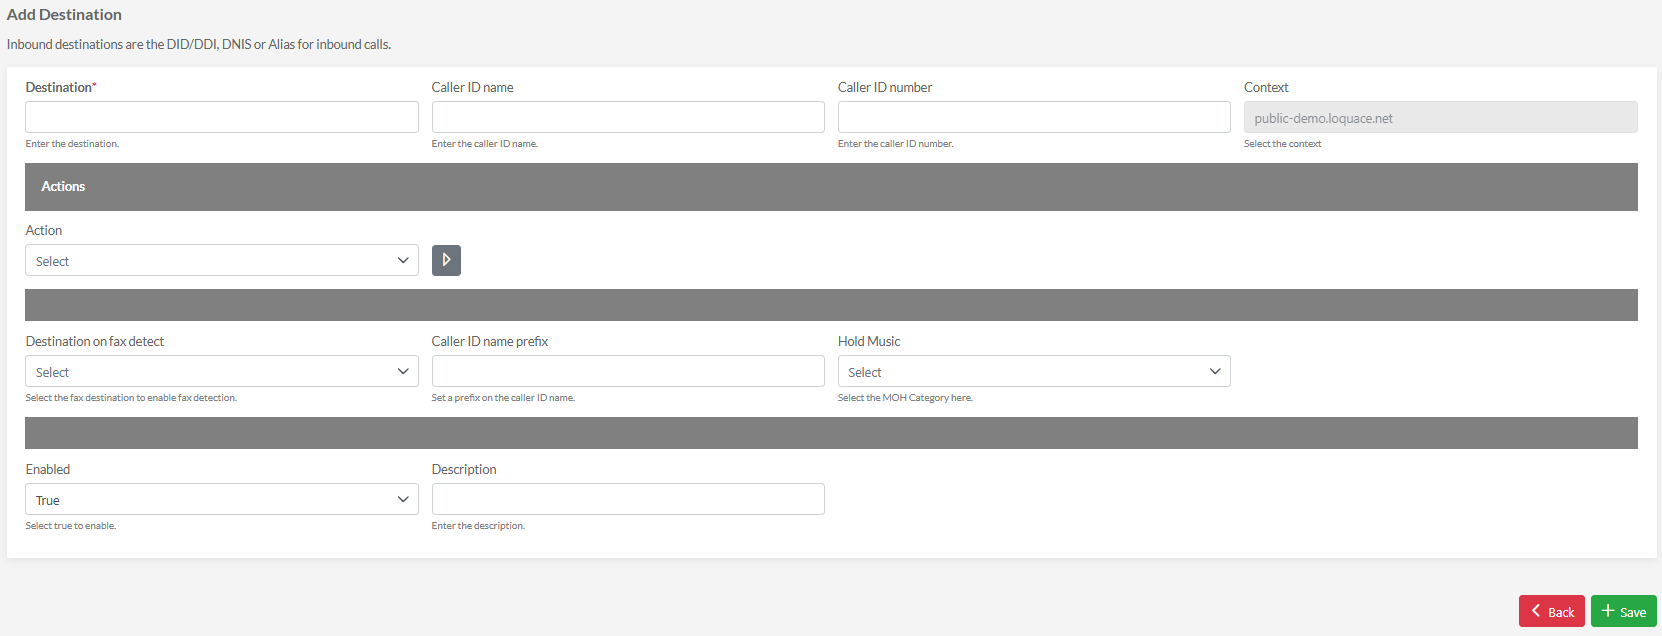
Country code: Destination country code (optional field)
Destination: The carrier PBX number (DID)
Caller ID name: To override original caller id name (da aggiunger nelle fusion pbx api)
Caller ID name: To override original caller id number (da aggiunger nelle fusion pbx api)
Caller ID name prefix: To prefix to append to caller ID name
Action: The dial plan extension the call will go after it enters Loquace PBX
Destination on fax detect: The dial plan extension the call will go if the tone fax is detected
Hold music: The default hold music
Enabled: Enable/Disable
Description: Description note
¶ Outbound routes
Route calls outside the PBX (to VoIP provider, gateway, etc.).
This module allows you to manage the Outbound Routes valid for the entire Domain.
A user and user group can however have their own private Outbound Routes (see the Users section of this manual), the user's private Outbound Routes are evaluated before the overall ones for the Domain.
The rules are evaluated from top to bottom.
A single Outbound Route routes the call to one or more gateways in descending order.
A single Domain has one or more Outbound Routes.
Outbound Routes are evaluated in descending order.
The Outbound Rute is evaluated concerning calling numbers and called numbers.
You can set the rule evaluation criteria regarding called numbers and called numbers using three modes:
- Basic: Only the caller's prefix is evaluated.
- Advanced: The evaluation is made concerning the first digits and the length of the number called and the number called
- Advanced with Regex: The evaluation is done through Regex
Outbound routes for a domain are evaluated as the last rules in the dialplan this means that if for example, you define an Outbound Route in the Basic mode without specifying the Prefix, each number dialed by a user that does not correspond to an internal number in the PBX will be evaluated positively and sent to the gateway.
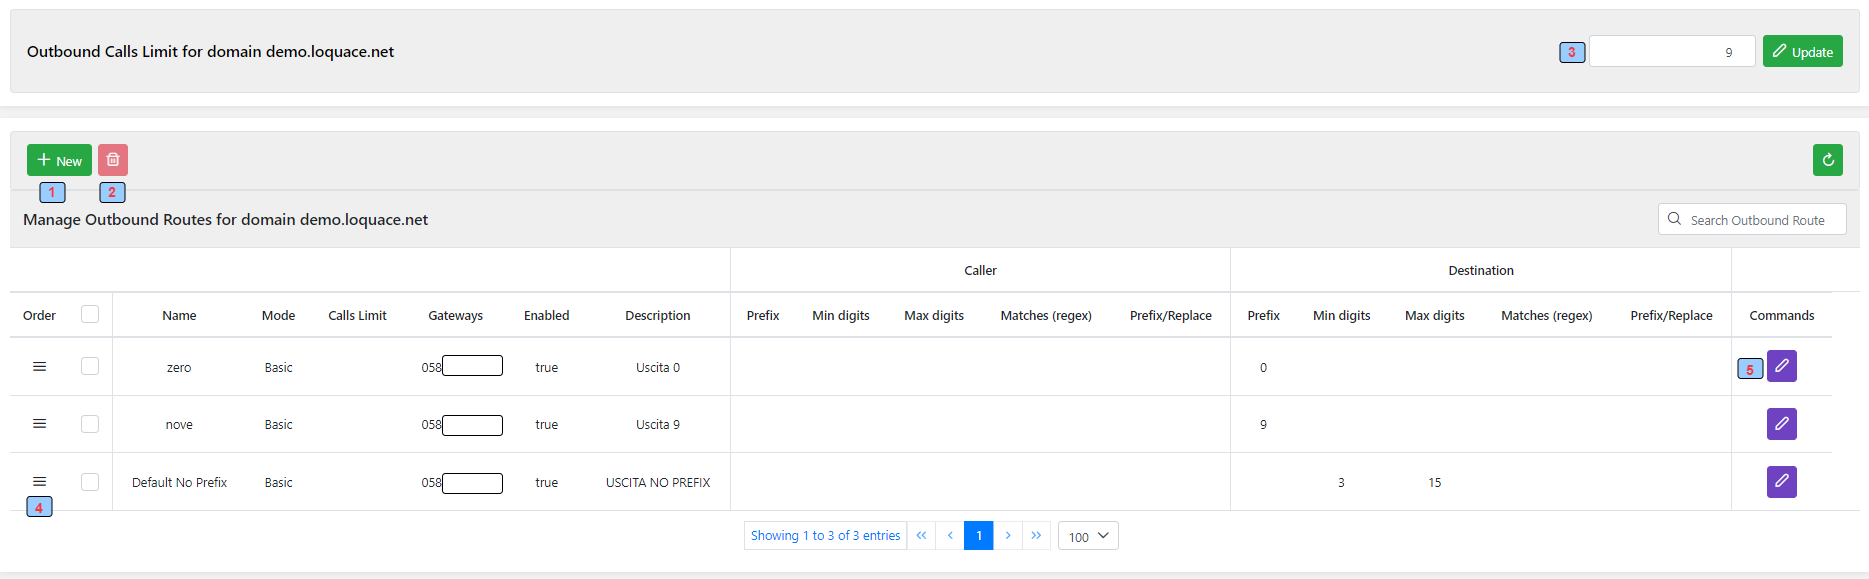
1 - Add new Outbound Route
2 - Delete selected Outbound Routes
3 - Maximum number of Outbound calls for the domain
4 - Order Outbound Routes
5 - Edit the Outbound Route
¶ Add Outbound Route
¶ Basic Mode

1 - Add a new gateway to the Outbound Routes
2 - Delete selected gateway from the Outbound Routes
3 - Reorder gateway list
Name: The gateway name
Calls Limit: Maximum number of Outbound calls for this Outbound Route
Enabled: Enable/Disable this Outbound Route
Description: Outbound Route description note
Mode: Basic mode
Prefix: Apply the route if the called number starts with this prefix. The prefix is stripped from the called number when sent to the gateway. If empty, the evaluation is true
Gateway: The gateway
GW Call LIimt: Maximum number of Outbound calls for that gateway. If this gateway has reached the maximum number of calls (or returns an error), the call is sent to the next gateway
Enabled: Enable/Disable this gateway
Description: Gateway description note
CLIR: Hide outbound caller ID
DEFAULT: Default Caller ID Number
Matches (regex): Matches in caller number
Replace (regex): Replace in outbound caller ID
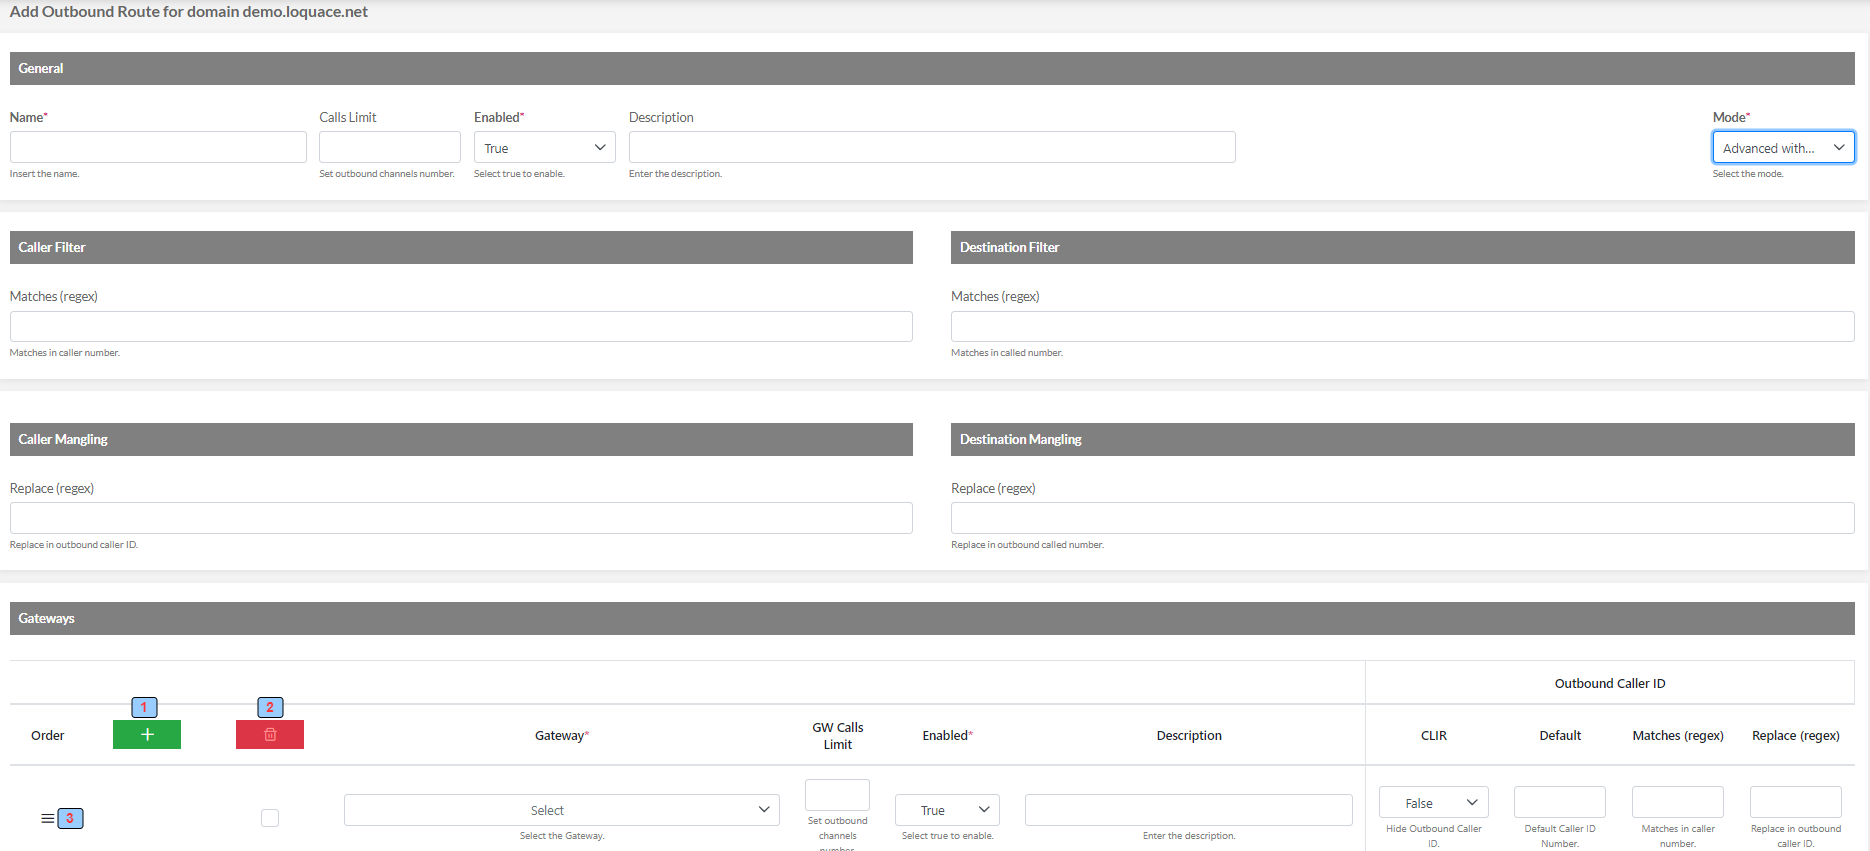
¶ Advanced Mode

1 - Add a new gateway to the Outbound Routes
2 - Delete selected gateway from the Outbound Routes
3 - Reorder gateway list
Name: The gateway name
Calls Limit: Maximum number of Outbound calls for all this Outbound Route
Enabled: Enable/Disable this Outbound Route
Description: Outbound Route description note
Mode: Advanced mode
Starts with: Apply the route if the caller number starts with these digits. If empty, the evaluation is true
Min digits: Min caller number length. If empty, the evaluation is true
Max digits: Max caller number length. If empty, the evaluation is true
Prefix: Apply the route if the called number starts with this prefix. The prefix is stripped from the called number when sent to the gateway. If empty, the evaluation is true
Min digits: Min called number length. If empty, the evaluation is true
Max digits: Max called number length. If empty, the evaluation is true
Add prefix: Insert the prefix to add at the start of the caller number when sent to the gateway
Add prefix: Insert the prefix to add at the start of the called number when sent to the gateway
Gateway: The gateway
GW Call LIimt: Maximum number of Outbound calls for that gateway. If this gateway has reached the maximum number of calls (or returns an error), the call is sent to the next gateway
Enabled: Enable/Disable this gateway
Description: Gateway description note
CLIR: Hide outbound caller ID
DEFAULT: Default Caller ID Number
Matches (regex): Matches in caller number
Replace (regex): Replace in outbound caller ID
¶ Advanced Mode with Regex
1 - Add a new gateway to the Outbound Routes
2 - Delete selected gateway from the Outbound Routes
3 - Reorder gateway list
Name: The gateway name
Calls Limit: Maximum number of Outbound calls for all this Outbound Route
Enabled: Enable/Disable this Outbound Route
Description: Outbound Route description note
Mode: Advanced mode with Regex
Matches (regex): Matches in the caller number. If empty, the evaluation is true
Matches (regex): Matches in the called number. If empty, the evaluation is true
Replace (regex): Replace in caller number when sent to the gateway
Replace (regex): Replace in called number when sent to the gateway
Gateway: The gateway
GW Call LIimt: Maximum number of Outbound calls for that gateway. If this gateway has reached the maximum number of calls (or returns an error), the call is sent to the next gateway
Enabled: Enable/Disable this gateway
Description: Gateway description note
CLIR: Hide outbound caller ID
DEFAULT: Default Caller ID Number
Matches (regex): Matches in caller number
Replace (regex): Replace in outbound caller ID
¶ Emergency Numbers
Emergency Numbers are special numbers that can be called directly by each PBX extension.
Multiple rules can be defined to manage how each emergency number is routed to one or more gateways than the calling PBX extension and the caller ID to present to the carrier.
Every time an Emergency Number is called, an email is sent to a configurable address with information regarding the caller, the emergency number called, and the time and outcome of the call.
In the following example, a company has two sites with different gateways to manage outbound calls.
The PBX extensions belonging to the main site have to be routed to the "main site gateway" and in case of a fault of this gateway to the "default gateway", an email must be sent to the defined address.
While the PBX extensions belonging to the secondary site must be routed to the "secondary site gateway", an email must be sent to the defined address.
In the end, a default rule is defined.
The Loquace Mobile App (Android and IOS) cannot call emergency numbers.
When these numbers are called by Loquace Mobile the call is redirected to the GSM network.
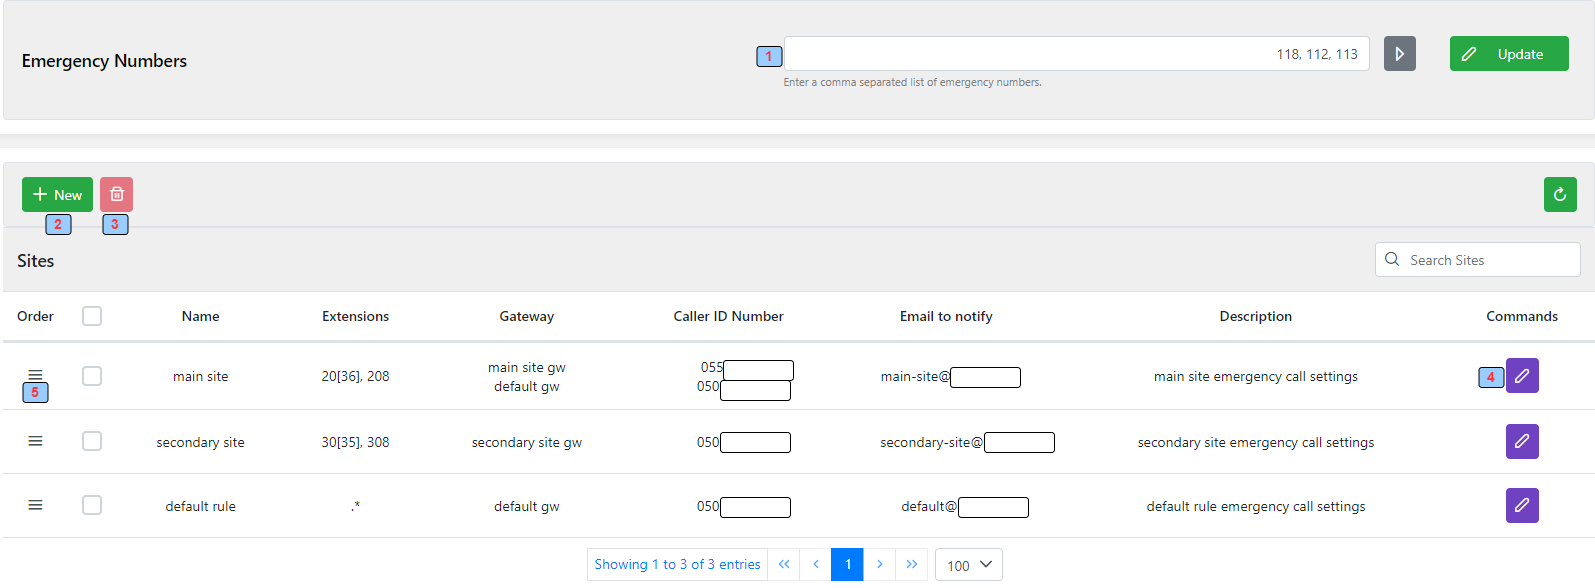
1 - Emergency number (it can be used in regular expressions)
2 - Add new site (rule)
3 - Delete selected site (rule)
4 - Delete selected site (rule)
5 - Reorder site (rule)
¶ Add Site (rule)
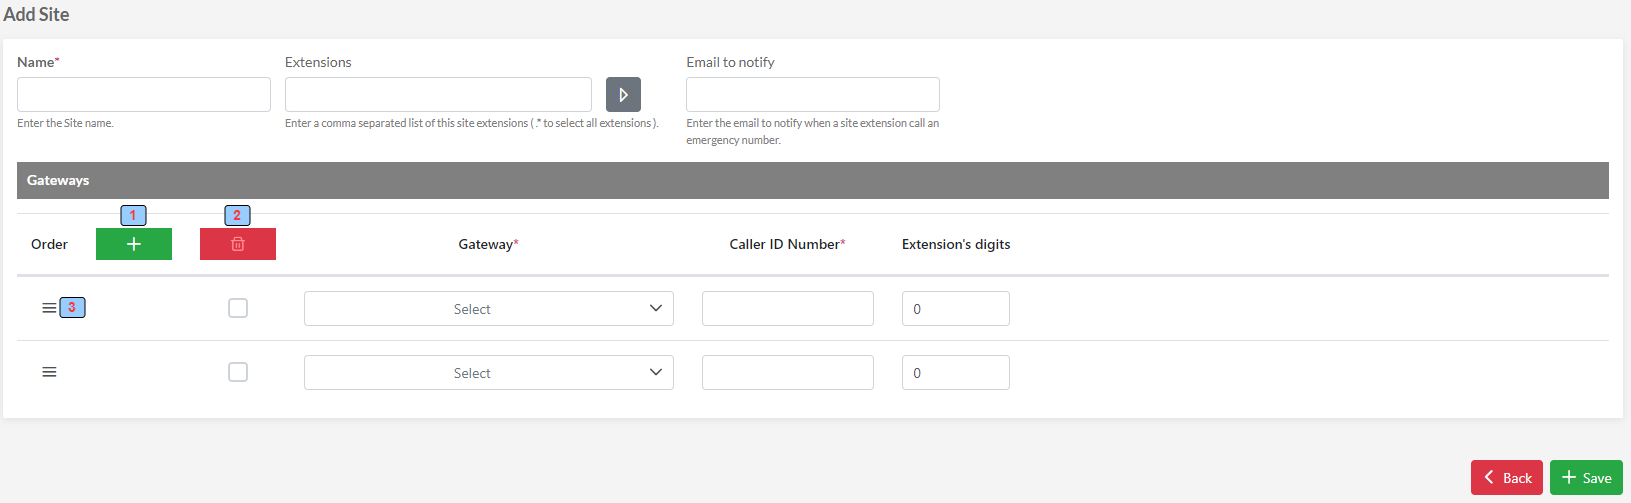
1 - Add new gateway to the site
2 - Delete selected gateway from the site
3 - Reorder gateway
Name: The site
Extensions: The PBX extensions belonging to this site (it can be used regular expressions)
Email to notify: The email address to send the notification mail
Gateway: The gateway to route the call
Caller ID Number: The caller ID to present to the carrier
Extension's digits: How many caller ID extension digits have to add to the Caller ID Number
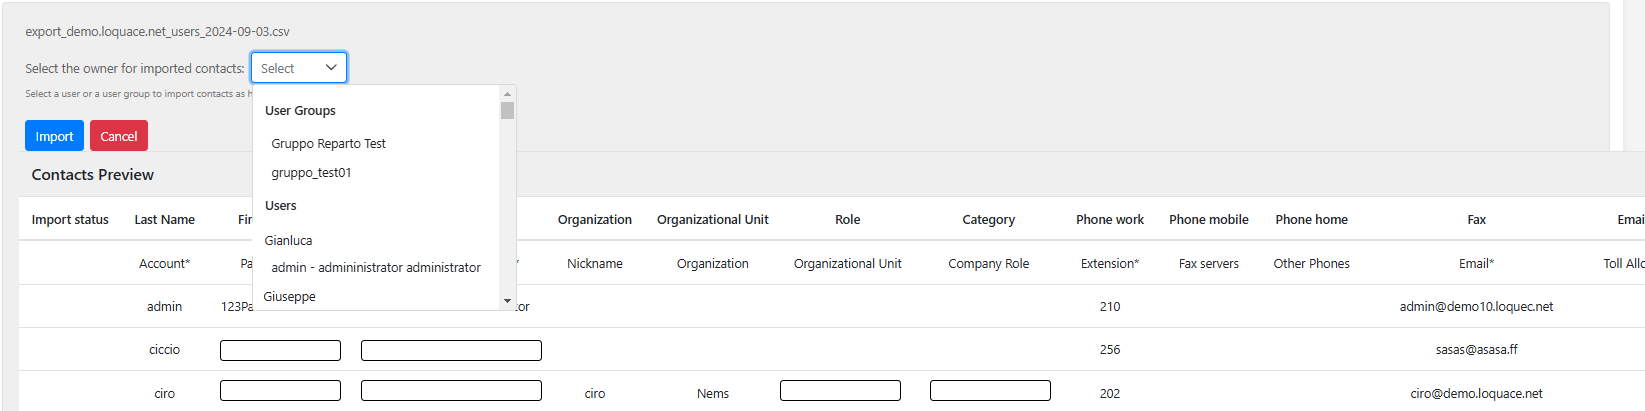
¶ Import Contacts
Import contacts from CSV and assign them to a user or a user group.
¶ Domain Settings
The Domain Settings

¶ Active Calls
Domain active calls.
In the following example, there is one call (two legs). Extension 111 has called and is connected with extension 208.
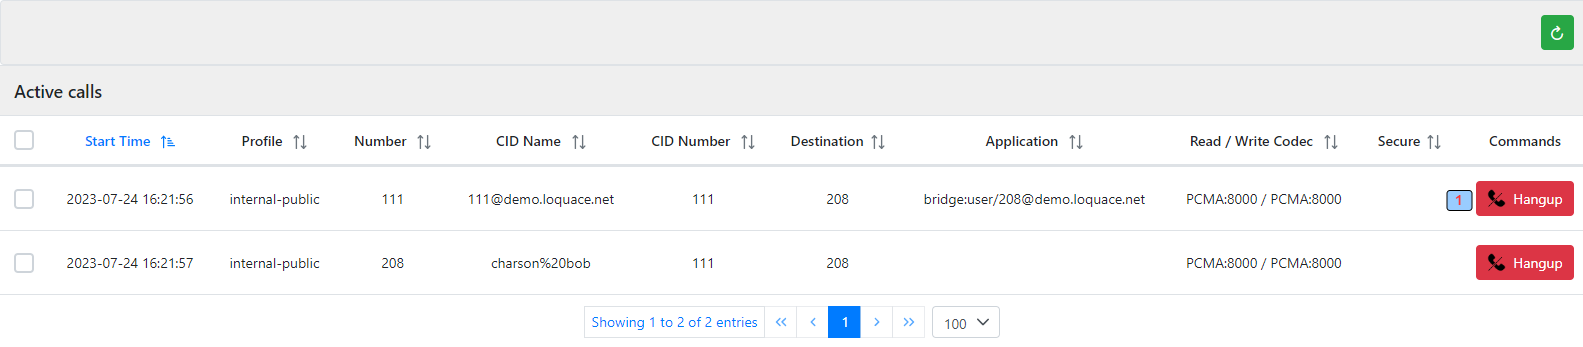
1 - Hungap the call
¶ Registration
Domain registered Sip devices.
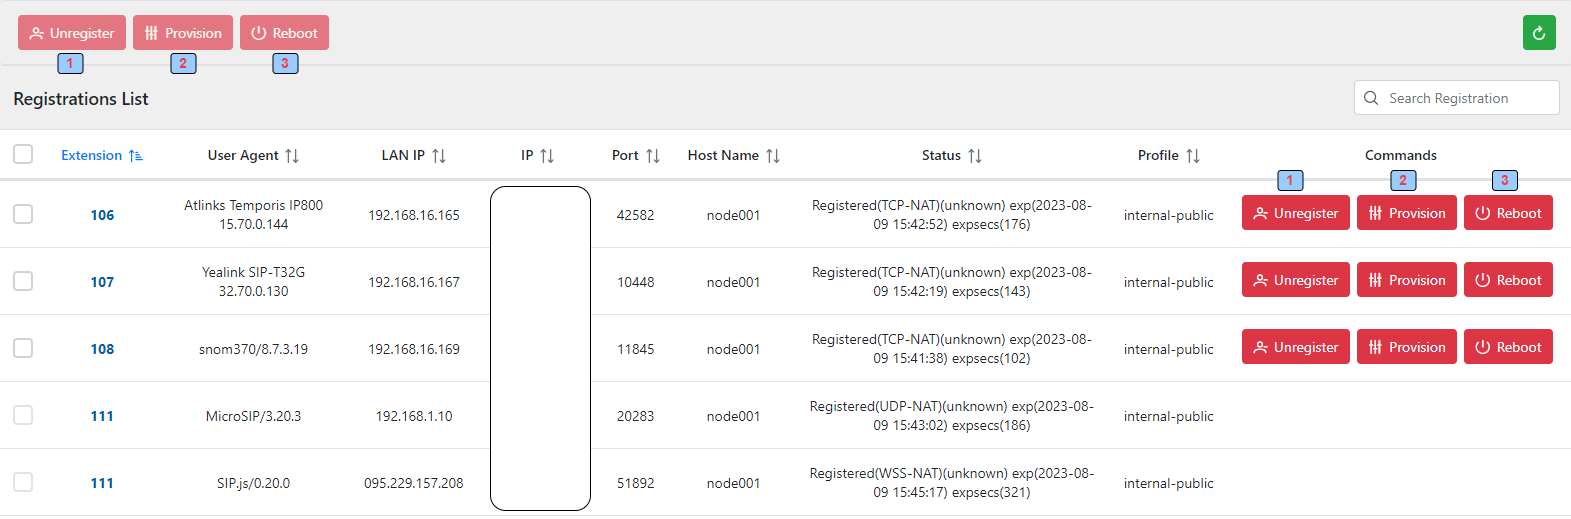
1 - Unregister the device/devices
2 - Provision the device/devices
3 - Reboot the device/devices
¶ Debug
Debug the domain. Loquace despite being a multitenant (multidomain) system allows for point-by-point debugging on a single domain.
Both through the freeswitch console (fs_cli) and the Sip trace, the information processed and displayed is exclusively about the domain you are operating on.
¶ Freeswitch console (fs_cli)
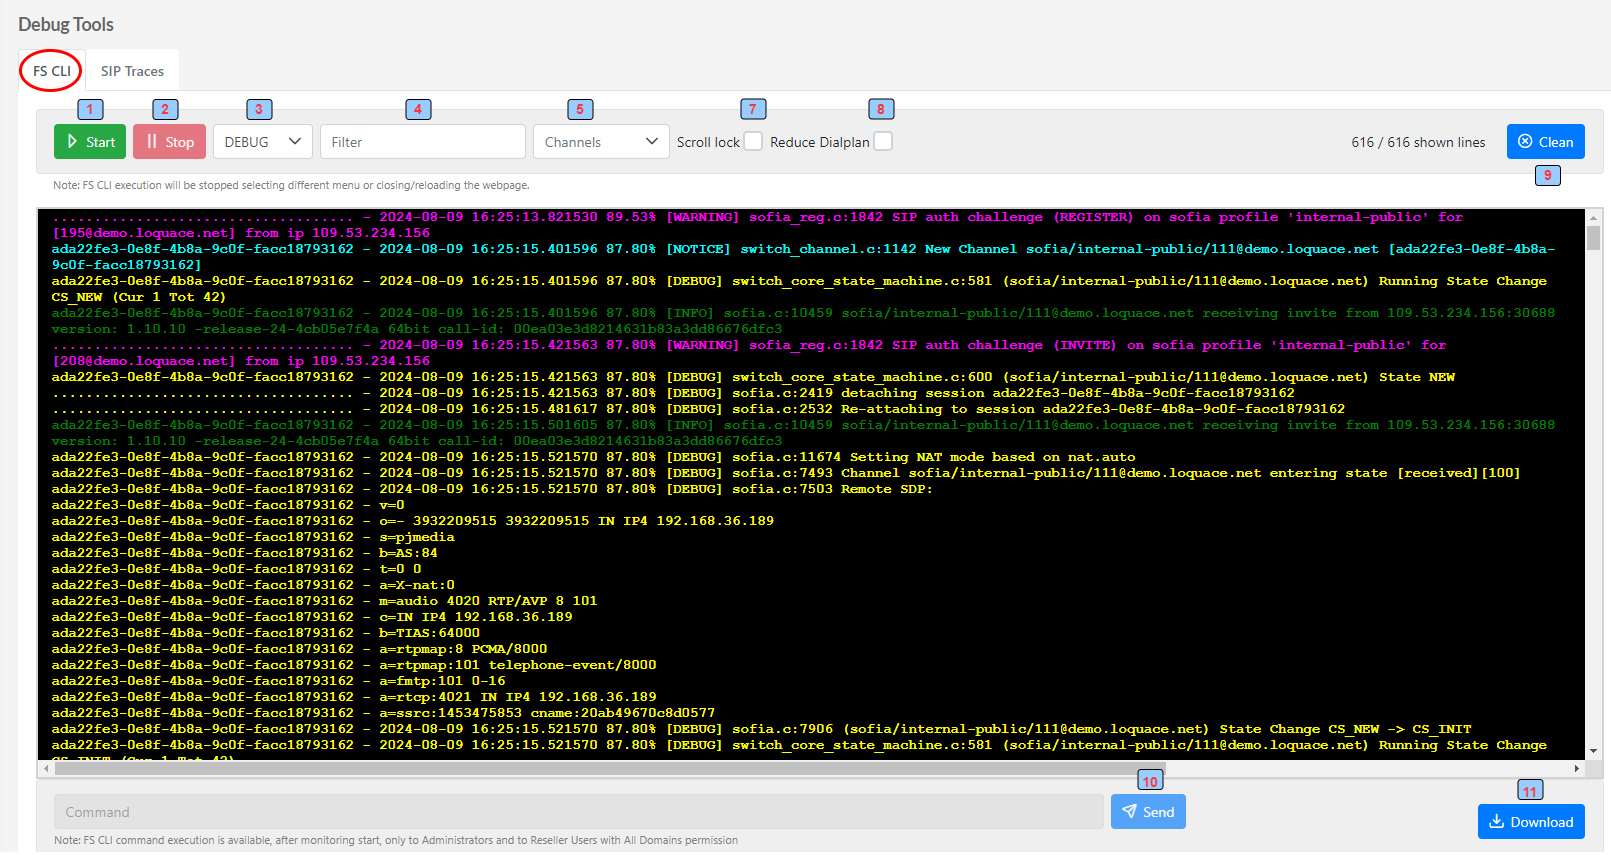
1 - Start Freeswitch fs_cli
2 - Stop Freeswitch fs_cli
3 - Select debug level
4 - Filter the displayed information
5 - Filter the channel leg/legs
7 - Unregister the device/devices
8 - Reduce dialplan
9 - Clean the console
10 - Send commands to fs_cli
11 - Download the debug
¶ Sip Trace
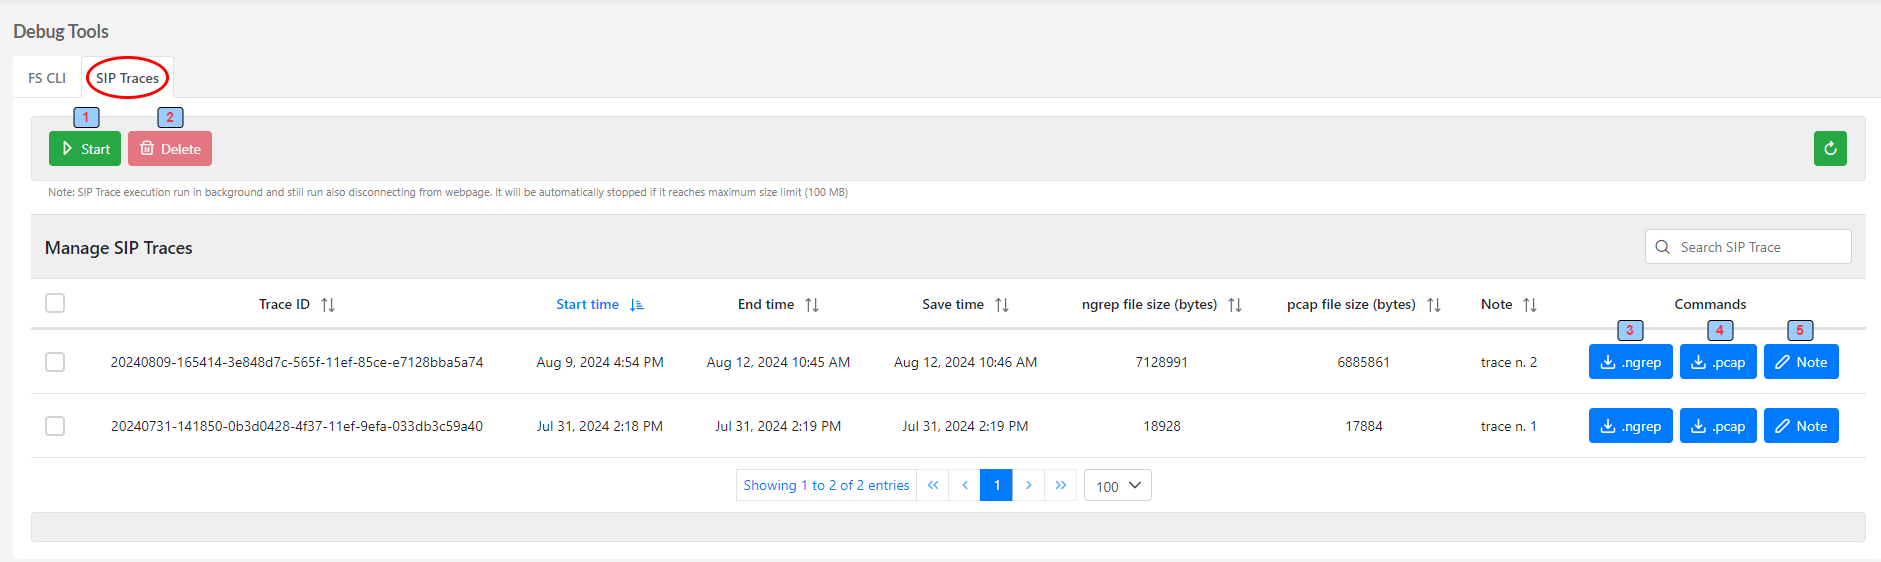
1 - Start Sip trace
2 - Stop Sip trace
3 - Download ngrep file format
4 - download pcap file format
5 - Note